Clock Movement Restoration

How We Restore a Clock Movement
All Overhauls Are Not “Created” Equally
Below is a description of the many steps involved in the restoration of an antique American clock movement. For the most part, the same steps will apply to almost any type of clock. We chose this clock movement as an example because it is the most common movement type that most repair shops find the need to rebuild.
All repairmen will clean and bush the clock mechanism, but many of them will leave out some of the finer details necessary for a proper repair. Leaving out these details allow them to charge less but leaves you with an inferior repair.
this is not intended to be a complete step-by-step description of a rebuild. We have included this description so our customers can see the main points of a proper rebuild.
A proper restoration includes quite a few steps.
Inspection and notes
disassembly
Cleaning
Repairing Wear
Pivots
Bearing Surfaces
Levers
Escapement pallets
Potential Mainspring Replacement
reassembly
synchronization
fine tuning of escapement and lever systems
Oiling
Mounting the movement
Testing
If we have overhauled a clock for you in the past, you might find it interesting to know how much effort went into your repair. If you are considering having a clock movement overhauled this will give you a good understanding of what will be done if we perform the work for you. If you are having it done somewhere else, you might use this information to make sure that the person performing the repair is doing it correctly.
Antique American
Strike Movement
Before Rebuild


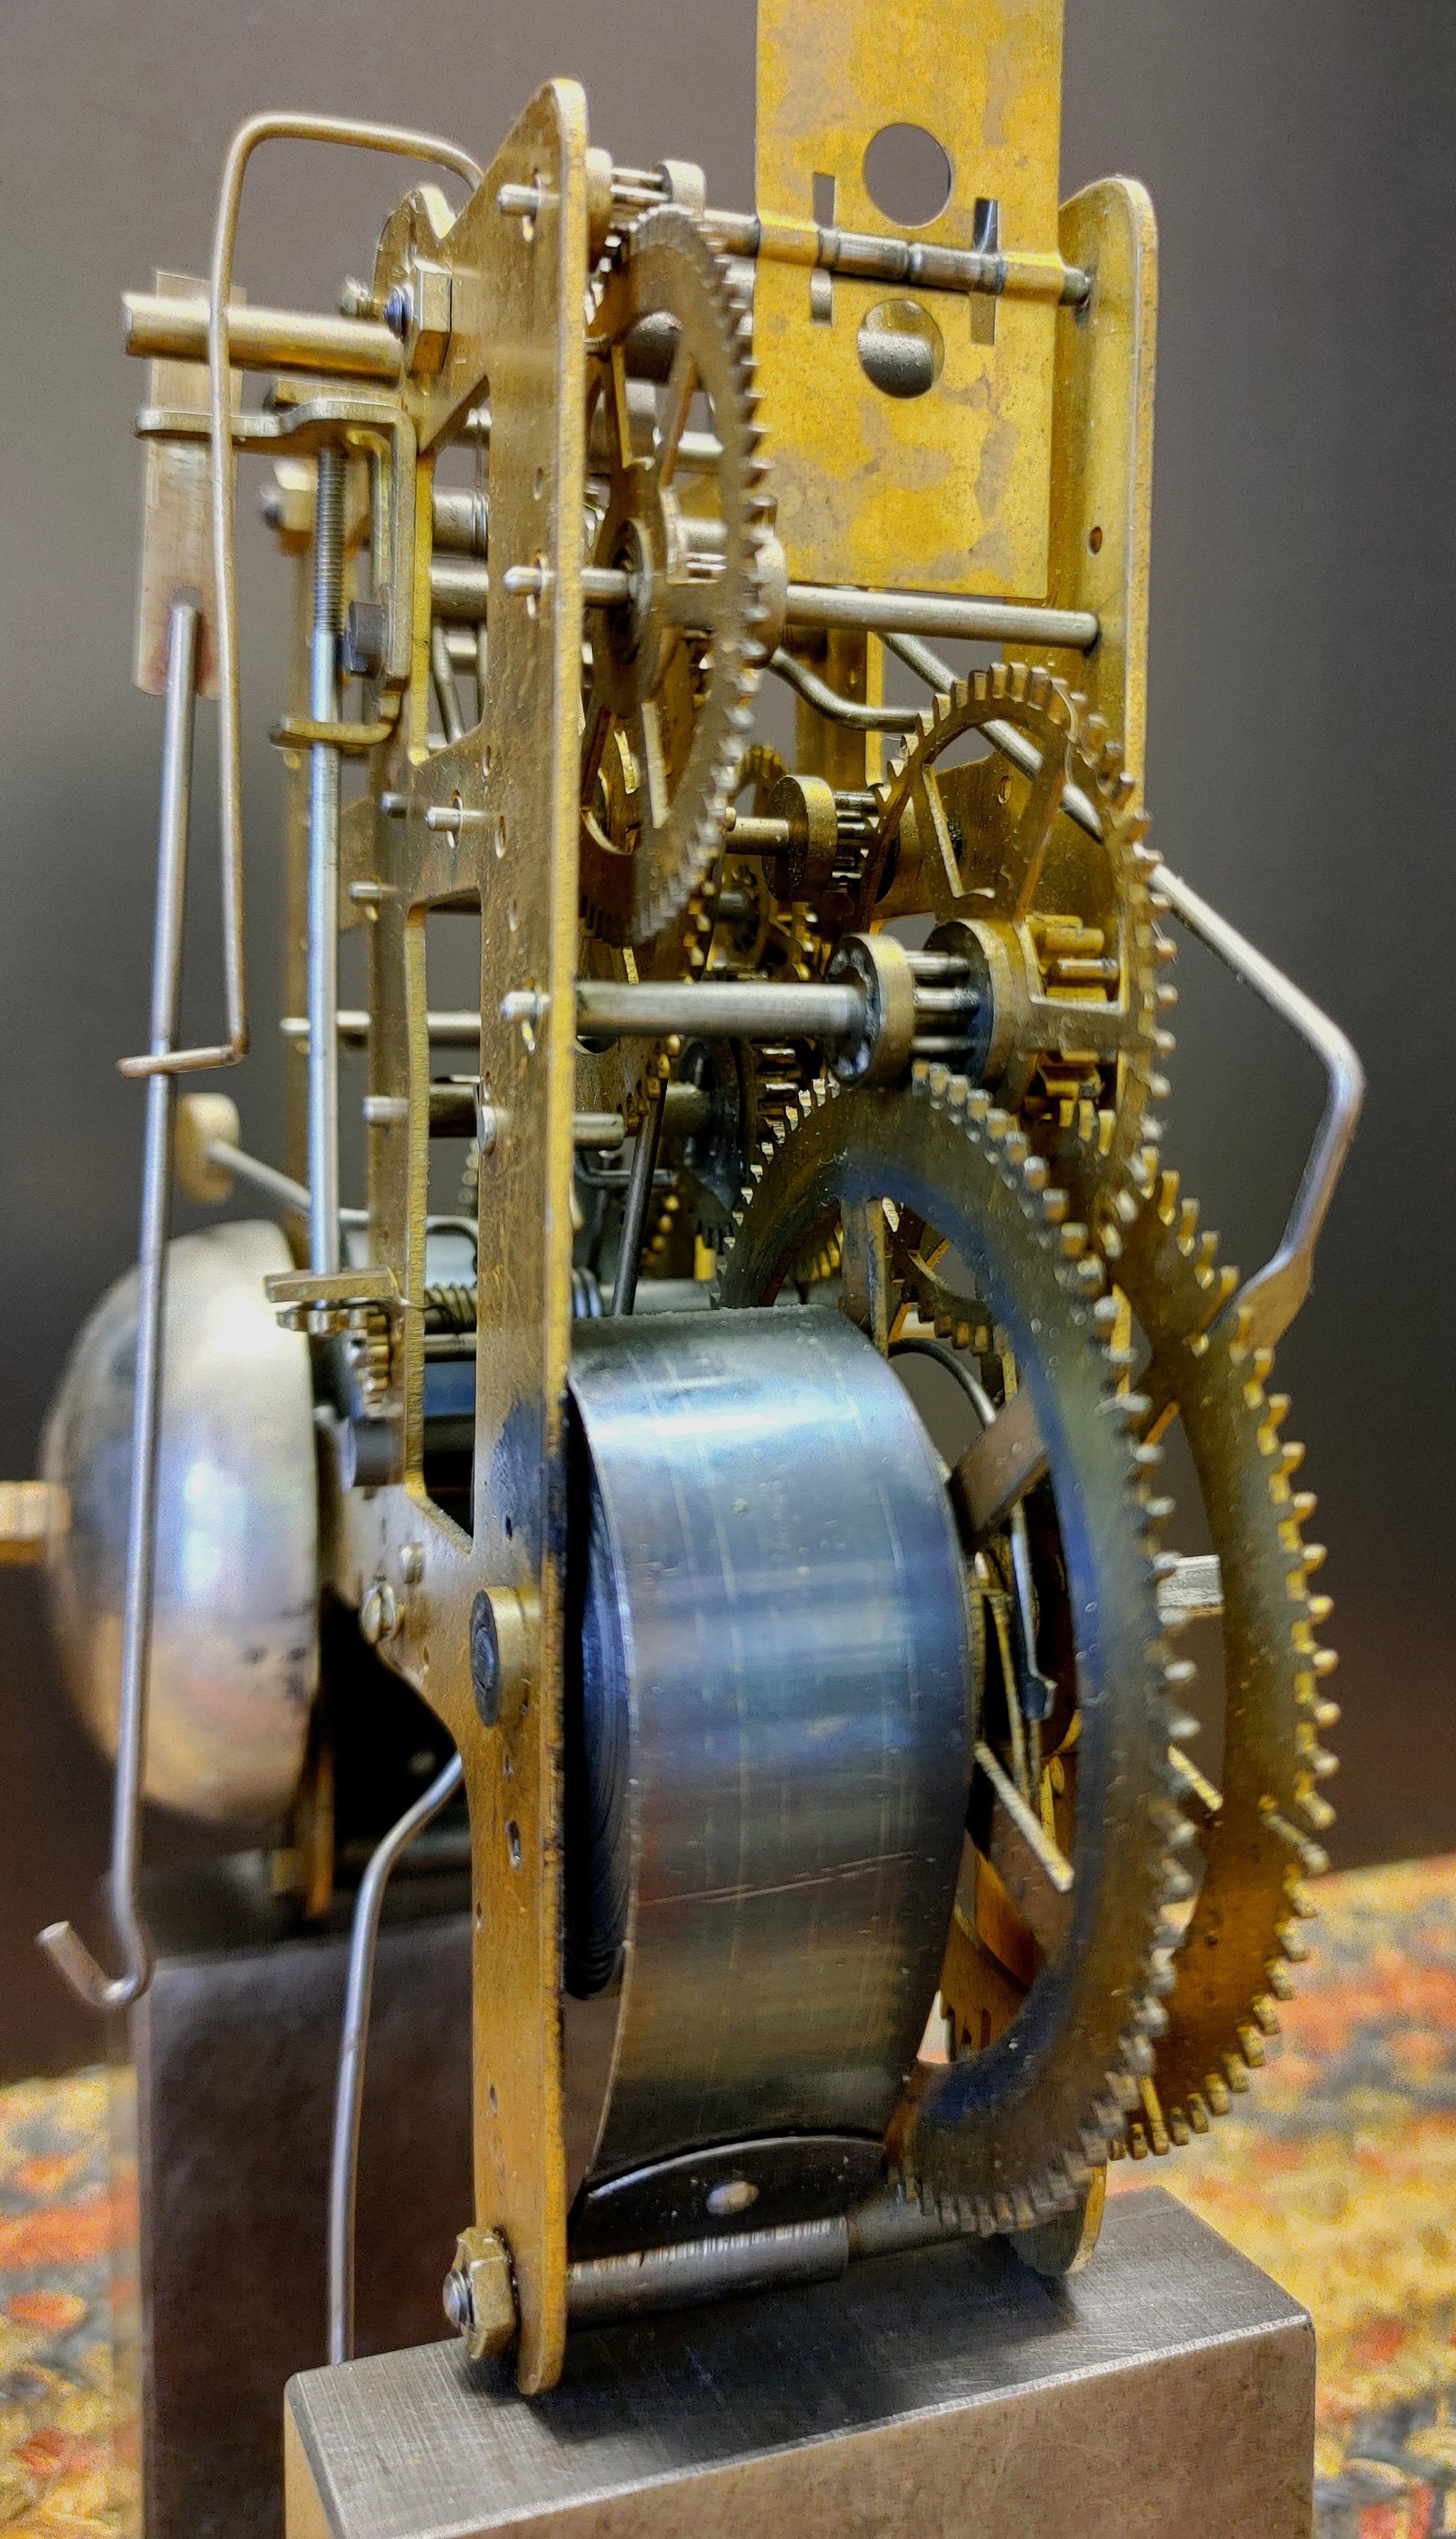
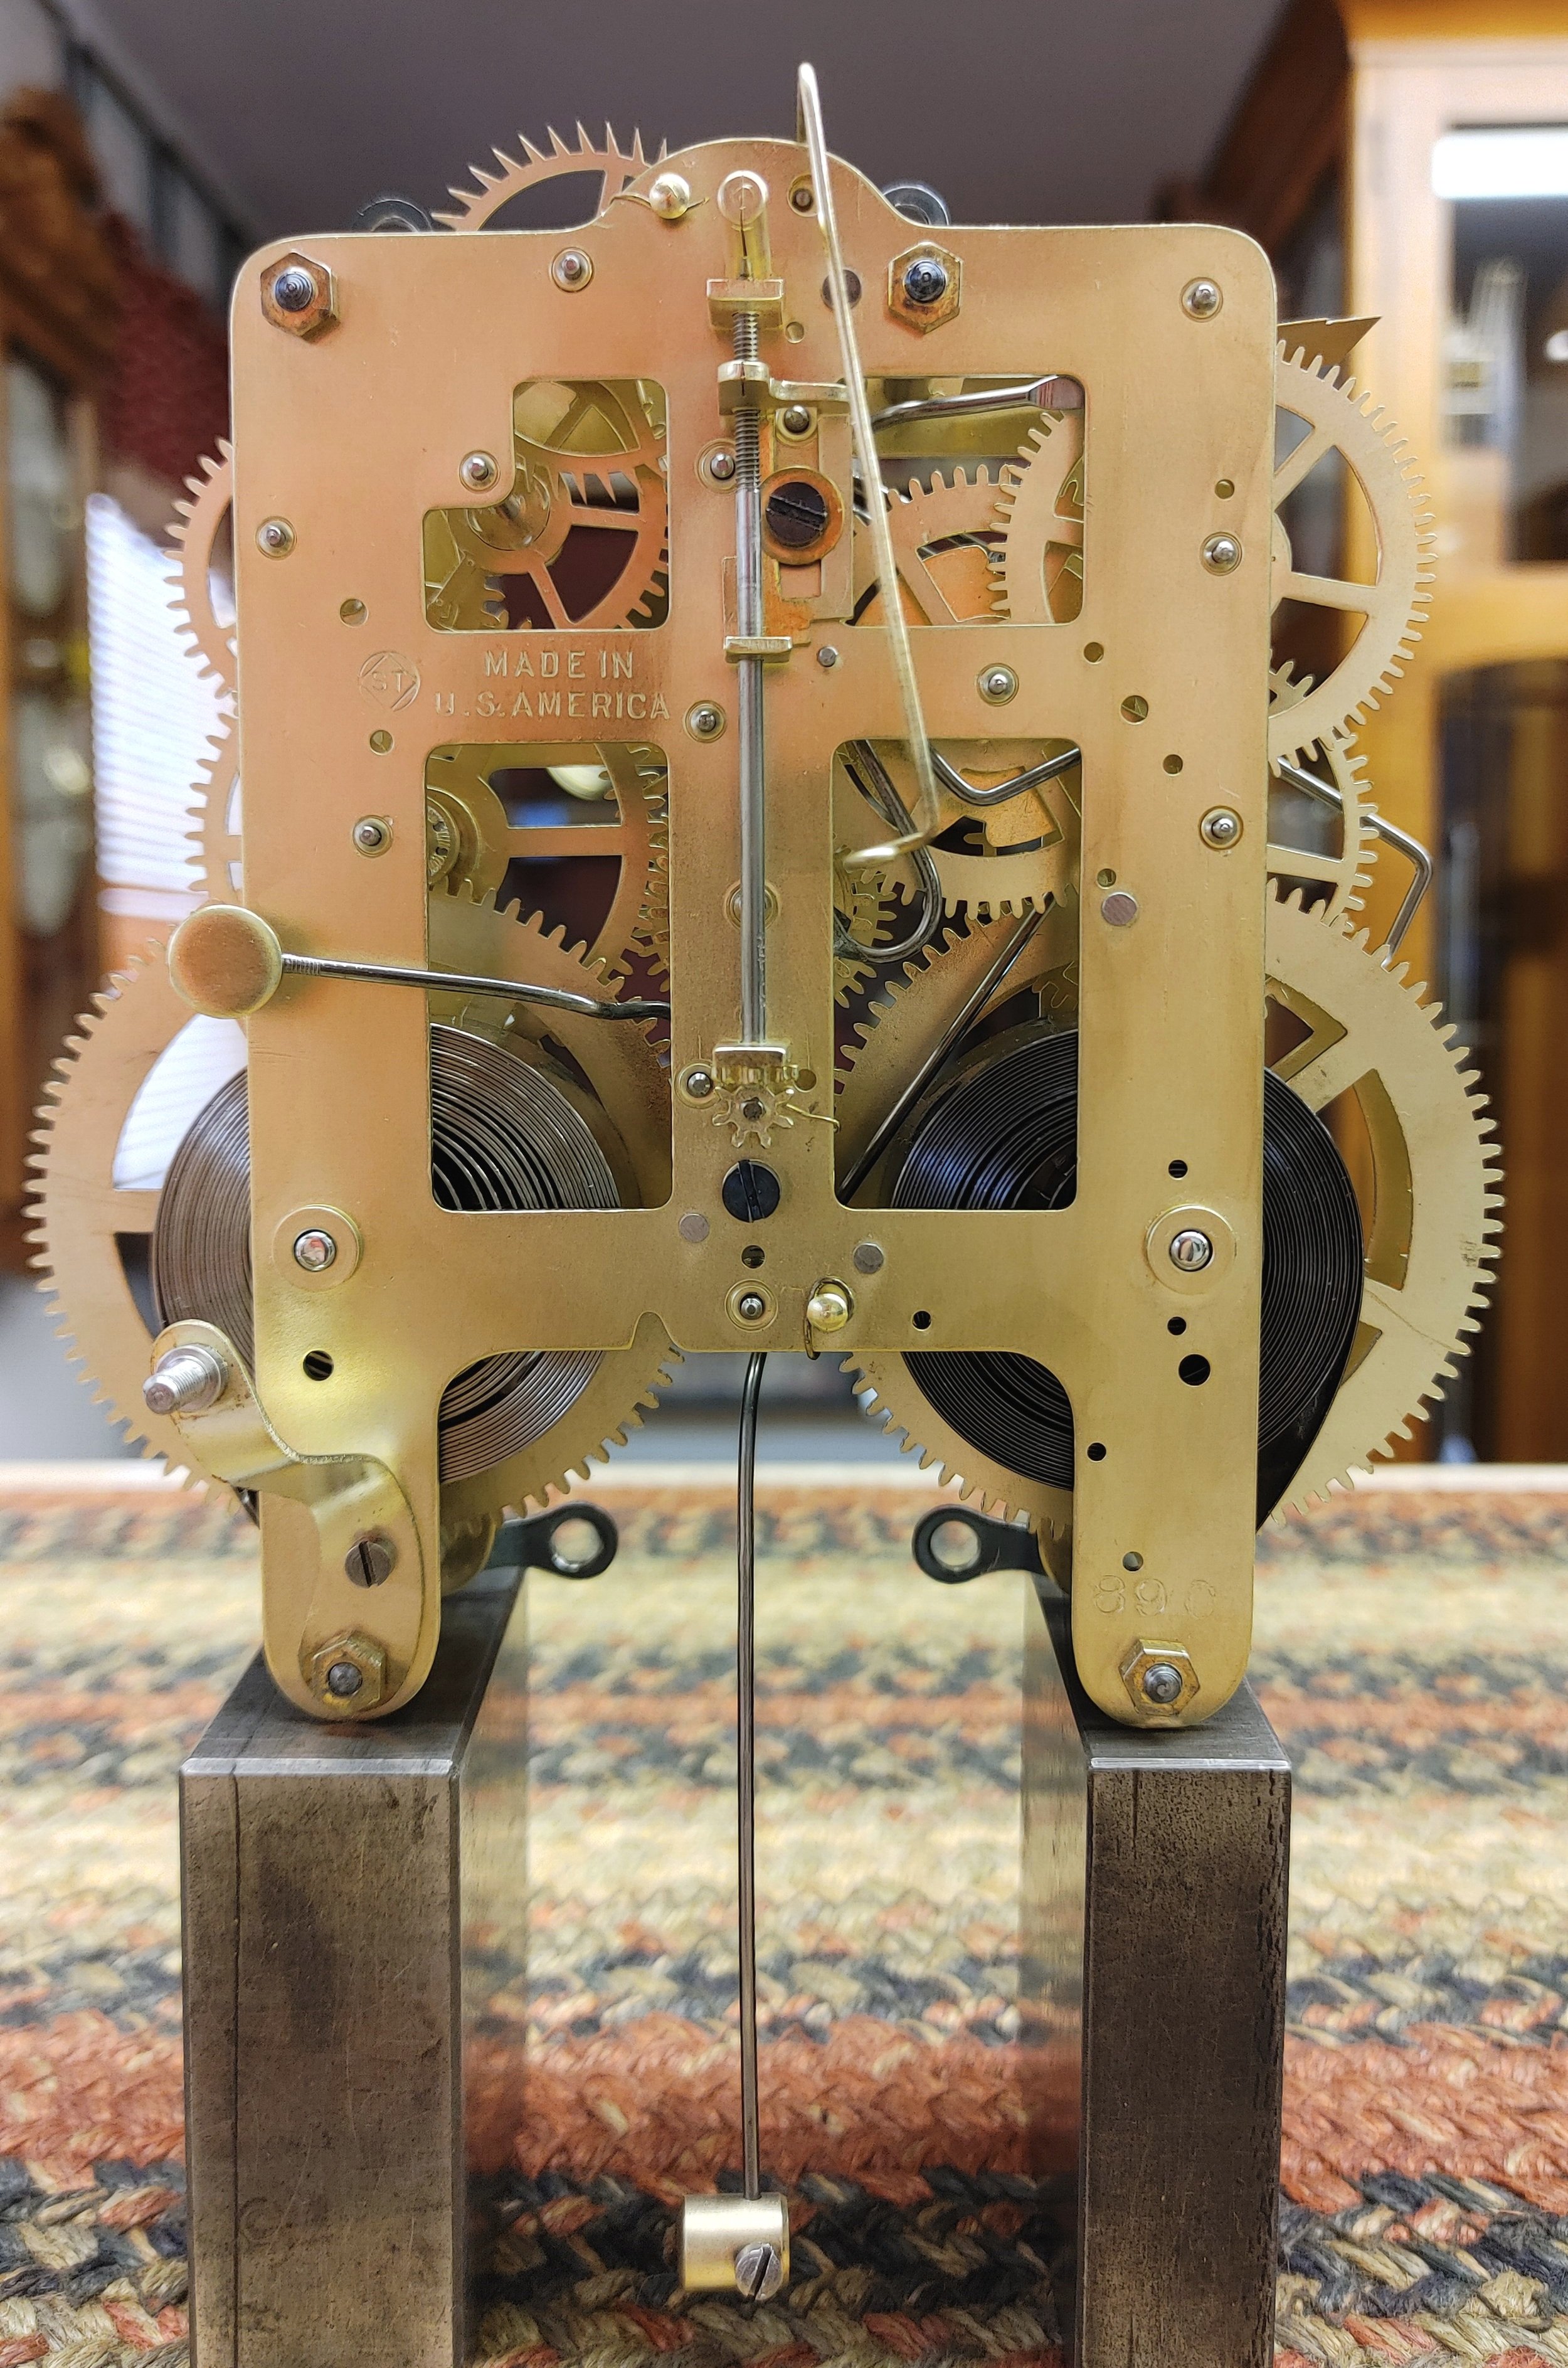
This is what the clock mechanism looked like when it was removed from the customer's clock case. The movement is worn and dirty. This movement is made by Seth Thomas and is a very common #89 movement dating to early 1900. The movement pictured here will be used throughout this demonstration unless noted otherwise.

This is the case the above movement came from. It is a Seth Thomas, Adamantine, eight day, striking, mantel clock.
Why DO Clock Movements Need to be Rebuilt?
Clocks are machines just like cars, washing machines and refrigerators. Machines by definition have moving metal parts. These metal parts rotate, spin or rub against each other as the machine operates. This action creates friction at the points of contact. The more friction that occurs, the more the parts will wear. In addition to the natural friction that occurs between moving parts; lack of oil, accumulating dirt and pivot break down will create additional friction resulting in an increase in the speed at which the machine will wear out. This is why it is important that clocks, just like other machines, receive the appropriate level of maintenance.

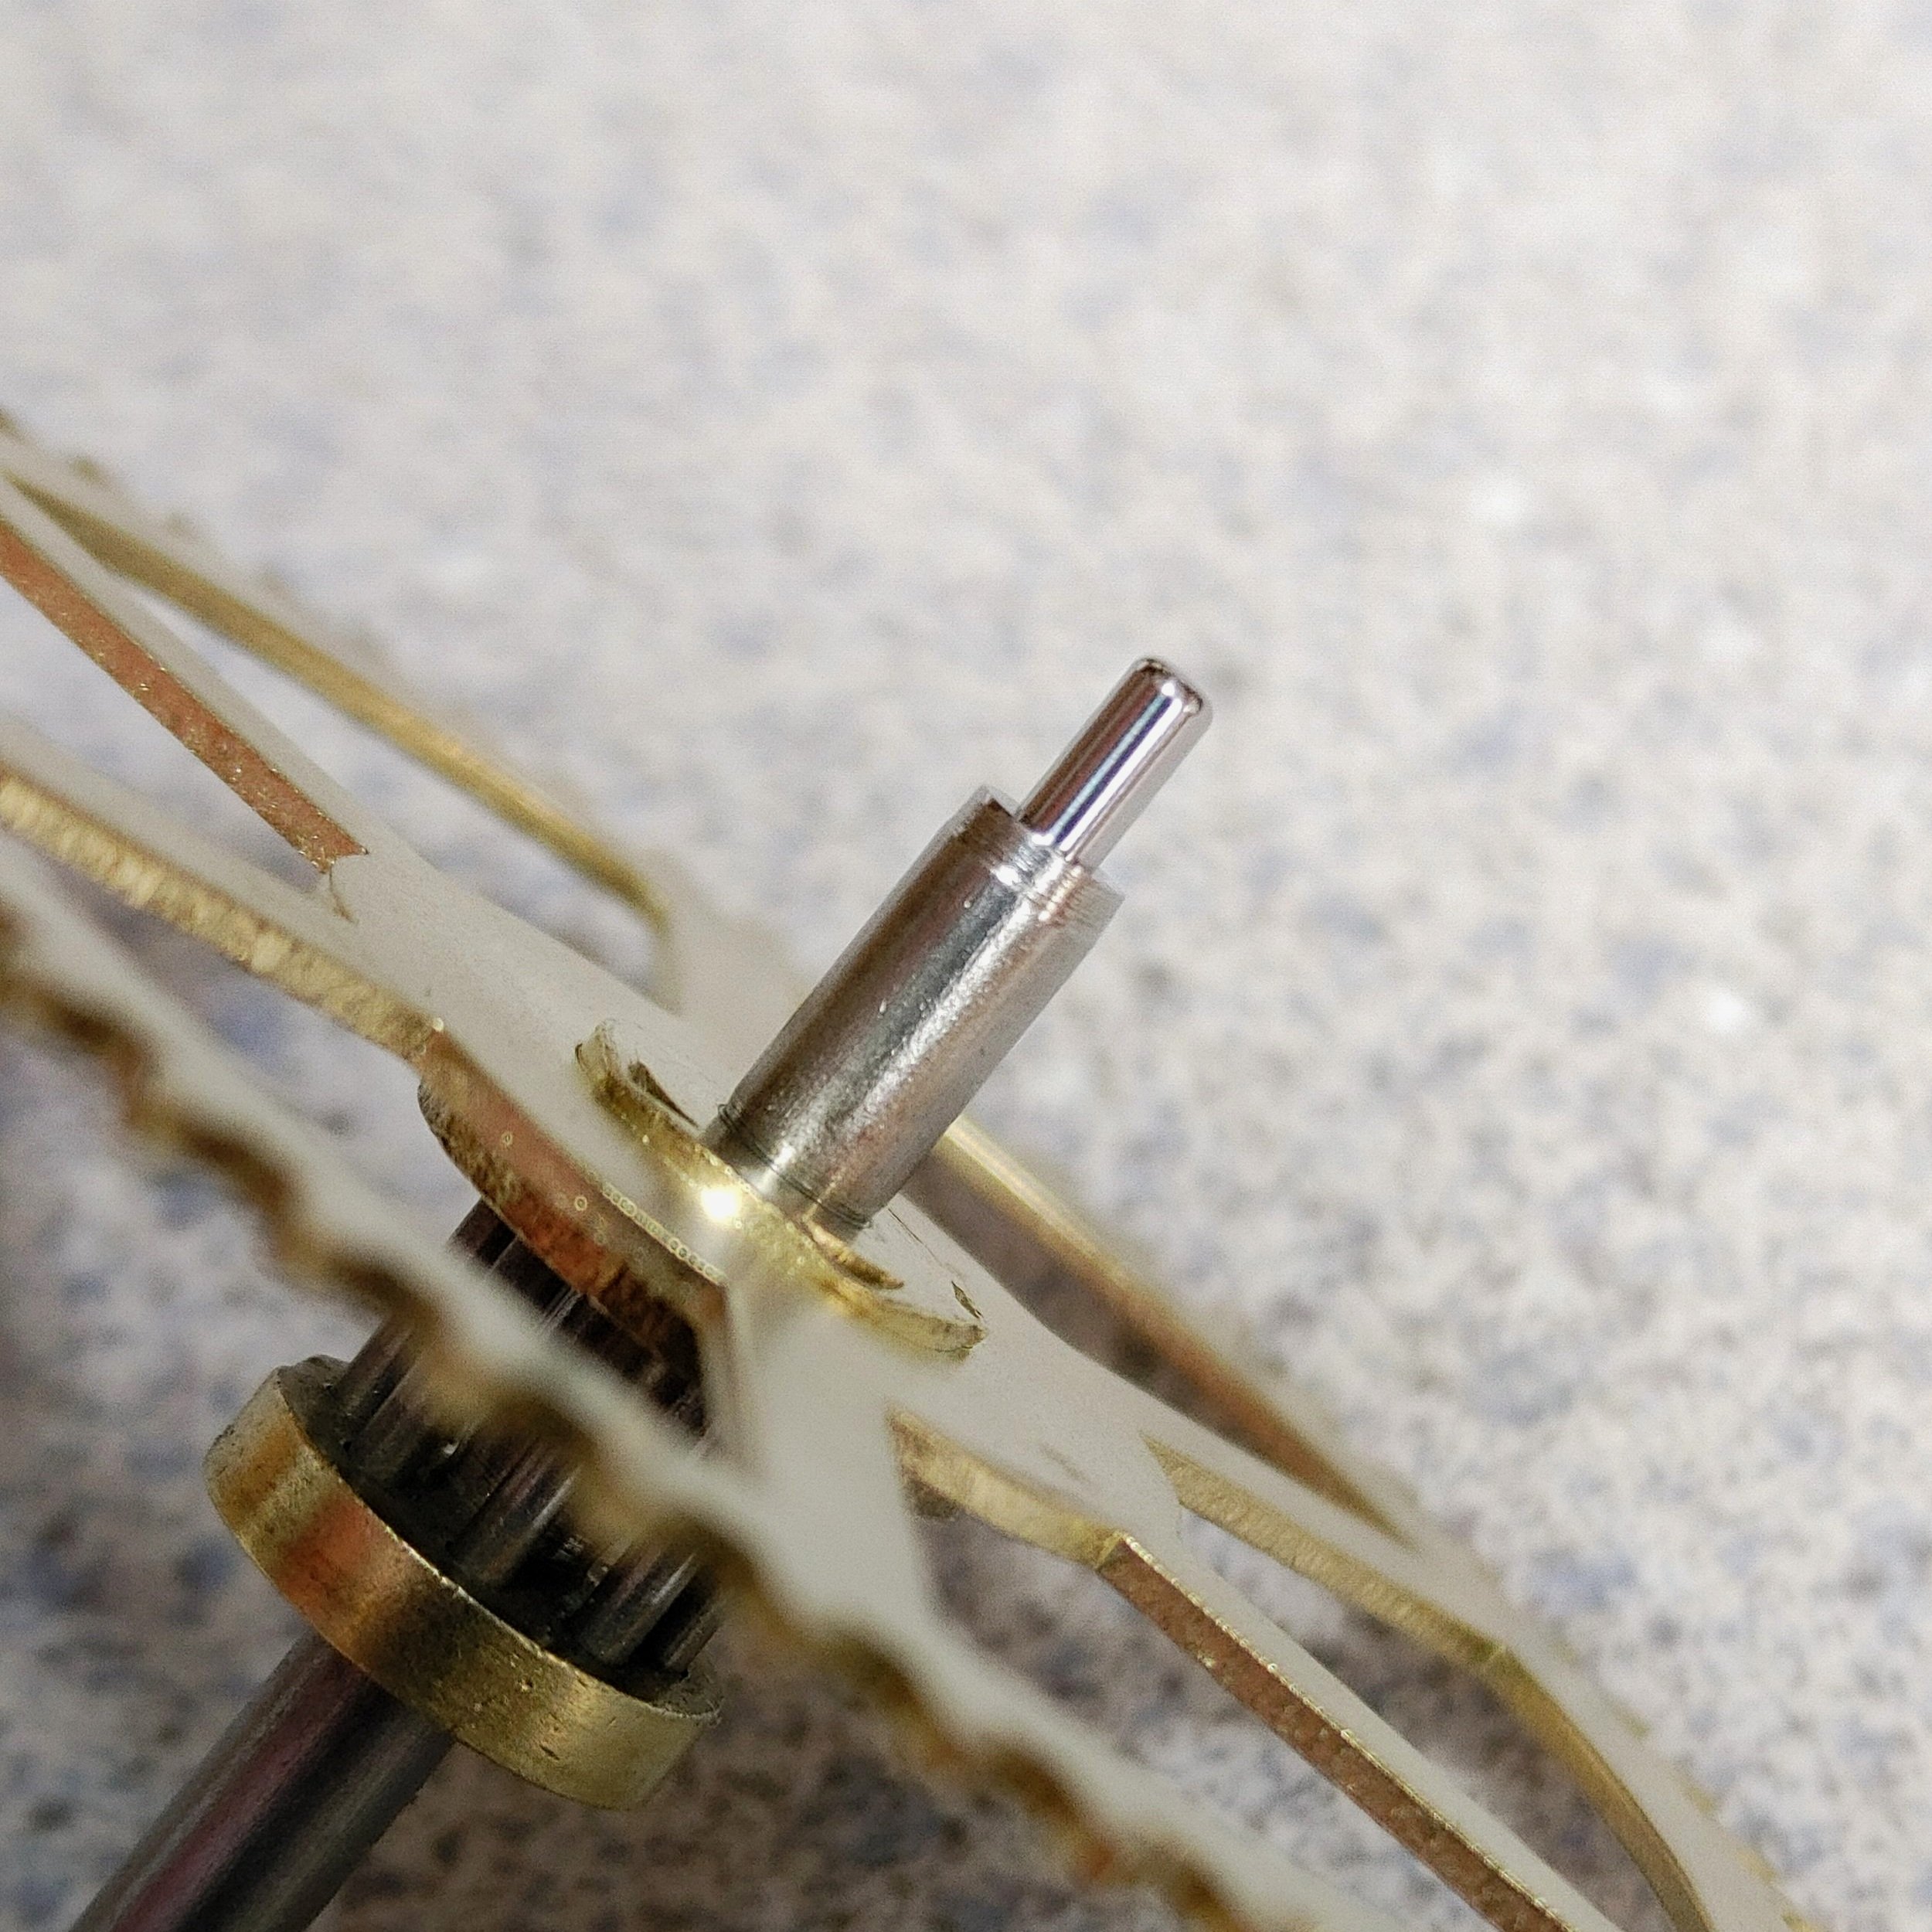
These photos were taken before our subject clock was disassembled and cleaned. If you look at the dead center of both the left and right photos, you will see the worn areas. To help you understand what you are looking at, the round, silver colored thing (at center) is called a pivot. The hole in which the pivot rotates is called the bearing surface. The rotating, harder steel pivot will create wear in the softer brass hole that the pivot rotates in. The bearing hole will wear in the direction of force caused by the gear that is driving it. If you examine the ring around the bearing hole you can clearly see that the pivot is not in the ring’s center where it should be.


Inspection and Notes
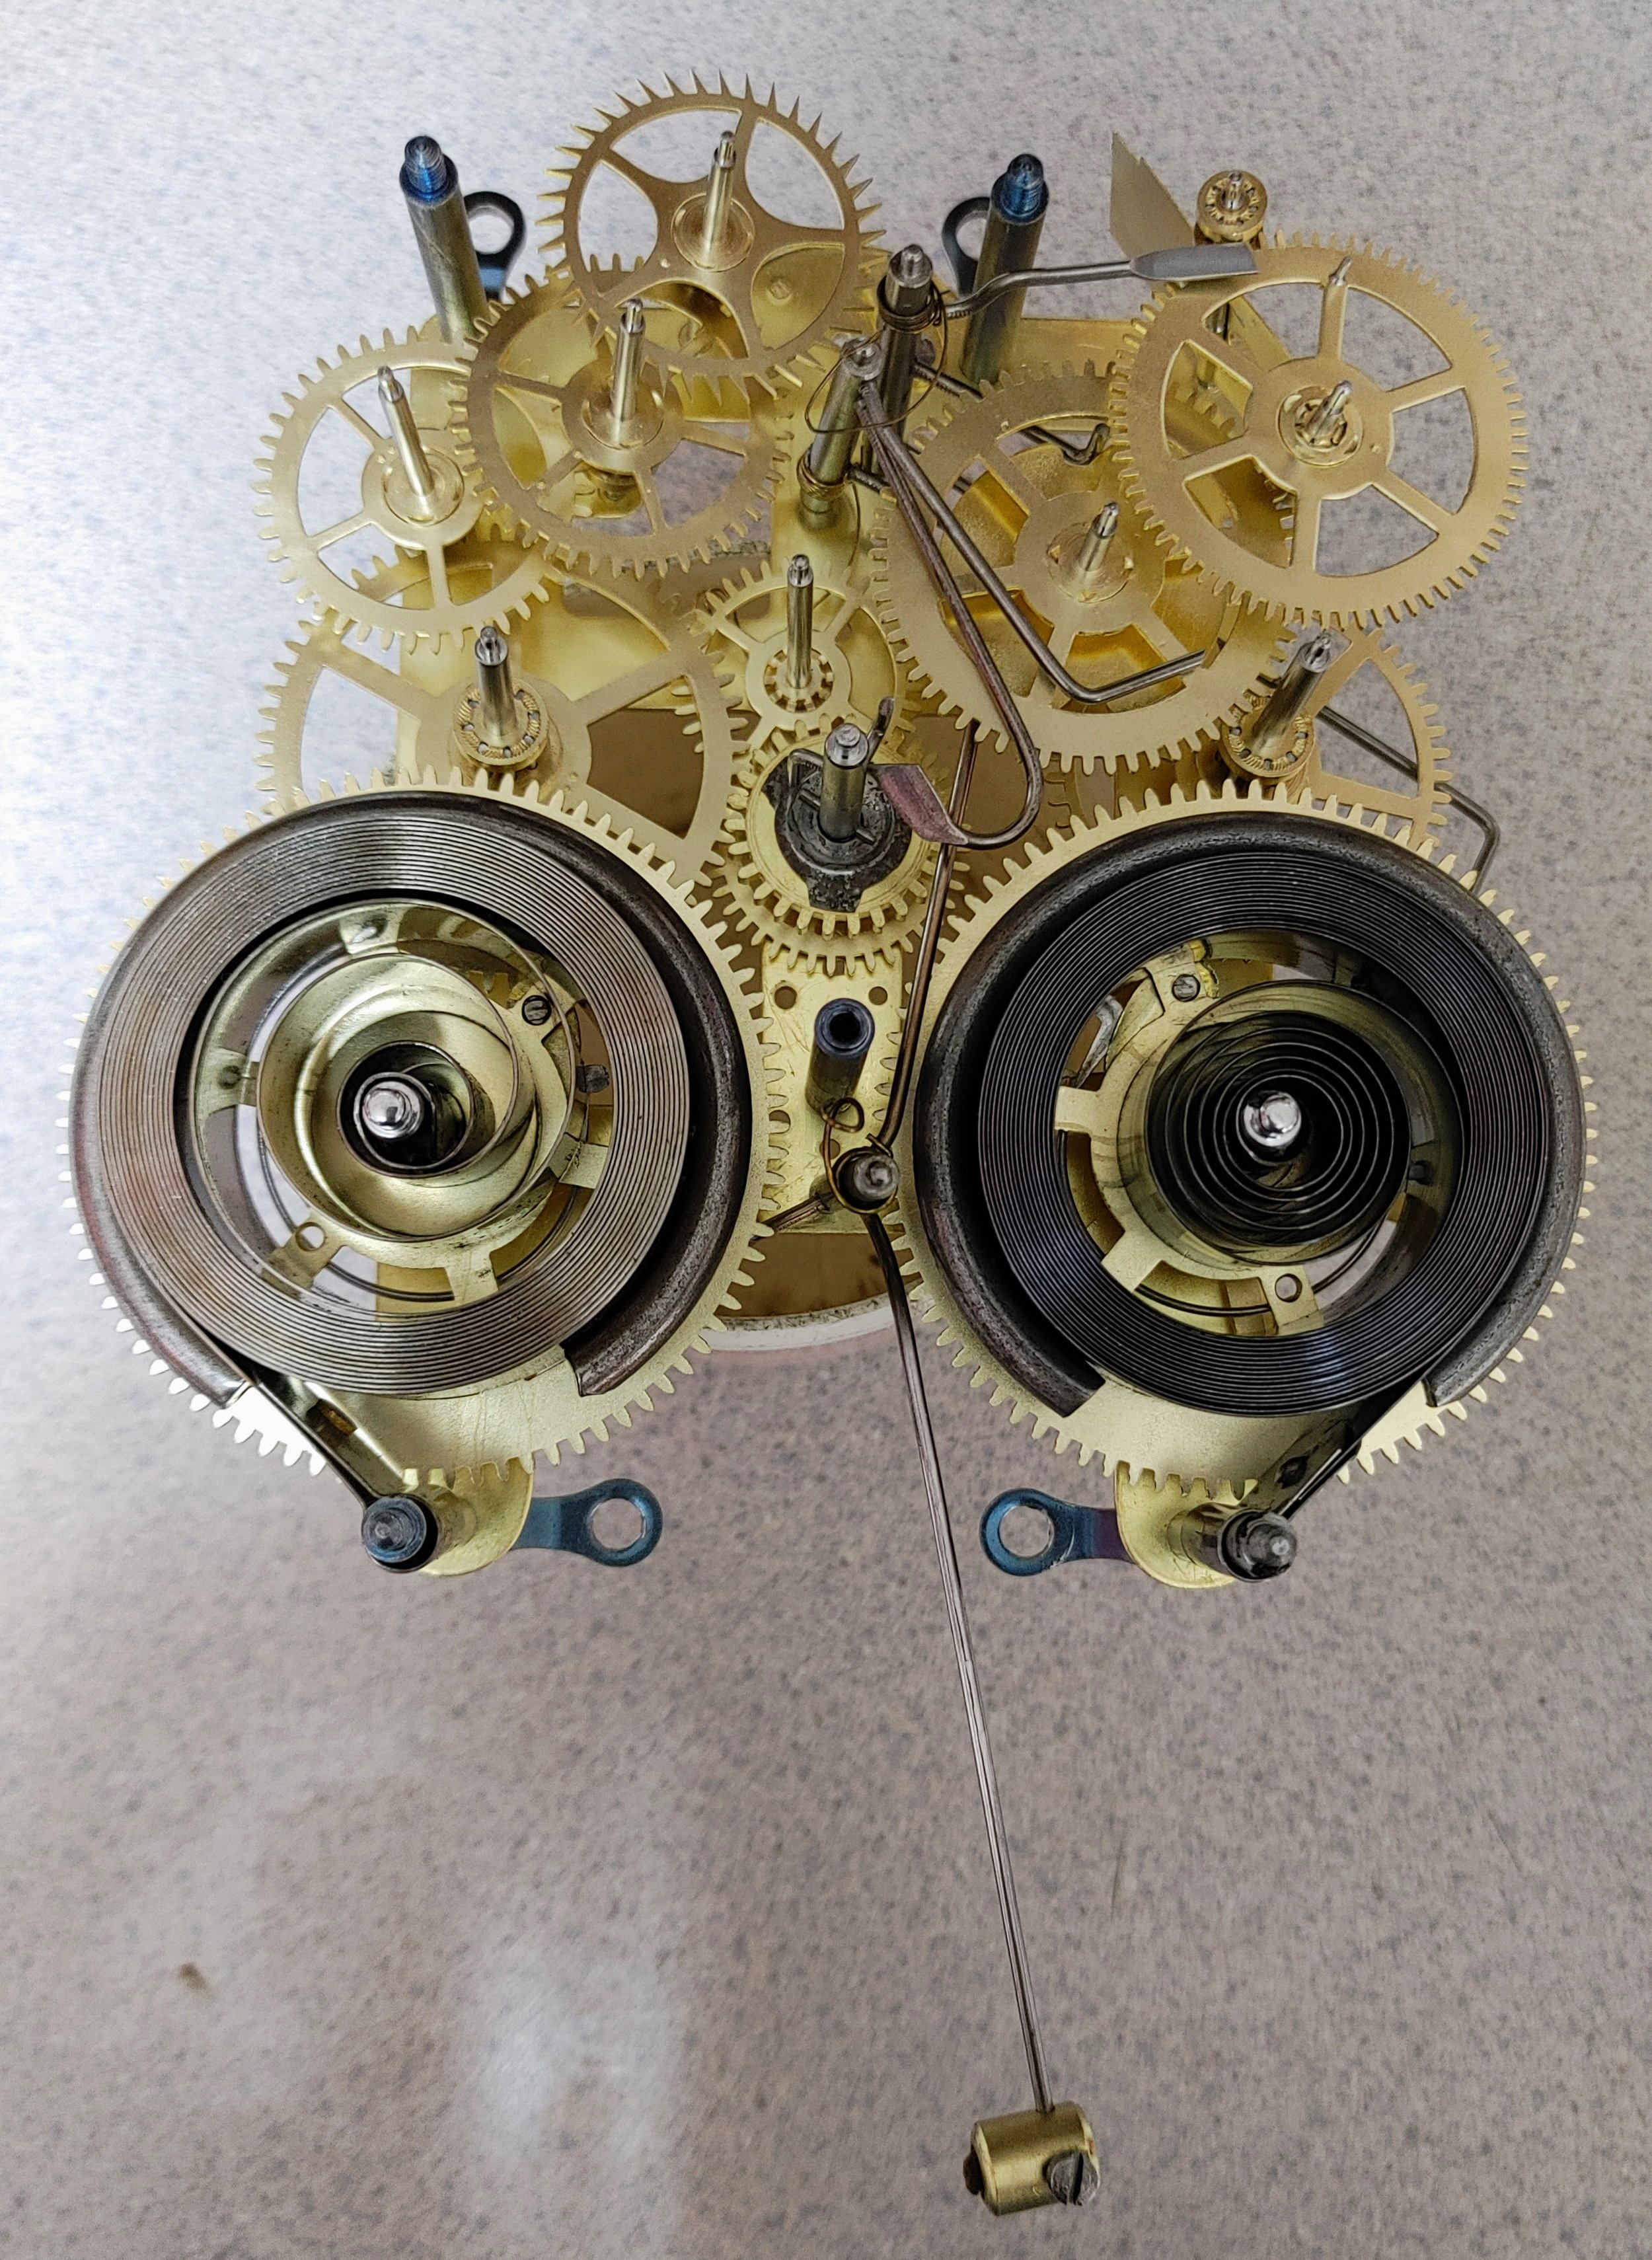
Since we have overhauled many of these clocks it is not necessary to draw a complete diagram of the movement, but it is necessary to note the areas on paper which will require a bushing. The dots indicate the bearing surfaces. The arrows indicate those bearing surfaces which are worn badly. The direction the arrow points is an aid to help us maintain the bearing surfaces original center when installing the bushing. If this is not done, the gearing will not align correctly at a proper depth for the most efficient transfer of power and may even cause the clock to fail. The curls at the bottom indicate the direction of coil for the mainsprings.
We show this drawing because many clock repair people will scratch these notes directly on to the clock, permanently marring the surface. The small amount of extra effort this requires is worthwhile because it helps to preserve the plates without unnecessary marking.

Disassembly of Movement
After releasing the wound mainsprings using a letdown key and mainspring clamps, the clock is disassembled.
Not including the nuts that hold the movement together or individual pinions, there are 26 parts which make up this clock movement. Each of these parts will receive individual attention after they are examined closely for damage of any kind.
Ultrasonic Cleaning
The parts are then put into a wire mesh basket and submerged into the ultrasonic cleaning tank. This picture shows the ultrasonic cleaning machine with the lid off. the chemical degreaser is being agitated by ultrasonic sound waves. This process is called cavitation. The sound waves create millions of tiny bubbles which implode on the surfaces of the pieces being cleaned. These implosions "scrub" the pieces as they sit in the degreaser. We run our movements through three ultrasonic cleaning tanks during our overhaul process.


Buffing after Cleaning
After the parts are cleaned, they are rinsed with a drying agent and then hand dried. At this point, we prefer to buff the parts with a soft wire buffing wheel shown below.
The Effects of Buffing
Although this process has no bearing on how the clock runs, we always felt that when performing a rebuild we should make the clock movement look as good as it can during the process. Buffing removes any old, deteriorated lacquer and oxidation of the metal parts.
After Cleaning

After Cleaning

After Buffing

After Buffing

Repairing Wear
Introduction
As previously discussed, all machines will eventually wear out. In our modern era, most of our worn-out machines simply get thrown out to be replaced by a new one. One big exception to this common practice is where quality mechanical clocks are concerned, especially antique clocks. When a clock fails to operate it can be due to accidental “abuse” by the owner, failure to understand how to operate the clock properly, lack of oil, excessive accumulation of dirt, maladjustment, or wear occurring through normal use. Once a clock is worn out it must be rebuilt to restore proper functionality.
Wear occurs in four main areas; the escapement, the lever systems (assuming it strikes or chimes), the bearing surfaces and the pivots. A fifth area would be wear occurring in the gear teeth or pinions. With the exception of “lantern” pinions, this fifth area of wear occurs far less frequently than the other four areas just mentioned and therefore, rarely needs to be addressed.
We will now address the main four areas of wear and how they are repaired properly below.

Repairing Wear - Part One
Pivot Restoration
the friction that occurs by the rotating pivots in the bearing holes can cause both the pivot and bearing surface to wear. As the clock runs day and night, the oil begins to dry out, dirt begins to accumulate and friction increases. This friction not only causes the softer brass bearing hole to wear but the lack of oil and the accumulation of dirt will begin to create scarring on the pivot surface. Both of these areas must be repaired in order to restore proper function to the clock. If you only repair the bearing surface, the scarred pivot, due to its rough surface, will cause the repaired bearing to wear prematurely. This section will discuss pivot wear, pivot damage and how it is repaired.
What is a Pivot?
Since we are talking about pivots, it might be helpful to understand exactly what that is, along with some other important words used when discussing clock movements and their components. See drawing on the right.


Pivot Drawing
Before we show you actual pivots, we thought it might be helpful to show you a drawing of what you will see in the next section. The pivot drawing in the middle illustrates what a pivot should look like. The sides are perfectly flat and smooth. The drawings to the left and right of center show deep ruts or grooves worn into the pivot surface. These drawings are extreme cases of badly worn pivots. Only a small percentage of pivots will have this much damage although most pivots will show some level of scarring.

Damaged Pivots
Both of these pivots are in unusually bad condition. The pivot on the left has been badly damaged from prick punching. See our “Hall of Shame” page. The pivot on the right has been deeply grooved by wear which occurs during normal use but is exacerbated by lack of oil and dirt build up.
Proper Method for Pivot restoration
Like most repairs, there is an ideal or “best practices method” for proper pivot restoration. It is best to avoid introducing abrasives into the process. In some clocks, the steel pivots are made of “mild” steel. Due to the “softness” of this type of steel, abrasives, like sandpaper or polishes can imbed themselves in the surface of the pivot making the pivot act like a very fine file that will wear against the bearing surface. To avoid this, a process called burnishing is used. Instead of sandpaper or emery boards, a series of metal files and burnishers are used that will not introduce abrasives into the pivot surface.
There are two main methods of burnishing. One method uses a lathe and the use of handheld files and burnishers and the other is through the use of a machine called a pivot polisher which is a bit more automated.
Burnishing In the Lathe

This picture shows one way that a pivot surface can be restored. The gear is mounted in the lathe and spun at high speed. As the pivot rotates a very fine file called a pivot file is pressed up against it and moved back and forth until all of the scarring is removed.
Next another "file" is used. This file has no real “teeth”. The surface of the "file" is prepared by stroking it sideways across a piece of 120 grit sandpaper. This creates a very, very fine file like surface used to further smooth the surface of the pivot. This is what is being used in the photo.
The last step involves the use of the burnisher. It is a piece of steel like the one in the picture but is finished with up to 2000 grit sandpaper which creates a hyper smooth, shiny surface.
The surface of the burnisher is so smooth it does not cut against the surface of the pivot like the two previous steps. When the burnisher is used, with a bit of lubrication, it is rubbed back and forth across the spinning pivot with as much force as the pivot can bear in order to compress the outer surface of the pivot making any fine scratches disappear while also work hardening the outer layer of steel.
Burnishing with a Rollimat

Another way to restore pivots is through the use of a Pivot Polishing machine. There are several types of these. The one shown here is a Rollimat. This machine does a very good job, much quicker than when done by hand but will not produce the same quality finish that hand burnishing can.
The photo on the left shows the Rollimat with a full set of gears ready to be burnished.
First the pivot is measured with a set of calipers, the indexable Jacot wheel is then set to the proper position for that size pivot and the gear is placed between the static Jacot wheel and the carbide cutting/burnishing wheel.
The gear is stabilized by the vertical arm and is held with the hand to keep it from spinning.
When the machine is turned on, the grey cylinder under the hand rotates quickly around the pivot in order to resurface or burnish it.


This process will be repeated for every pivot in this clock. A striking clock will typically have close to twenty pivots, and a chime clock, around thirty.
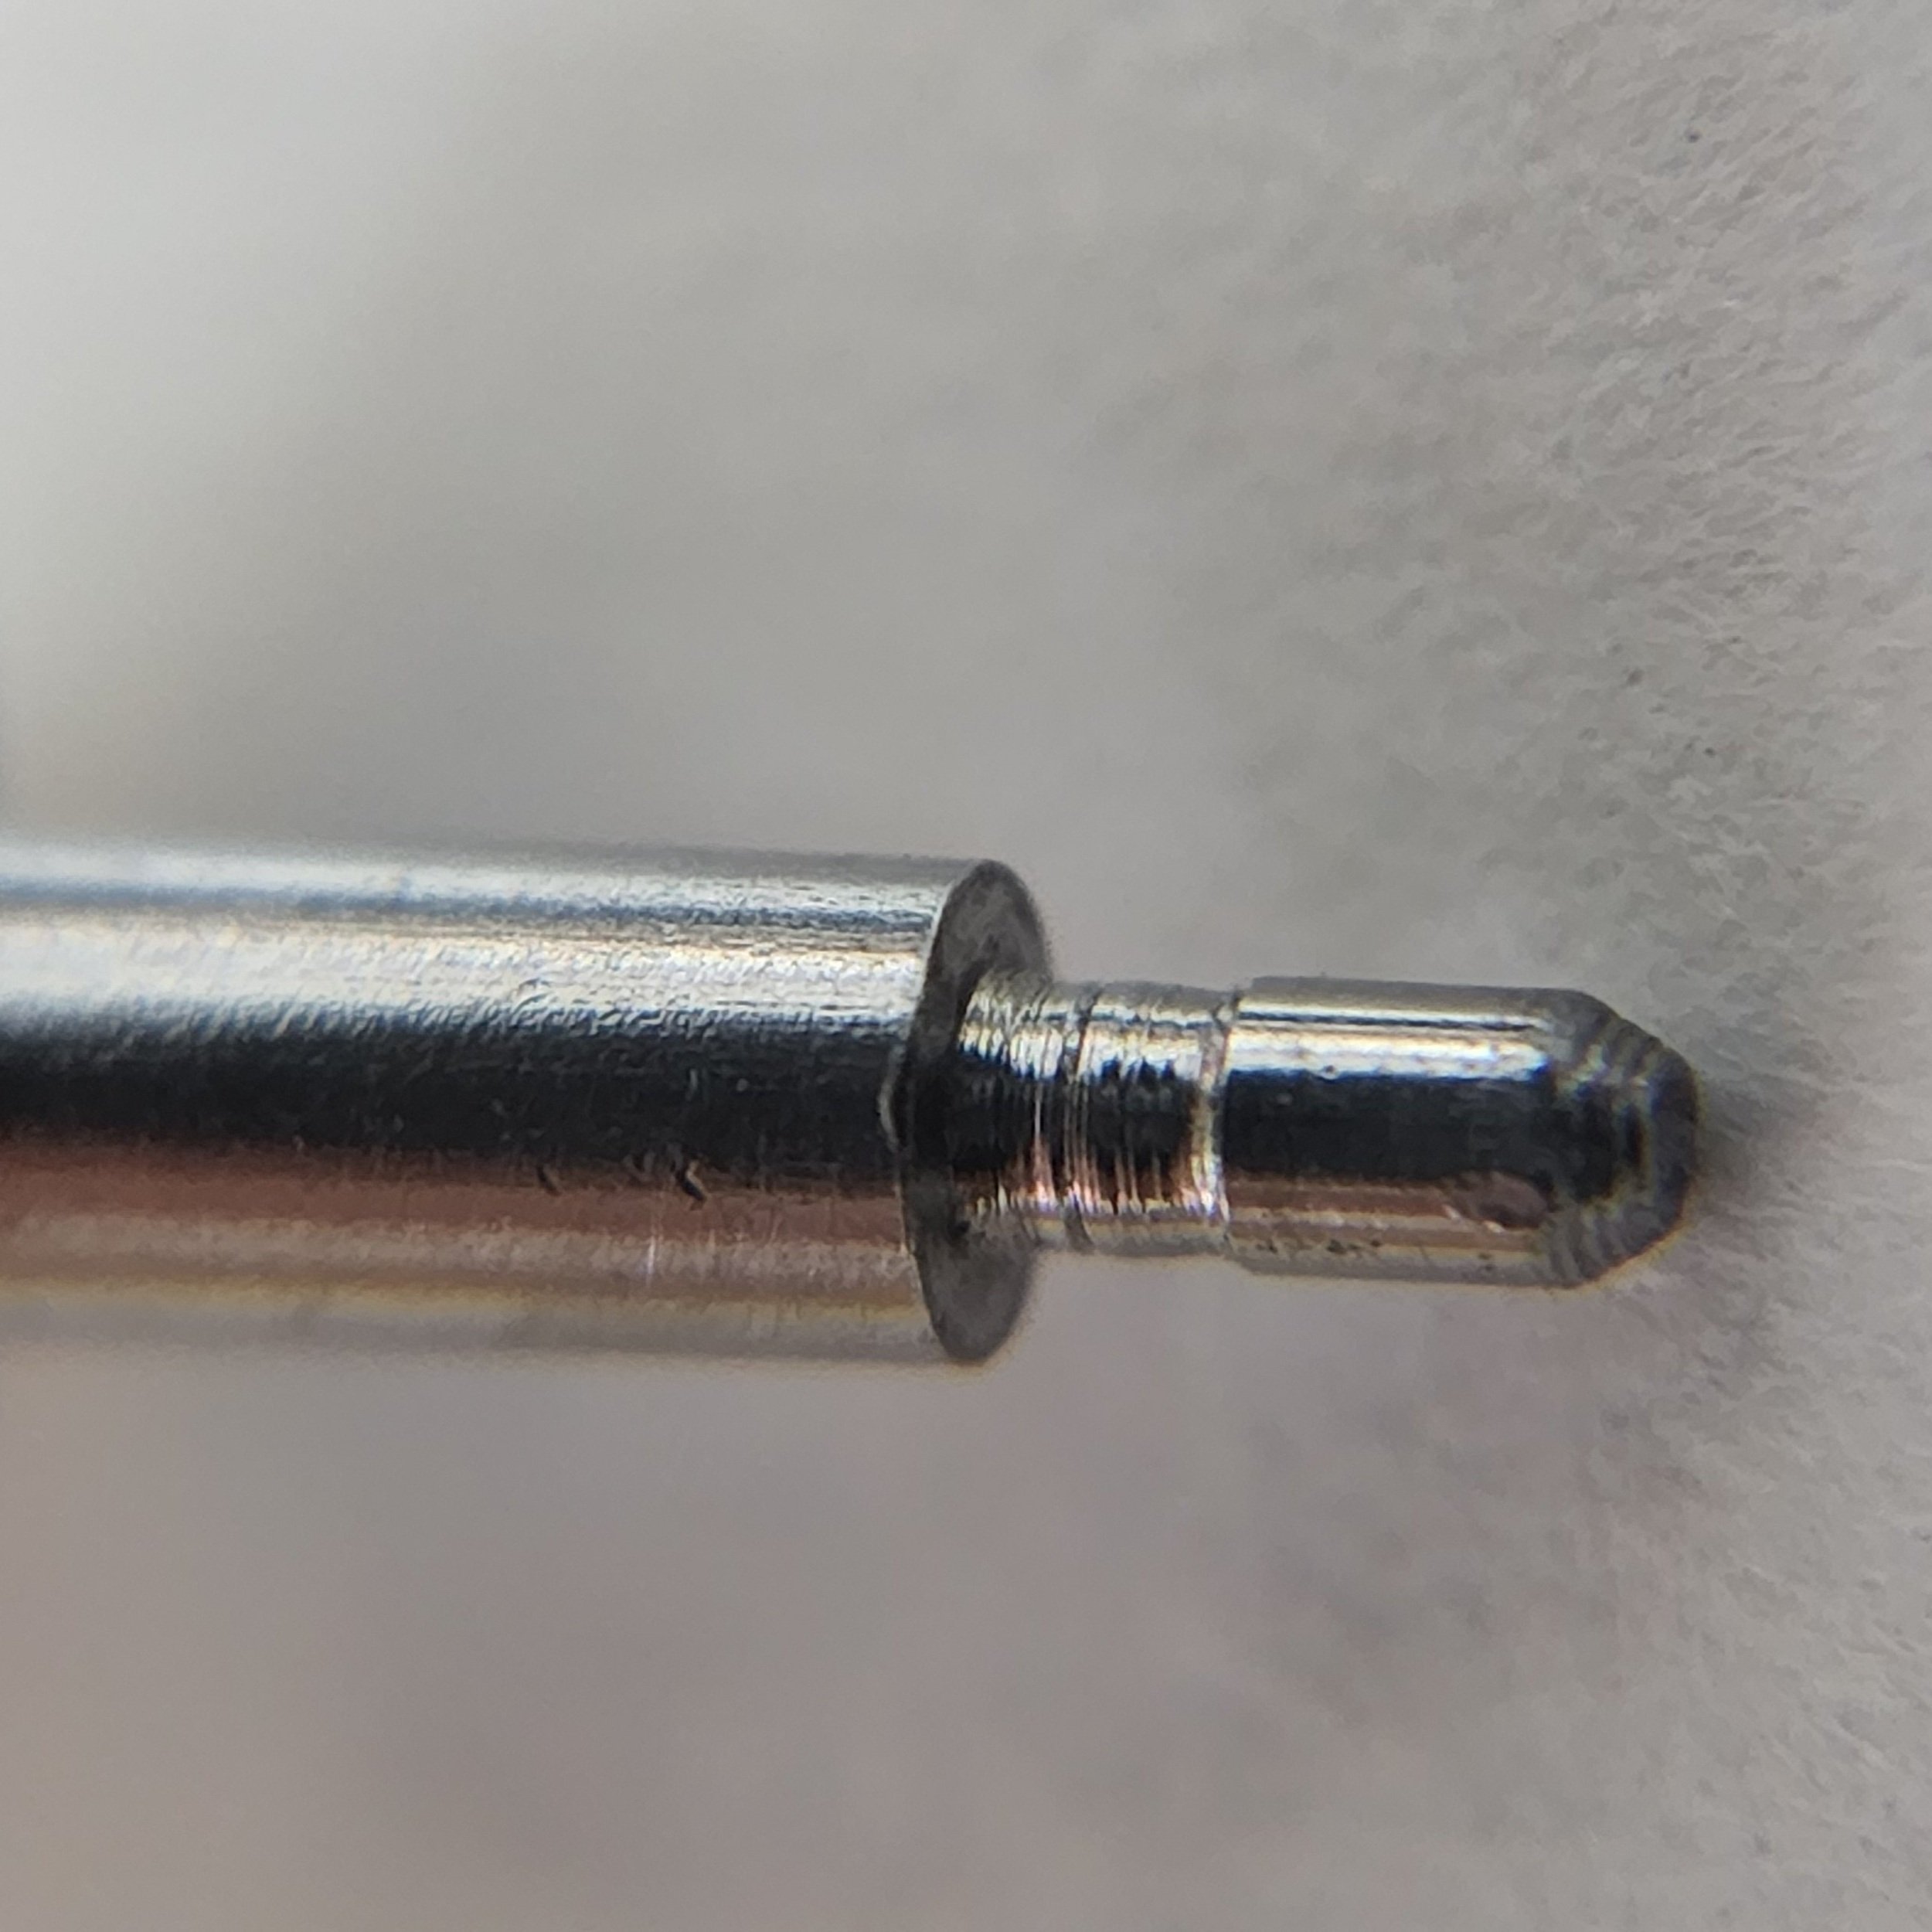
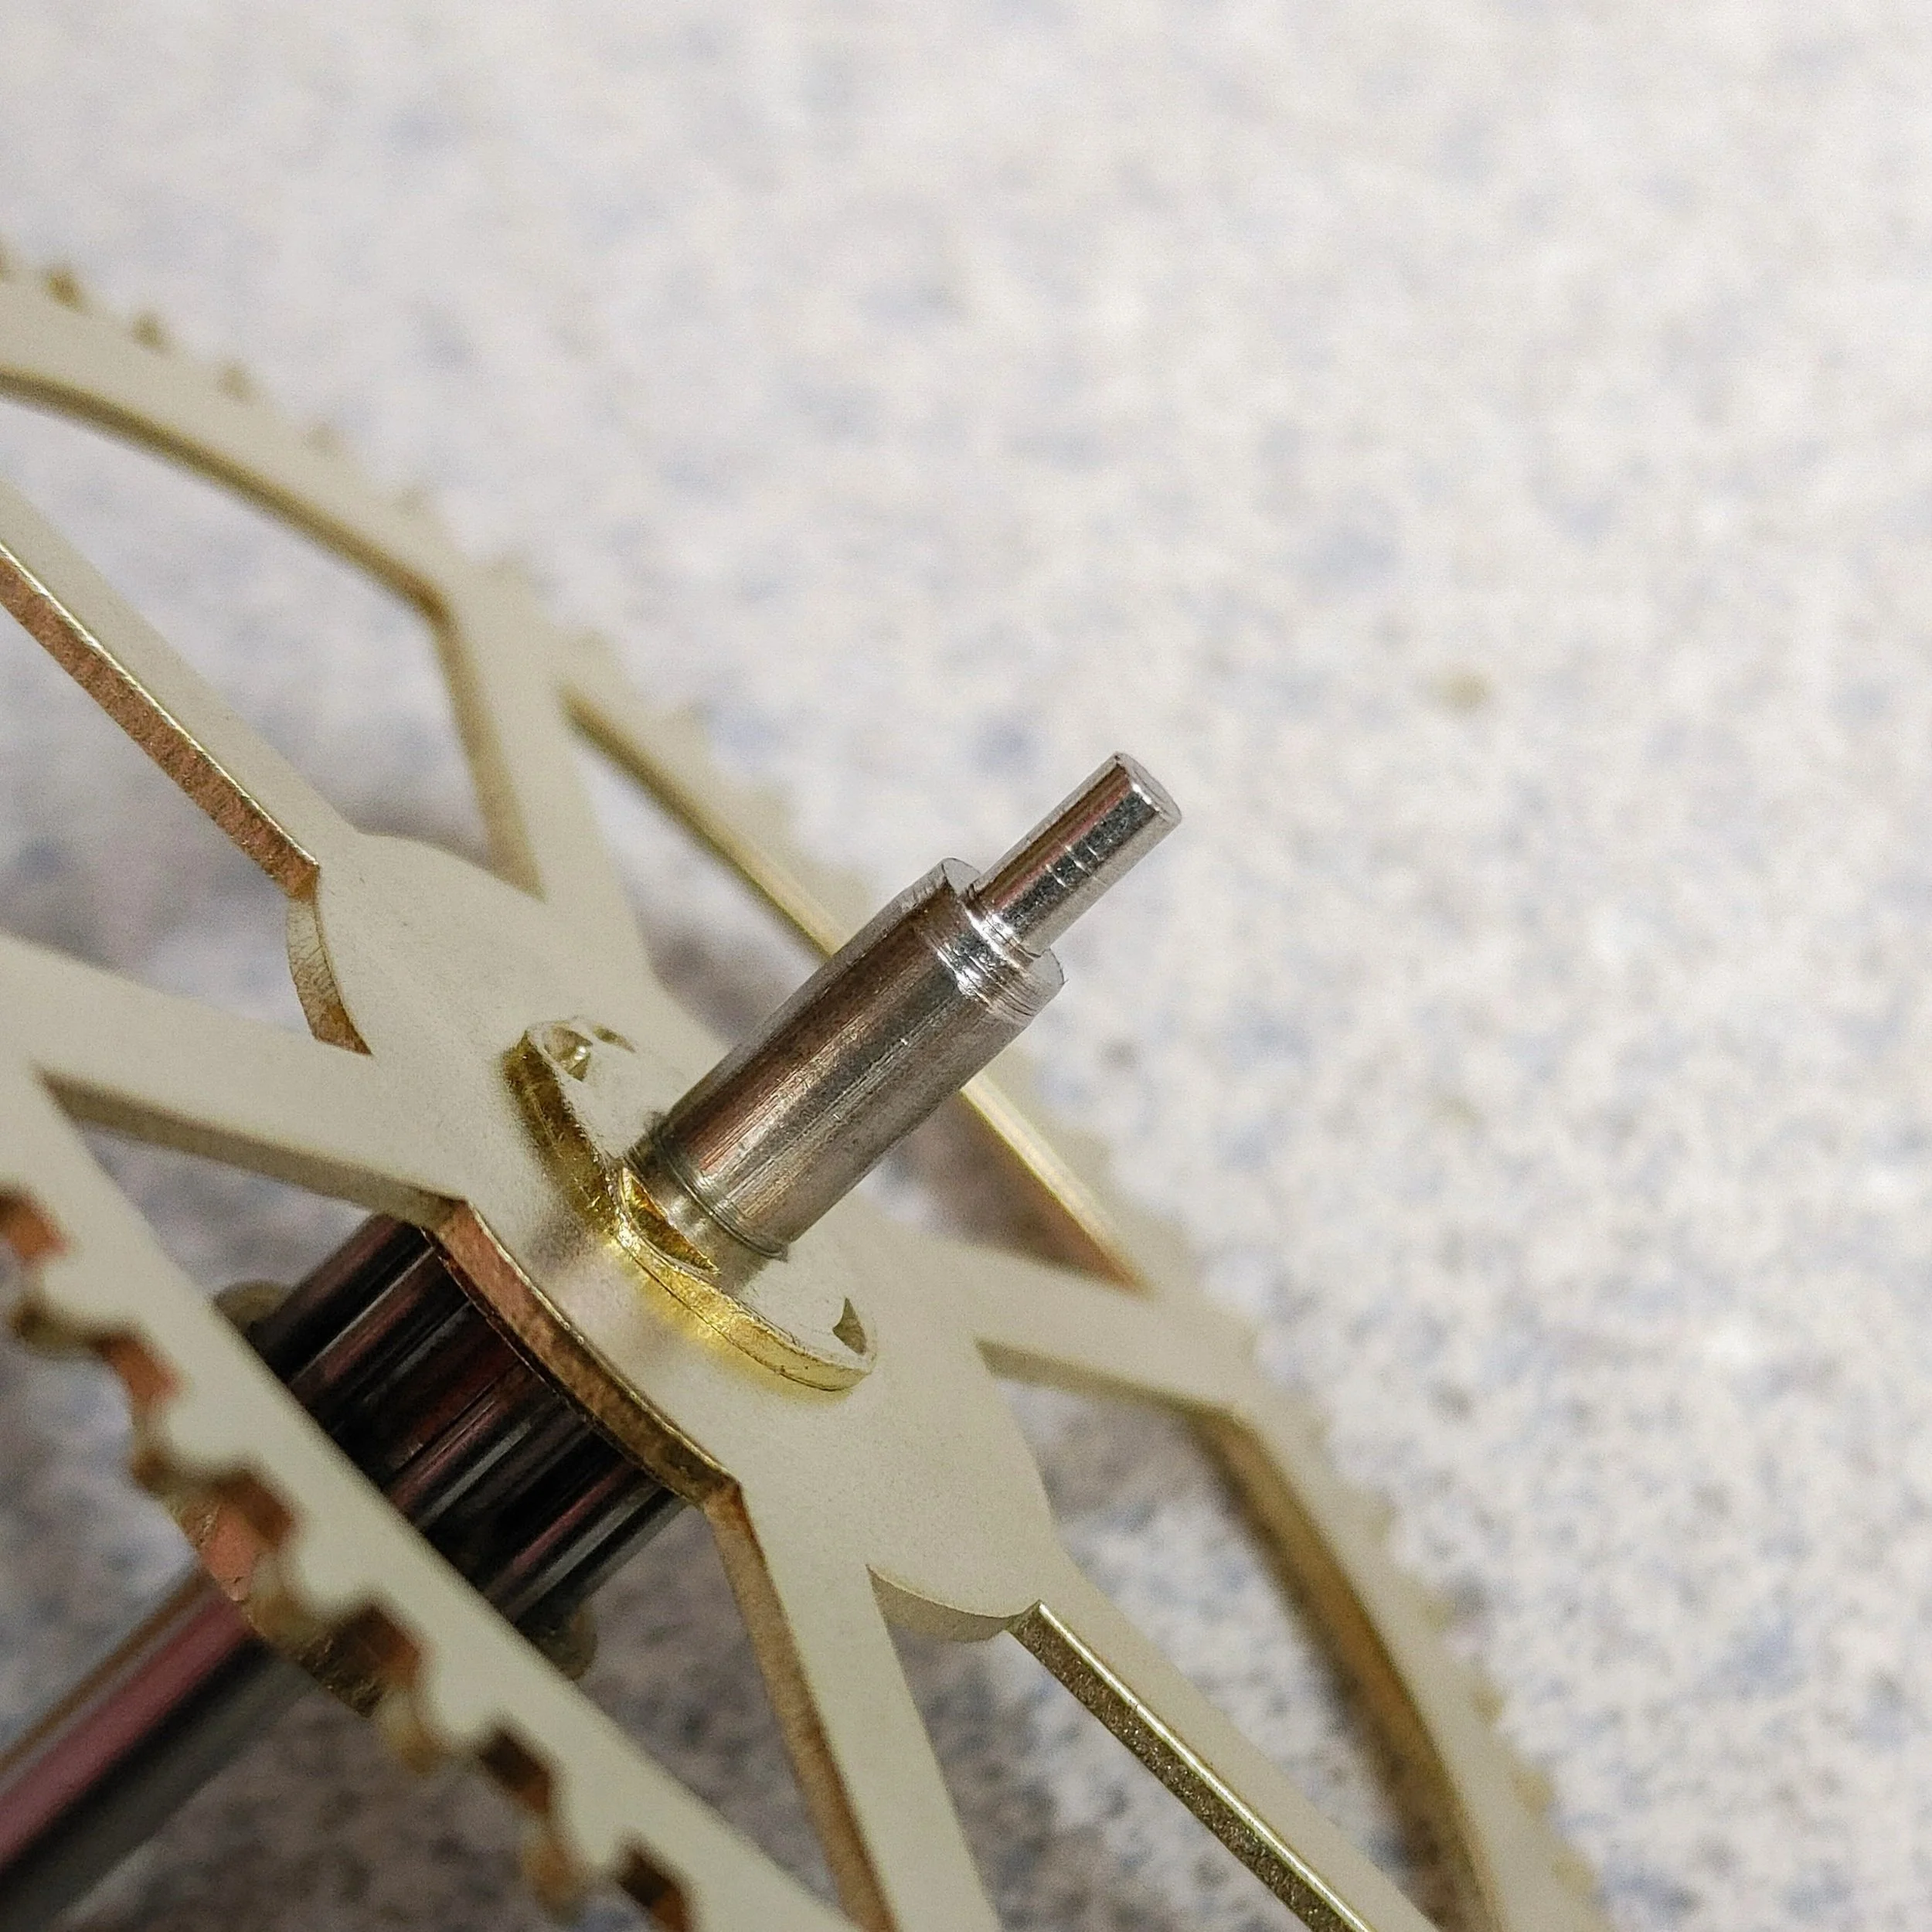
Restored Pivot
This photo shows what a restored pivot should look like, no grooves, ruts or scratches and a hyper smooth surface. A burnished pivot creates less friction, creates less wear and improves oil retention.

Before and After
This pivot has minor scarring. You can clearly see the scratches in the pivot in the before photo on the left and the highly burnished, very smooth surface on the pivot in the after photo on the right.
Repairing Wear - Part Two “A”
Restoring Worn Bearing Surfaces
What Does Bearing Wear Look Like?
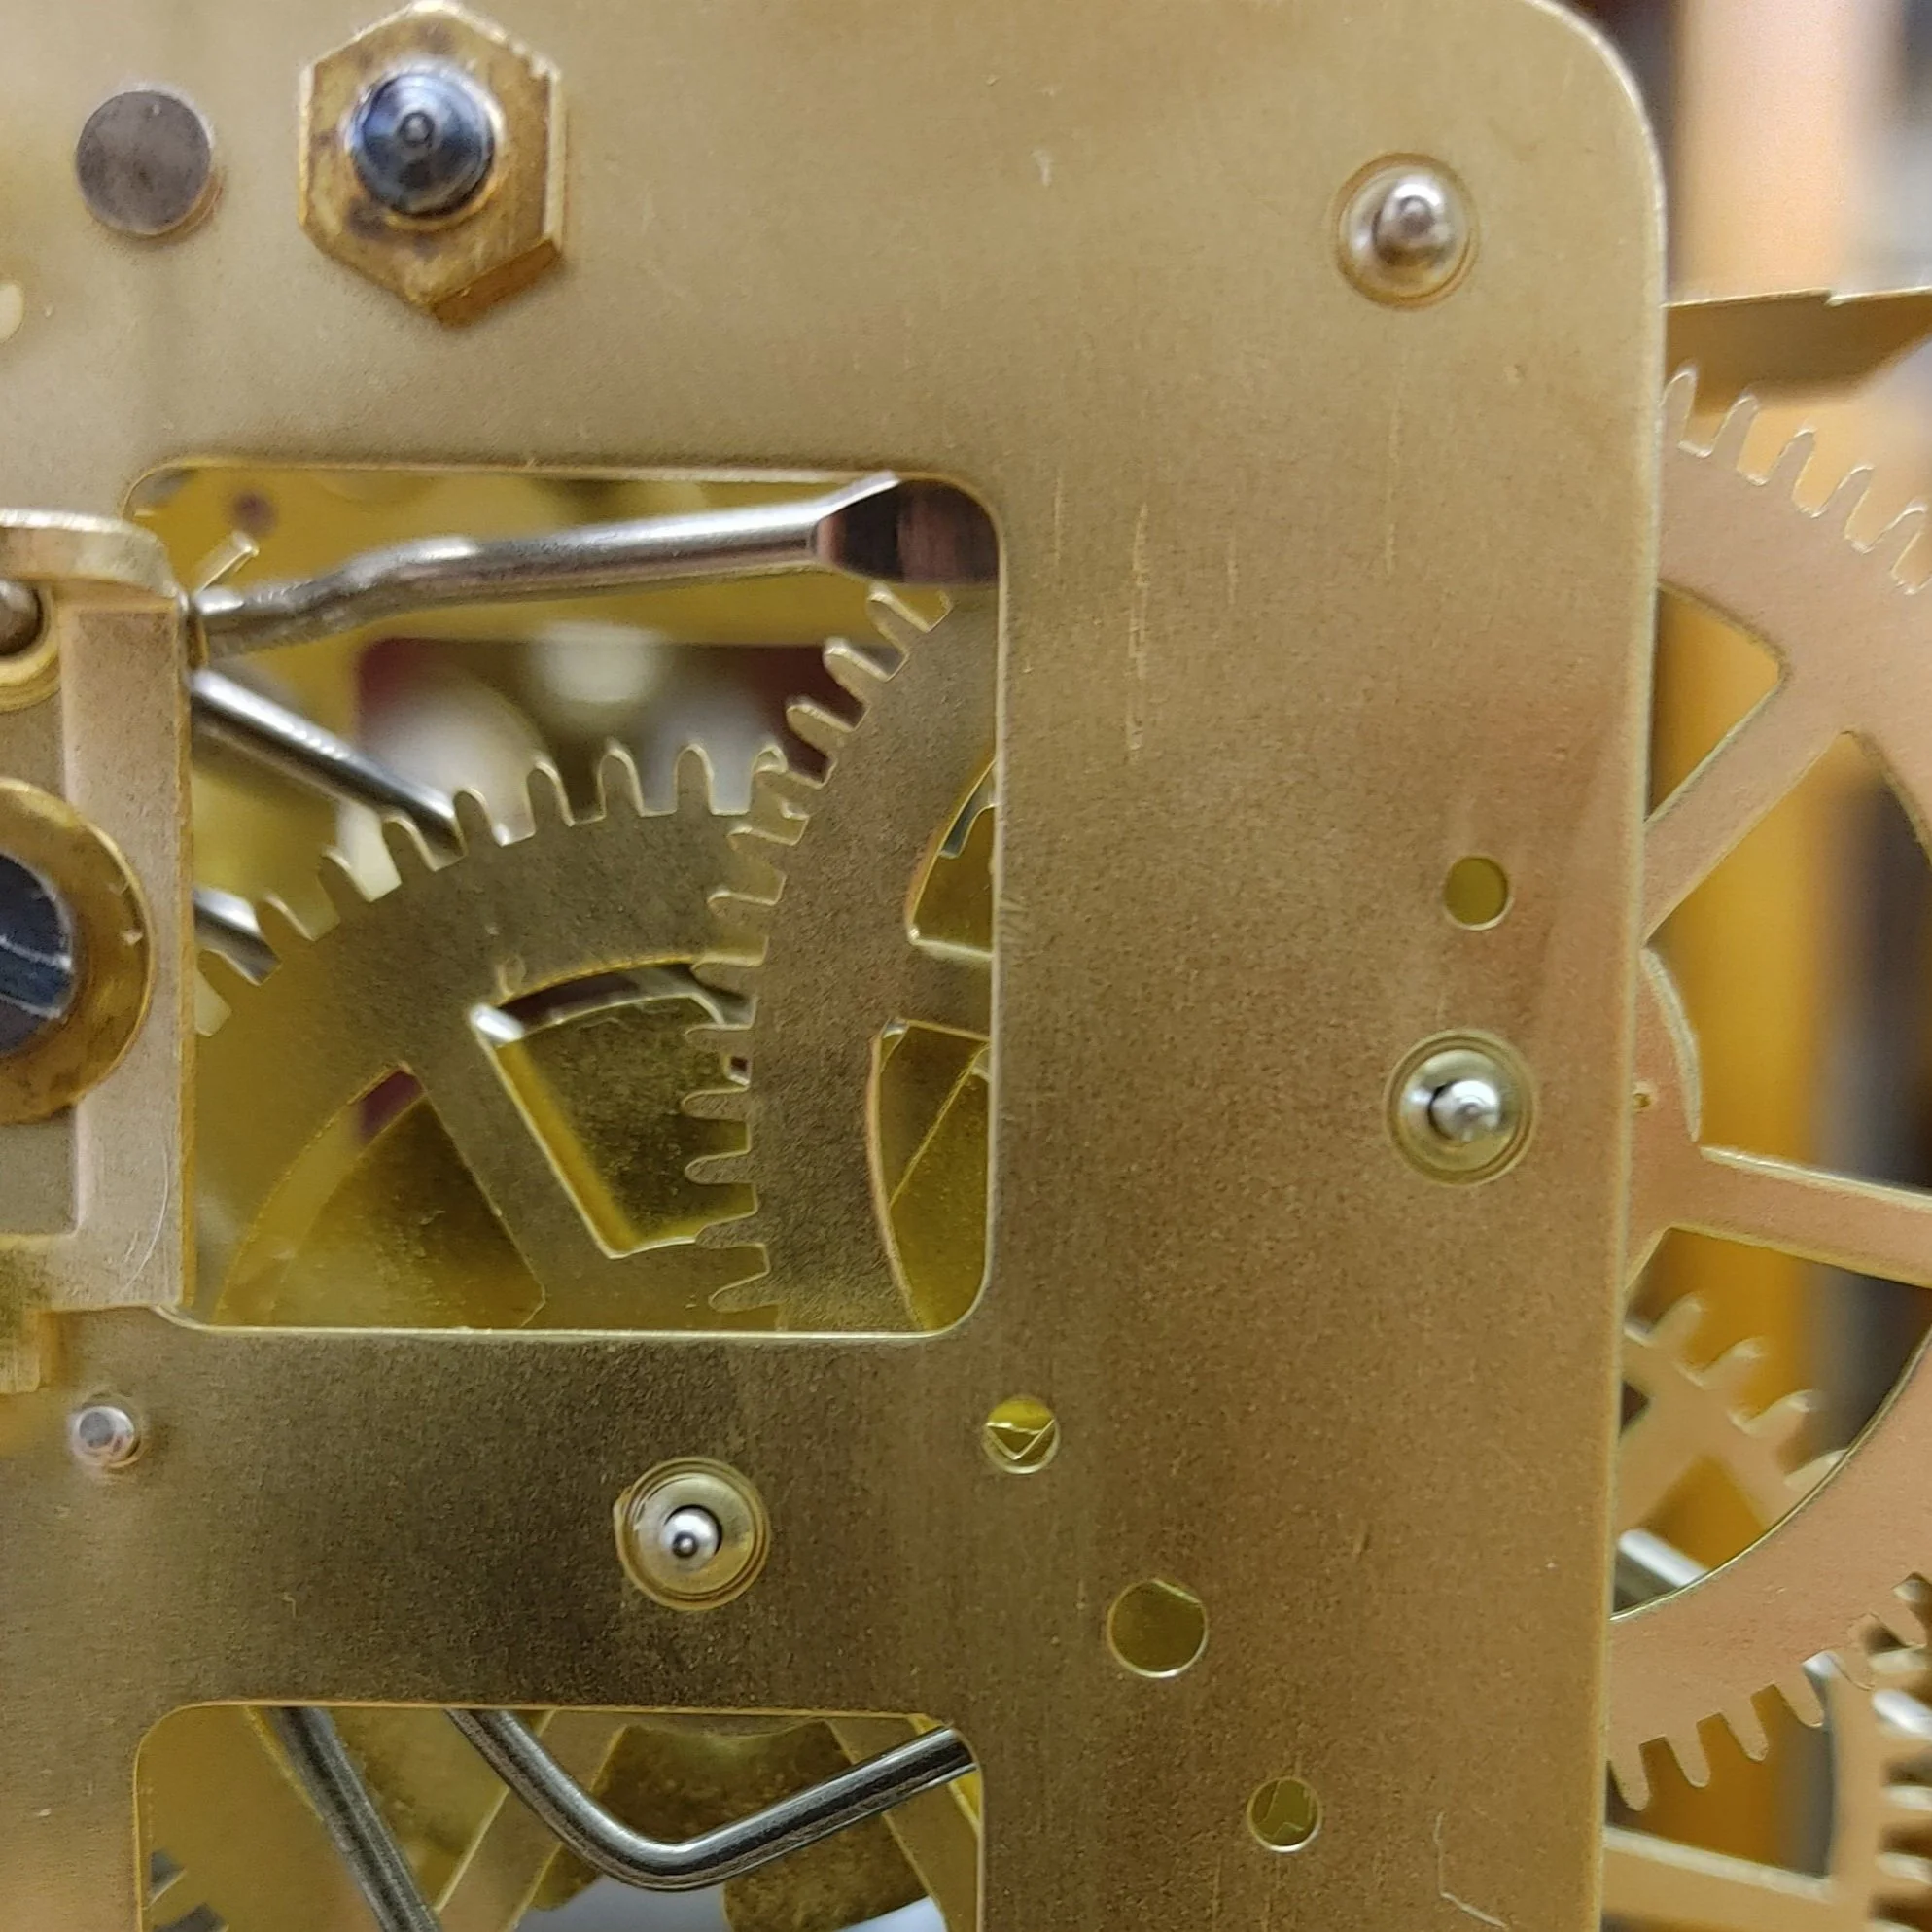
Now that we have covered pivot wear, we will discuss bearing wear. First let’s take a look at what wear looks like by examining three movements which are not our demonstration movement but happen to be worn very badly. The wear is visible in the very center of all three photos. What you want to examine is the tip of the steel pivot protruding through a hole that should be perfectly round and have a diameter only slightly larger than the pivot. It is obvious that the bearing holes shown here are no longer round but are oblong and much larger than the pivot diameter.


Videos Showing Wear
Using our freshly cleaned demonstration movement, we have installed a few of the gears so we can see the wear more clearly. The next two videos, show an extreme amount of wear in the escape wheel bearing on both the front and rear plate. The escape wheel is one of the most critical wheels in the clock movement as it is the one that pushes the pendulum back and forth and is responsible for the time keeping of the clock. Due to the large amount of wear, these bearing holes will require a bushing.
This video shows extreme wear in the strike train third wheel on the front plate.
Now we can look at a bearing hole that is not worn as bad as the others we just examined above. Even though the wear is not that bad and would not cause any malfunctions of the gear train, there is no reason to leave any wear unrepaired. We will repair this wear with a method less intrusive than the installation of a bushing.
Repairing Wear - Part Two “B”
Bushing Installation
Now that you know what wear looks like, we will show you how we repair the worn bearing surfaces. The main method for doing this is through the use of bushings. Bushings are small "donut" shaped pieces of metal made of brass or bronze, which are used to replace the metal in the badly worn areas. In order to install a bushing, a series of reamers are used to open up the worn hole, being careful to maintain its original center, and then the bushing is tightly pressed into the hole creating a bearing surface that is normally smaller than necessary. This small hole will be opened up to the proper size later.
Choosing the Right Bushing
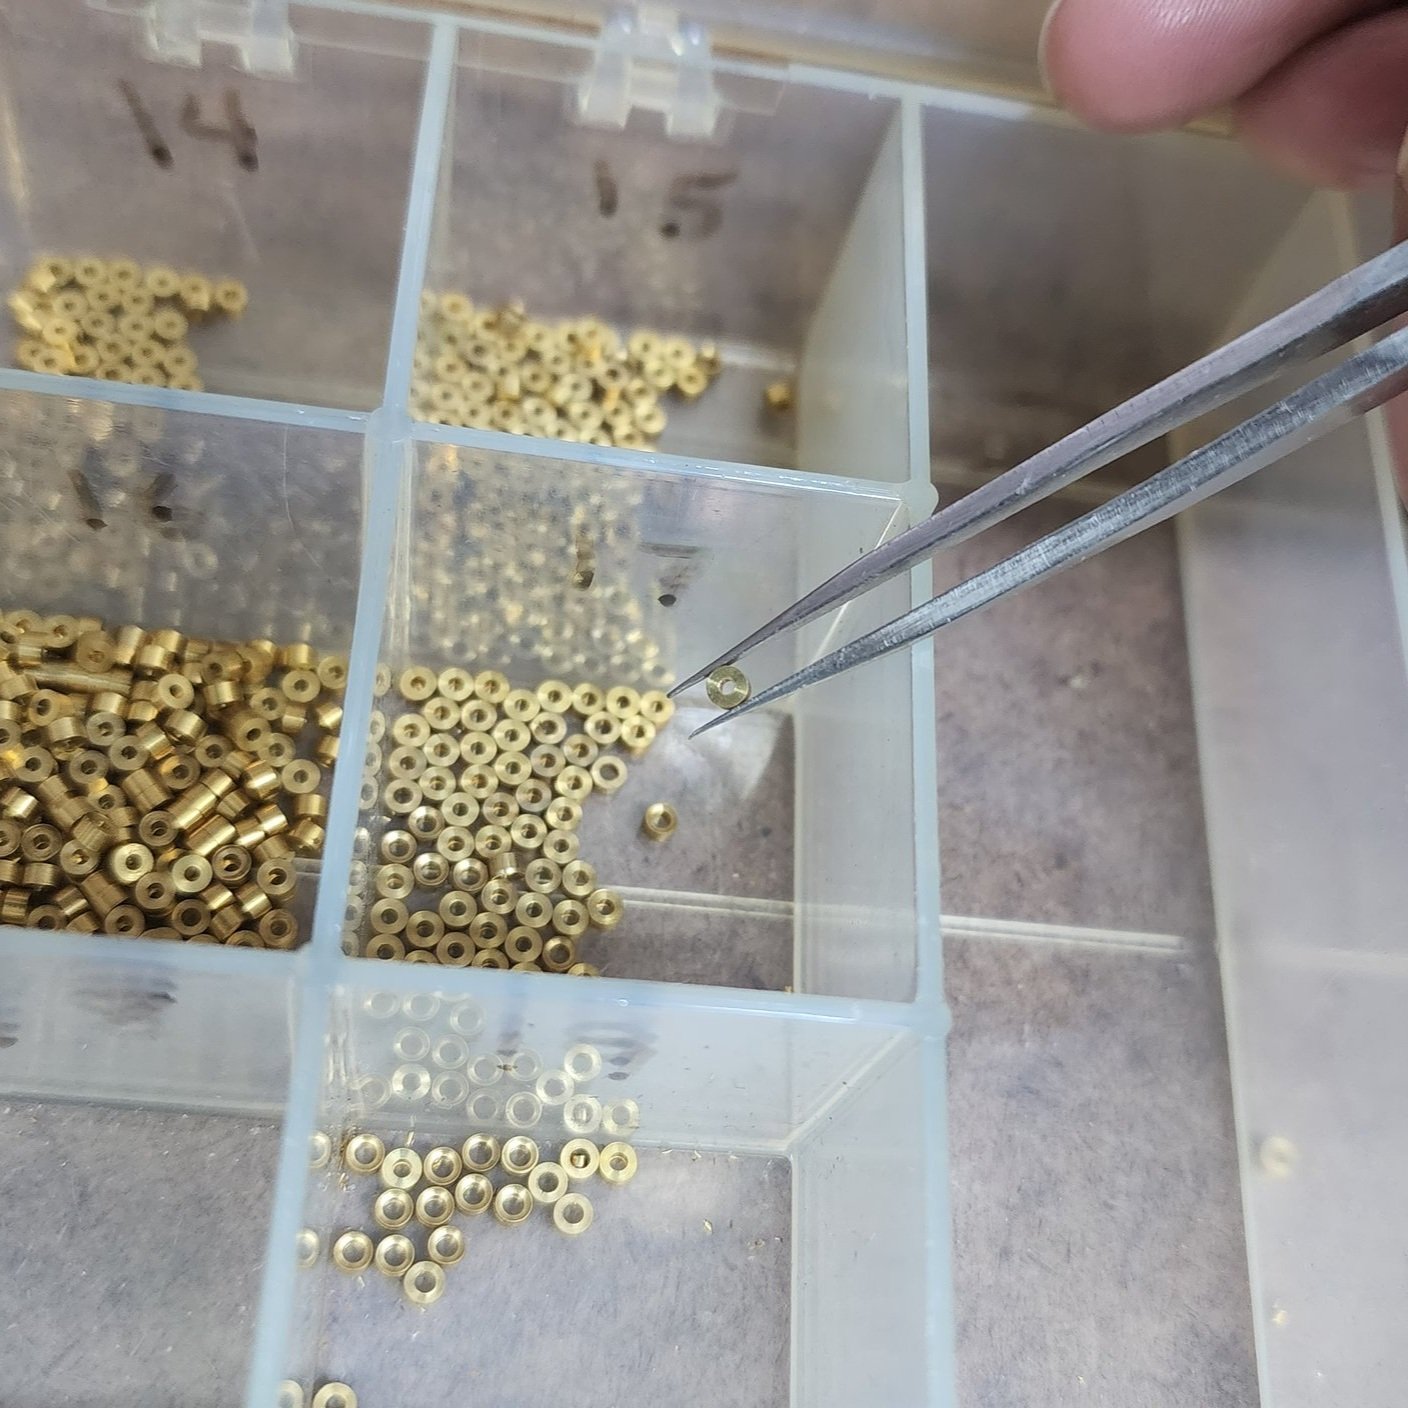
The first photo shows one of our many bushing boxes. We have several brands and many sizes. The type of clock movement dictates the bushing brand, bushing material and bushing height.
The second photo shows the bushing being held over the top of a freshly burnished pivot. Initially we want the inner diameter of the bushing to be too small or to fit tightly. We will perfect the inner diameter in a later step.
The third photo shows the bushing on the pivot with a snug fit.


Re-Centering the Bearing Hole
The reason we need to repair the badly worn bearing hole is not because the hole is too big, it is because the pivot is no longer centered properly which creates improper depthing of wheel to pinion teeth. This improper depthing creates additional drag and inefficient transfer of power flow from one gear to the next. In order to install the bushing, we must do three things: enlarge the worn hole to fit the bushing, make it round again and bring the center of the hole back to its correct location.


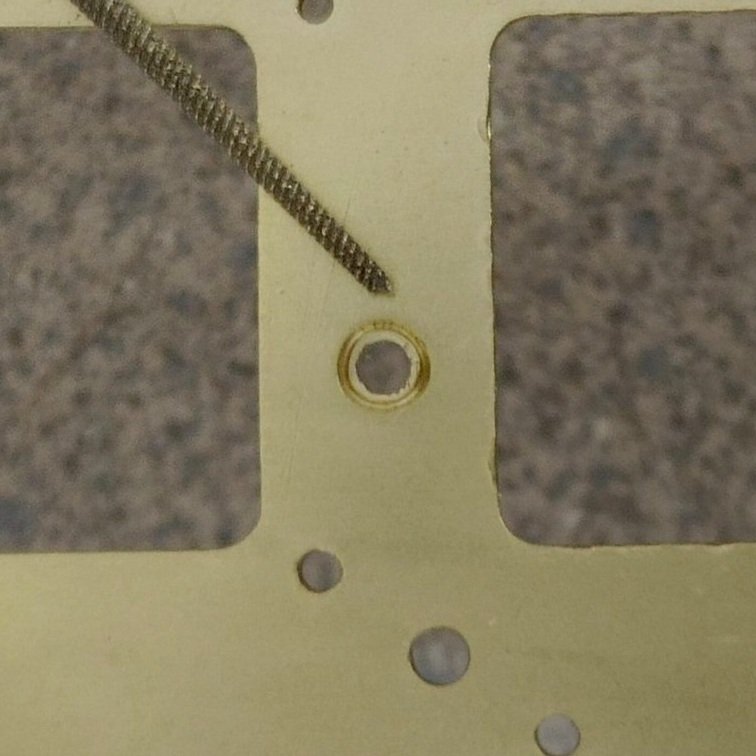
The two photos, on the left and right, show worn bearing surfaces. If the holes were not worn, they would be perfectly round, not oblong like we see in the photos. Although not all clocks have this, the factory produced oil sink and corresponding ring make the job of re-centering the hole to prepare it for bushing installation, much easier.
These two photos, showing the same bearing holes above, have now been enlarged, rounded out and re-centered with the use of a file. You can see that the new hole is now concentric to the oil sink and ring produced by the factory.

Reaming the hole to fit the bushing
Now that the badly worn holes are re-centered, we can ream the holes with a reamer that matches the diameter of the bushing we need for each hole. This can be done by hand, with the use of a drill press (like the video below) or with a special tool called a bushing machine.
De-burring the reamed hole
The process of reaming will raise a burr around the hole. We can remove the burr with a tool called a chamfer. This creates a shallow countersink around the hole where the bushing will be pressed in.
Mounting the Bushing
Now that the reamed hole is ready, we can insert the bushing tightly into the hole either by pressing it in or using a flat faced punch and a hammer. The photo on the right shows the bushing in place.


Here we have the bushed hole in the same position but on the opposite side of the movement while also showing the same sized un-used bushing next to it as a reference.


Repairing Wear - Part Two “C”
The Proper Use of the Hole Closing Punch
to repair slightly worn holes
This method of wear repair (hole closing) is considered controversial by those who are not truly familiar with the process. For those who are, who use it only when appropriate, and perform the technique correctly, it is a valuable tool for repairing slightly worn bearing holes. It is controversial to some as it is often confused with “prick punching”, a completely different process. Prick punching is a horrible technique for wear repair. Because it is done with the clock still assembled, it does not allow for pivot restoration, it won’t make a round hole, it often damages the pivot further and leaves permanent grotesque scars on the clock plates. See our “Hall of shame” page for more information on “Prick Punching”.
Prick Punching - What Should not be done!
Below are three examples of prick punching that we will contrast with the proper use of the hole closing tool in the next section. It doesn’t take a clockmaker to know that this is poor quality work. we can all agree that this is very ugly. This is much different from using a hole closing tool.


The Hole Closing Process
to repair slightly worn holes
The process of hole closing “shrinks” the slightly worn hole by compressing or pushing the brass around the hole back towards its center. This allows the bearing surface to be broached or opened to the correct size. The use of a hole closing punch mimics the ring around the oil sink that is already present on almost all antique American strike movements like the example we are using here. When done correctly, most people would not be able to tell the difference between a bearing surface repaired with a bushing and one that was repaired with a hole closing punch or even that it was repaired at all! Using a hole closing punch is not a substitute for the use of bushings. If the bearing hole is badly out of round or the clock plates are very thick, a hole closing punch is not a good choice. Many bearing surfaces on a clock will not be worn very badly and the use of a bushing in every bearing hole is not justified or desired. One of the advantages that early American clock movements had was a near perfect “marriage” of brass bearing and pivot steel hardness. Even though neither the steel pivots nor the brass bearings were particularly hard, the combination worked very well together. This perfect match of opposing metals was so good that these movements often ran 100 years without the need for a rebuild, even though their plates were relatively thin. This makes these specific clock movements good candidates for the use of this tool. Using a hole closing punch allows the clockmaker to maintain the original brass that was so durable. In addition, the act of using the hole closing punch and the round nosed punch to create the countersink, actually work hardens the brass as well.
Many clock shops will ignore slightly worn bearing holes that are close to round claiming that if they are round, they cannot possibly be worn. I would say that it is close to impossible for a bearing hole in a machine that is 100 years old to not have some wear in it. If it happened that the hole was not worn and the hole was perfectly round, we still have a problem when we burnish the pivot. the act of burnishing will reduce the diameter of the pivot making the “unworn” bearing hole larger than the now burnished pivot. For this reason, we use the tool to close up the holes on bearing surfaces that do not require a bushing.
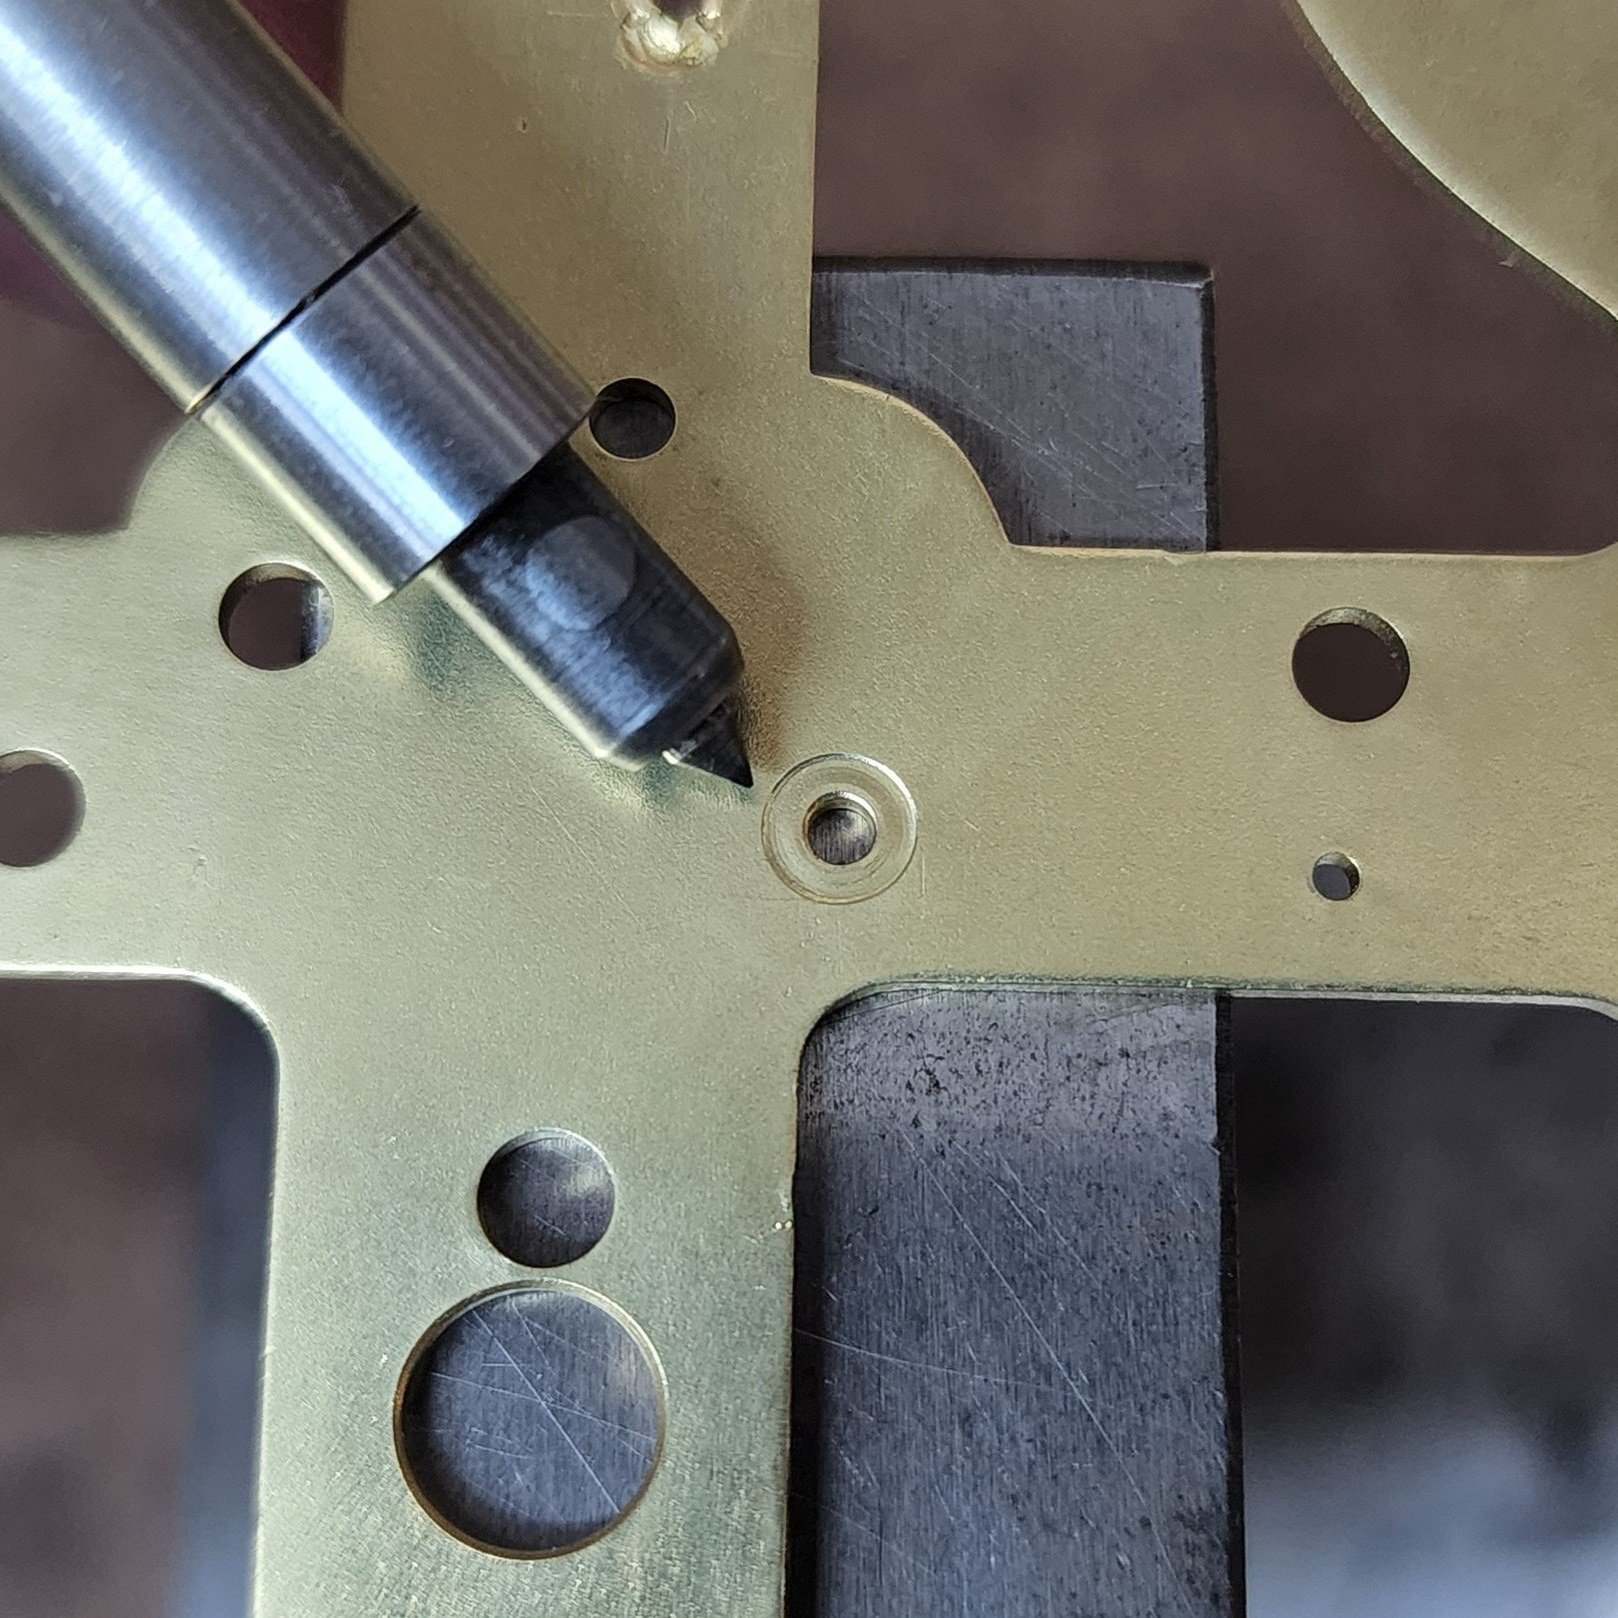
The four photos below show how the tool is used correctly.
In the photo on the left, you can now see the deeper ring punched around the bearing hole.
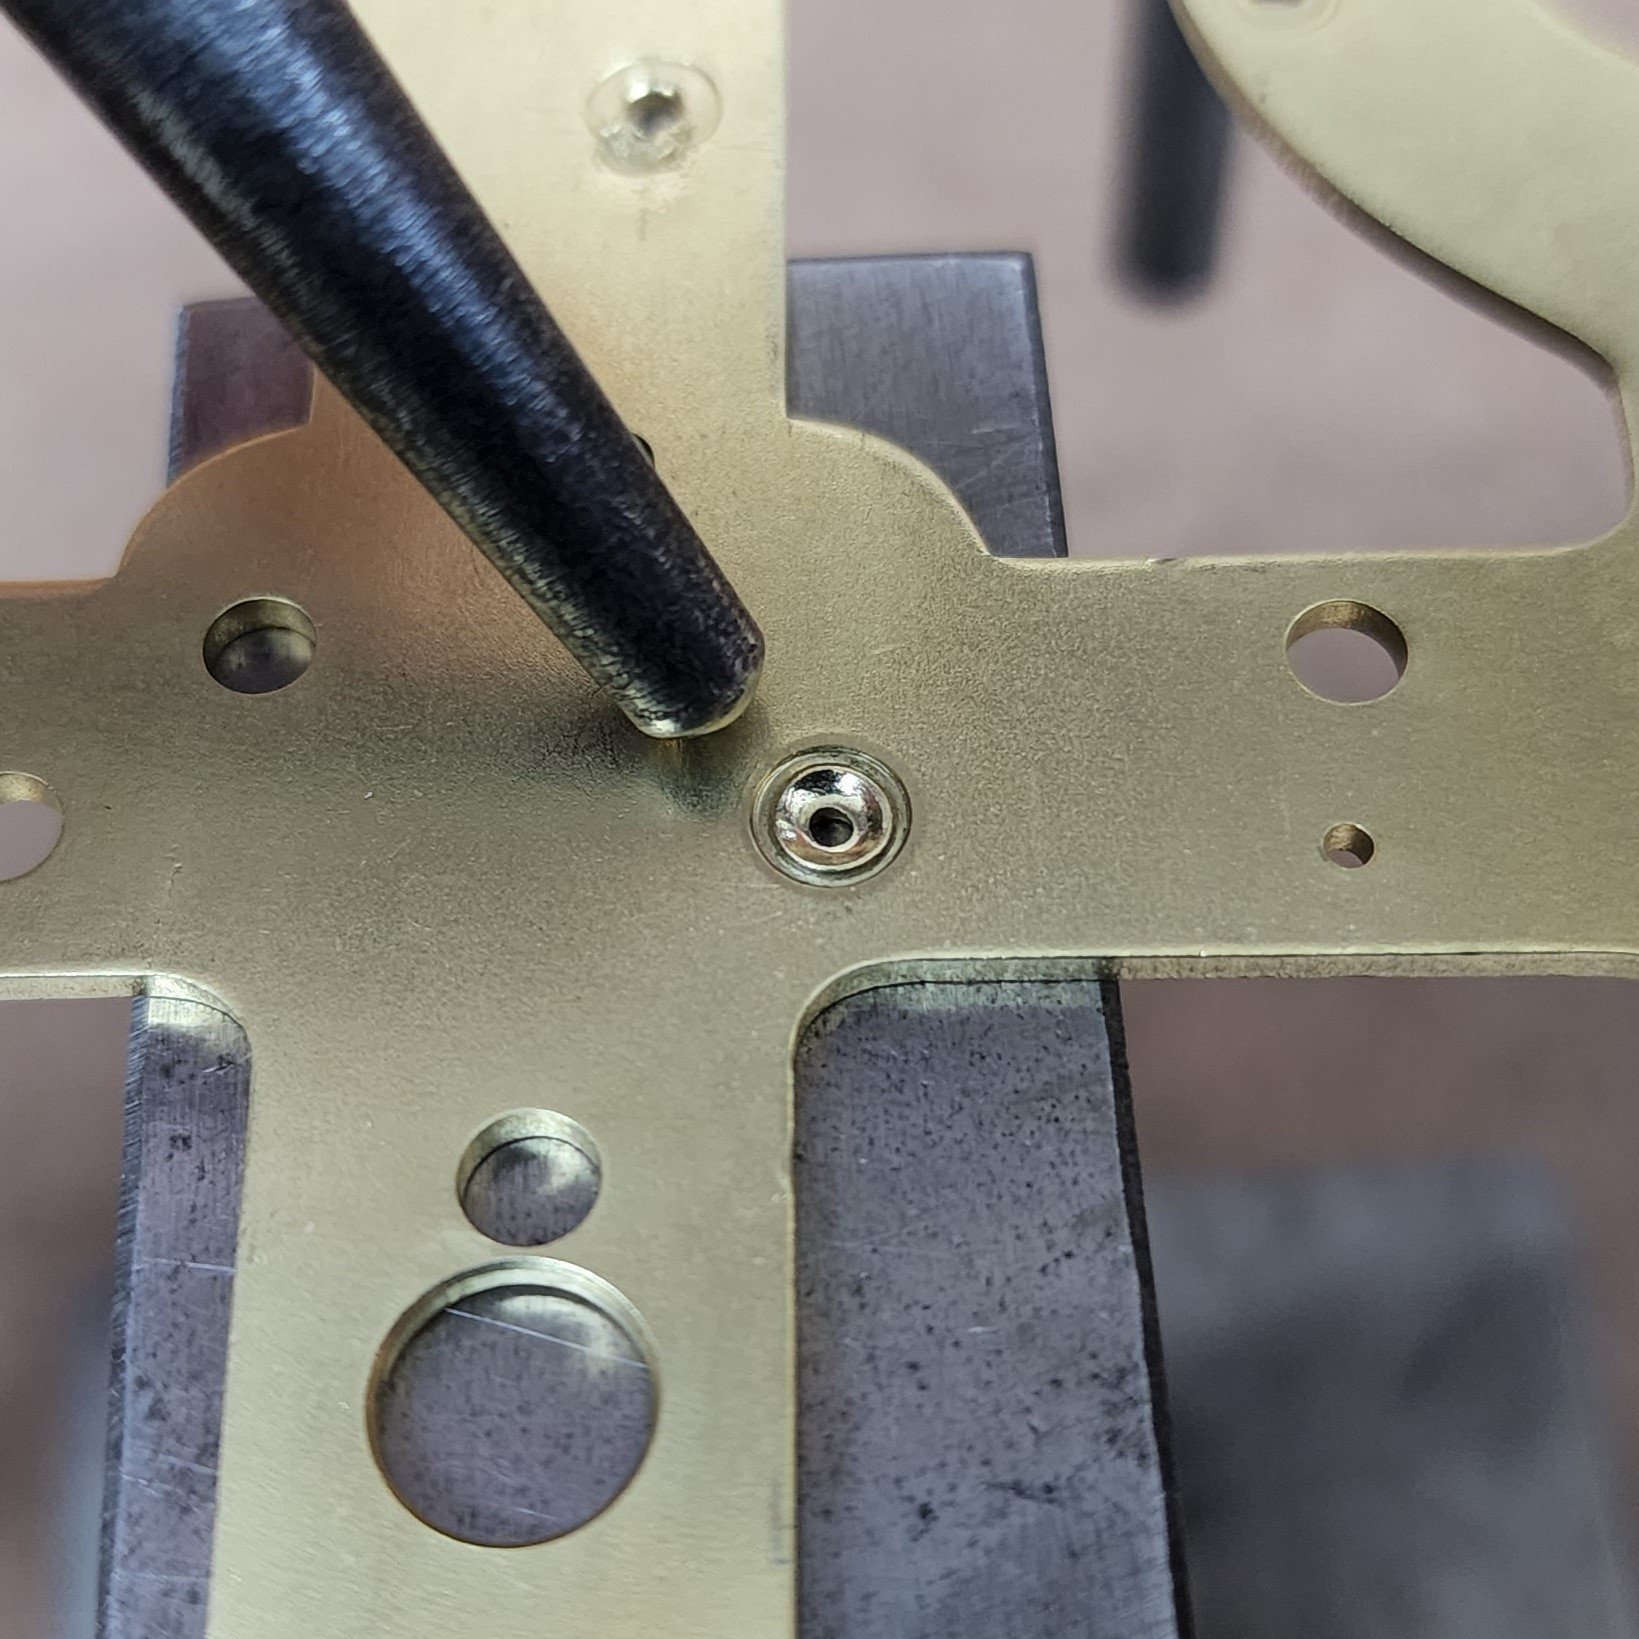
In the photo on the left we see a chamfering tool. The rounded end of the tool will be placed over the newly formed oil and sink and twisted. This process will form a perfectly rounded cup while also polishing the surface a bit.
In the photo on the right, you see the hole closing punch pointing at the bearing hole about to be closed. The punch will be laid on top of the hole and given one firm smack with a small five-ounce hammer. The same process will be repeated on the opposite side of the same hole.

In the photo on the right, we have punched the center of the hole with a round nosed punch to create an oil sink. When brass is hammered it will become harder. Therefore, the use of both the hole closing punch and the round nosed punch will make the bearing hole more durable.

Comparison of the use of Bushings and Hole Closing
All of the bearing holes in the photo below have been repaired through the use of a hole closing punch. Comparing it to the prick punching in the photos above reveals a sharp contrast in functionality and neatness. Unlike prick punching, because the clock was disassembled, we were able to restore the pivot first then close the holes and broach them to the proper size.
For further comparison, in the photo below, the upper bearing hole was repaired with a bushing and the lower one with the hole closing punch.

One more comparison. At the very center of both photos on the left and right are shown opposite ends of the same gear. The photo on the left shows a bushed bearing hole and the photo on the right shows a closed bearing hole. It is hard to tell the difference. Both are done neatly, both are well centered and both holes are, once again, the correct size.


Repairing Wear Part Two “D”
Broaching
The broach is a slightly tapered, five-sided cutting instrument. By pushing and turning the tool inside the hole we are able to slowly enlarge the hole until the pivot fits perfectly. It is important to keep the broach perpendicular to the plate while performing this procedure while alternating the cut from both inside and outside the plate. The process of broaching will often raise a small burr. Because of this we will use a tool called a chamfer to make a delicate cut on the inside of the bearing hole. We will then reverse the plate and perform the same action on the outside but cut slightly deeper to create an oil sink.
After this is done, another tool, called a smoothing broach can be used. It is very similar to the cutting broach except that this one is round (not five sided) and the sides are smooth. This broach, with a light coating of oil, is pushed hard into the newly cut bearing surface and rotated in the hole. This action, similar to the burnishing of the clock pivot mentioned earlier, both smooths and hardens the working surface of the bearing improving durability. This is a step that many repairmen leave out when overhauling a clock.
Once these steps are taken for each and every bearing surface, each gear train is put in place between the clock plates and spun to check for smoothness of motion. Each gear is also checked for proper end and side shake as well as depthing.
Now that the worn holes or bearing surfaces have been repaired, in most cases the holes will be too small. The inner diameter of the new hole must be “broached” to fit the corresponding pivot. This step needs to be done with a degree of precision. if the hole is left too tight, the pivot may seize up inside the hole due to dirt accumulation or expansion of the pivot caused by temperature change. If the hole is broached too big you are introducing “wear” into the hole before the clock has even had a chance to run.

Set of Cutting Broaches

Broaching the bearing hole
Repairing Wear - Part Three
Levers
Clocks that “strike” or “chime and strike” must have lever systems to activate those functions. The levers link the rotation of the hands (the time train) to the tripping or release of the strike or the chime and strike. The chiming or striking gear trains, once activated, will then lift other levers attached to hammers that strike the gongs or chime rods. These levers are making contact with and rubbing against other levers or pins attached to the wheels in the chime or strike trains. These points of contact create friction which results in wear to the levers. The rougher the levers, the more friction or drag is introduced into the movement. Too much drag can cause stalling of the various functions. These worn areas must be polished out and then the levers readjusted to compensate for the wear. The smoother the levers, the more efficient the clock movement will operate.
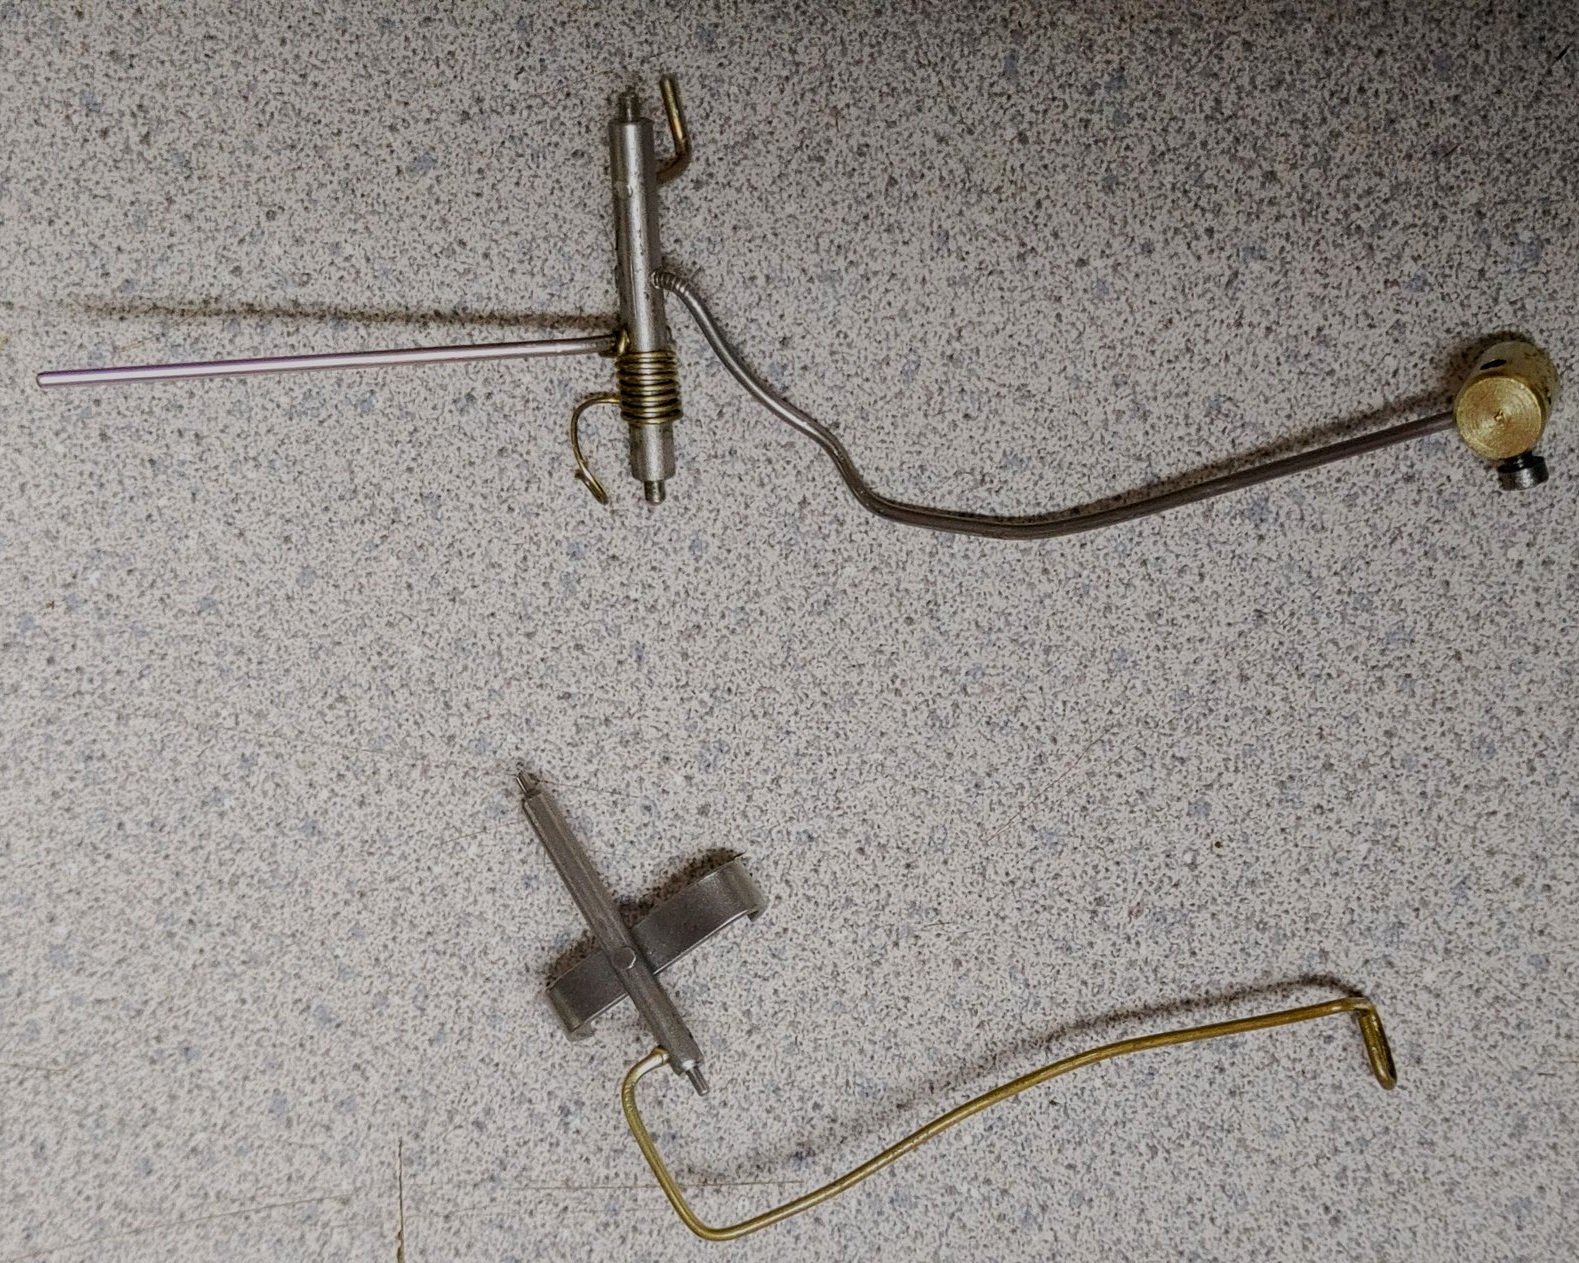
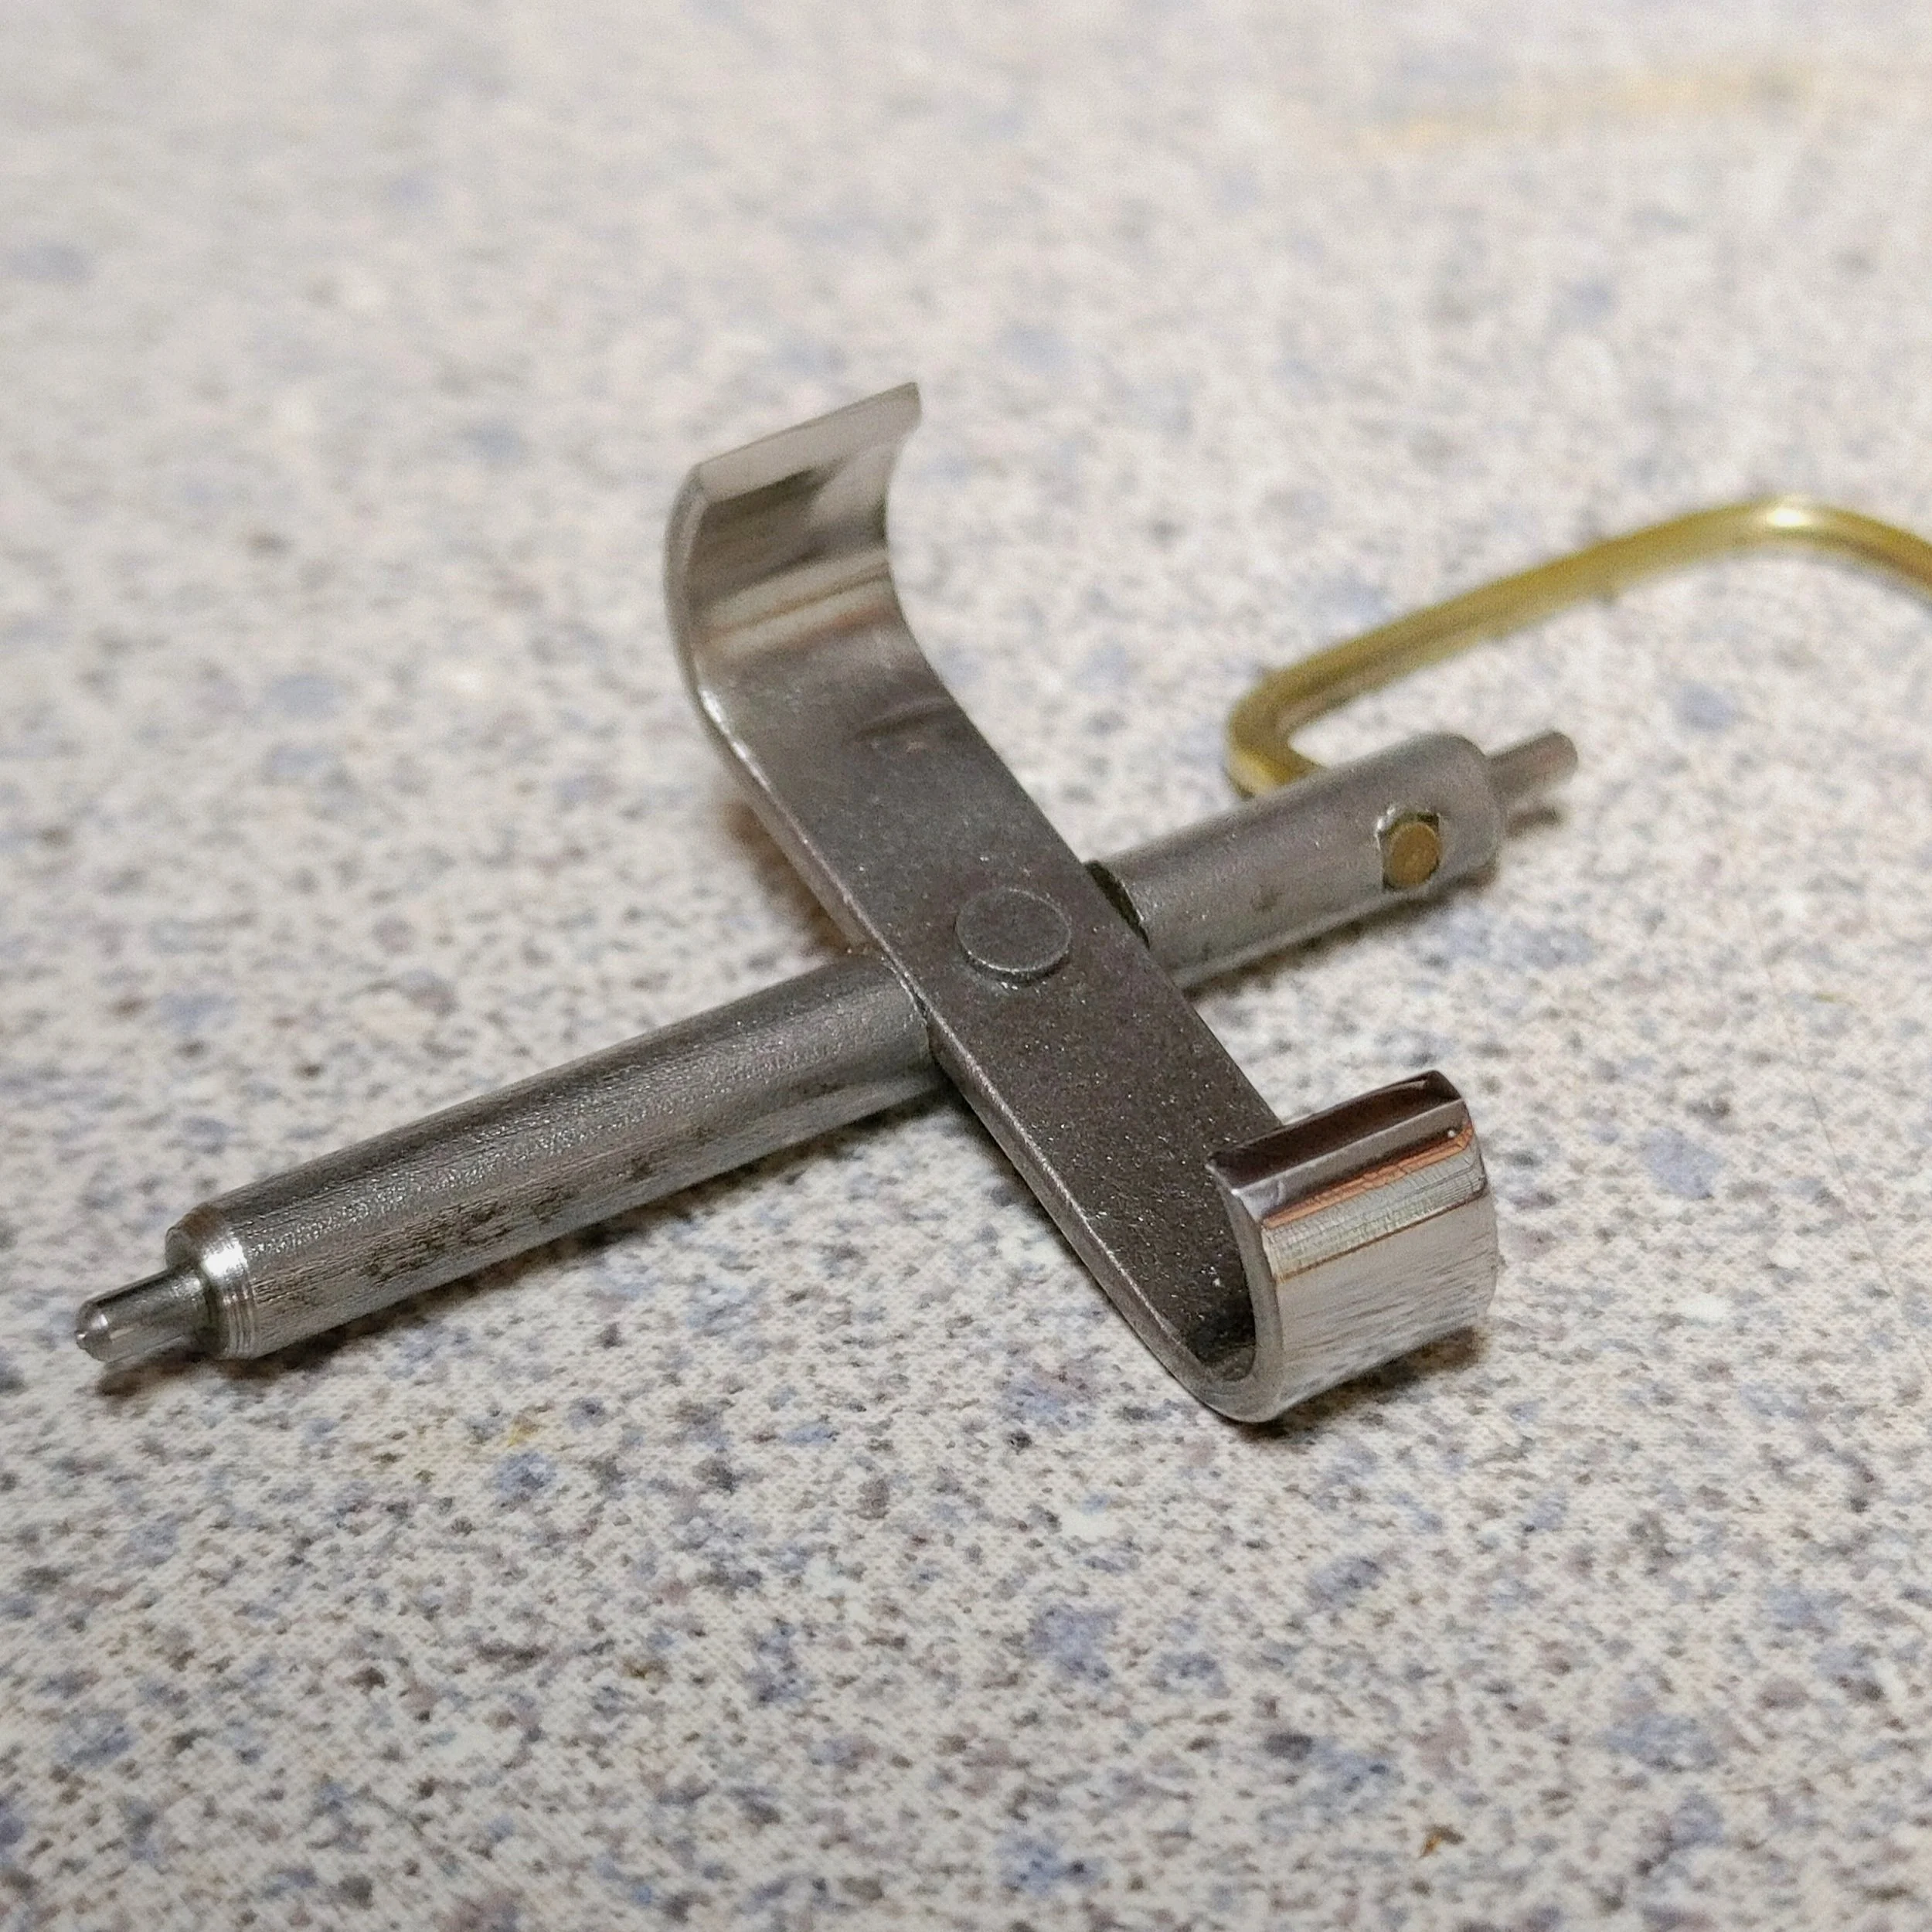
The photo below shows all the levers contained within the clock we are restoring.

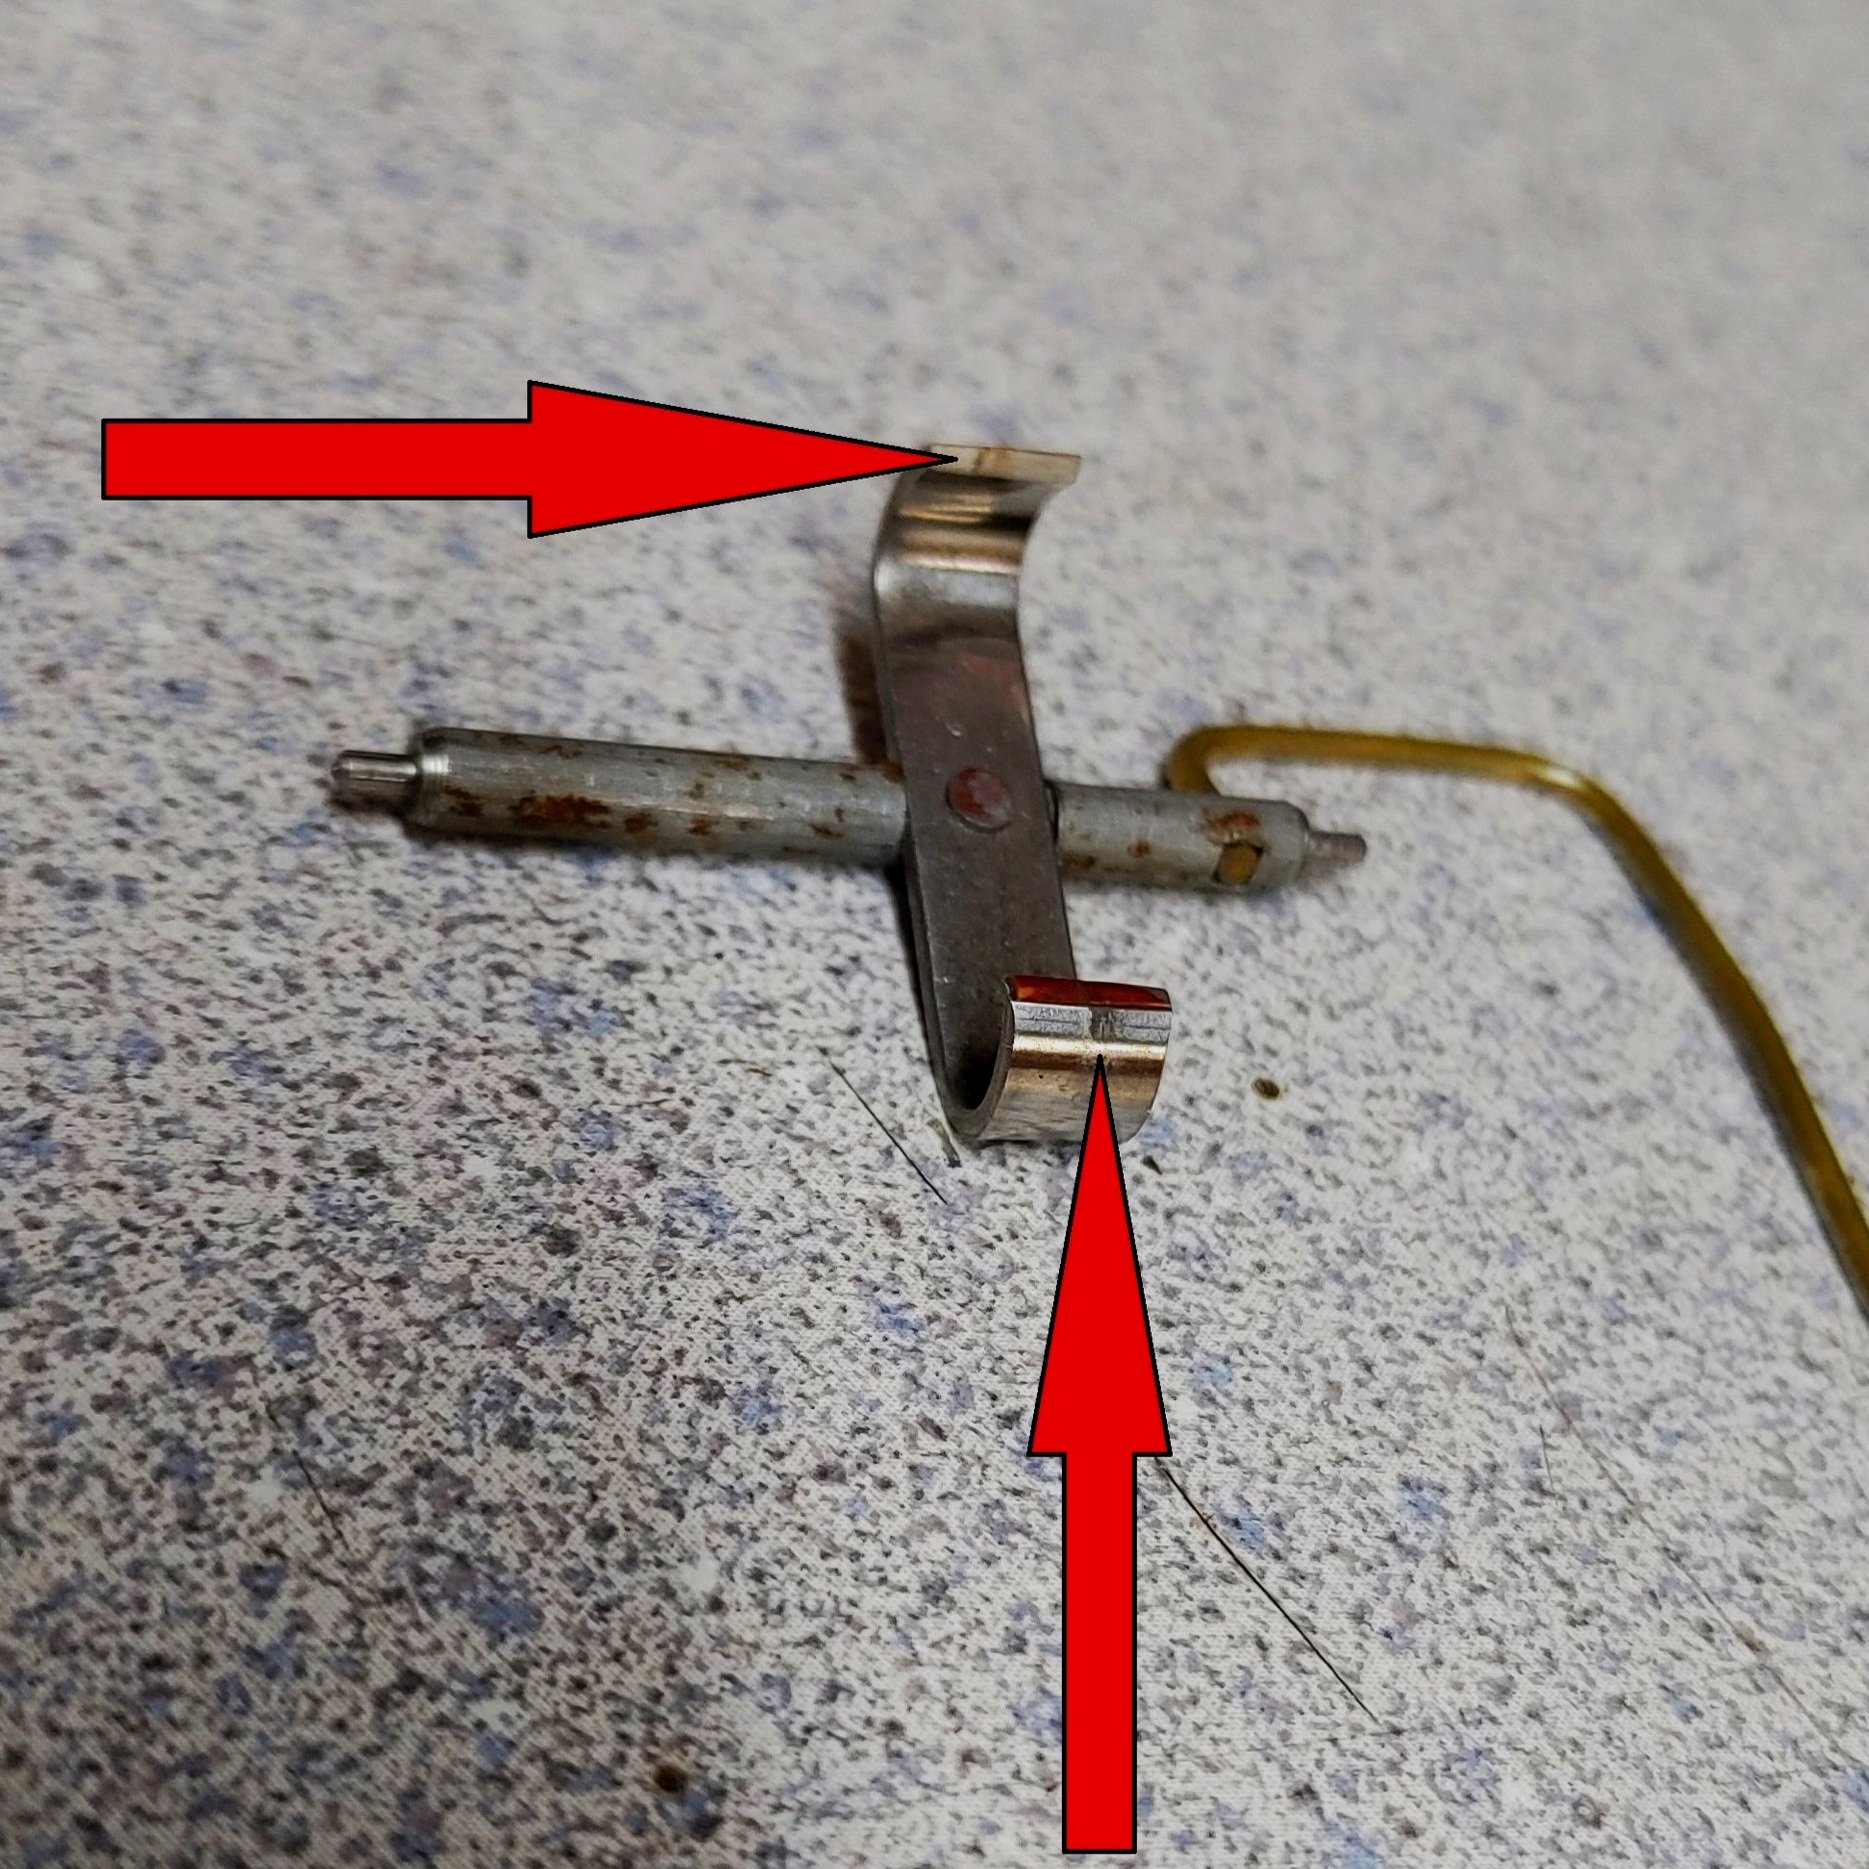
The red arrow in the photo on the left is pointing at a common area of wear on antique striking clocks. Although most clocks like this would have a rut a millimeter or more deep, this example is not that bad. However, you can still see the scarring just under the tip of the arrow. The photo on the right shows the same lever after the scarring has been polished out. This is just one example of eight places where the levers of this clock needed to be polished.


After decades of repair many levers are bent out of shape by well-meaning but untrained “clockmakers”. The photo on the left shows the badly bent levers. The photo on the right shows the same levers after they have been straightened.

Repairing Wear - Part Four
Escapement Pallets
The escapement is made up of two parts: the pallets (sometimes called a verge or anchor) and the escape wheel. These are the parts that make the “tic-toc” sound in a mechanical clock. The action of the escapement is both dividing time into small segments (which cause the hands to move) and providing “impulse” to the pendulum to keep it swinging. Every tic and toc you hear is a brass tooth slamming into the face of the steel pallets. On a seconds beat pendulum (like many grandfather clocks) this is occurring 86,400 times per day! For smaller clocks, that beat faster, this number could easily double. The initial impact and consequent sliding action will create scarring or rutting of the pallet faces. If you are viewing this on a desktop computer, an example of a working escapement (from a different clock type) is shown in the photo at the top of this page.
The wear caused by this action must be filed out and then polished. This is accomplished with a series of emery boards of different grits in a way that removes the least amount of material and maintains the original angles. If too much material is removed, or the angles changed, the pallets must be resurfaced, reshaped or readjusted in order for the escapement to operate in the most efficient manner.
The escapement is often the most highly engineered part of a mechanical clock. This process of resetting an escapement is little understood by many who claim to be able to repair clocks. Escapement resetting and pallet manipulation is one of the more difficult aspects of clock repair for people to master.
The red arrows in the photo on the left show the scarring in the pallet faces caused by the brass escape wheel teeth sliding across the surface. Once again, this clock had less than normal wear in both the levers and the pallets as compared to other clocks of this age. In most cases what we would be seeing here is a rut instead of just a scarring of the pallet surface. The photo on the right shows the same pallets with the scarring polished out.
Potential mainspring Replacement
Weak Mainsprings
Mainsprings are the power supply for most wall and mantel clocks. Mainsprings will slowly lose power over time from being wound and unwound over the course of many decades. A mainspring that has lost power is called a “set” mainspring. A weak or “set” mainspring will cause the clock to work poorly or not run for its full duration (one week for most clocks) and therefore must be replaced. Determining when it is necessary to replace a mainspring is often an educated guess. In most cases, especially with antiques, it is necessary to disassemble a clock in order to replace the mainspring, therefore it is important to choose wisely, or the clockmaker may find that the clock will not run a full week on one winding and necessitate a complete disassembly of the clock that was just recently reassembled.
Broken Mainsprings
Broken mainsprings can most often be repaired if the break is near the outer end of the spring. if the mainspring is in otherwise good condition, it is desirable to use the original spring as it is the right size and strength for the clock. repairing the end will only shorten the overall length of the spring a few inches and will have no noticeable effect on its run time.
The photo below is a comparison of the same length, width and strength of a mainspring from a clock like the one in our sample. The spring on the left is what we call “set”. You can see that the outer diameter is much smaller, and you can also you can see how much tighter the inner coils are as compared to the looser inner coils and larger diameter of the new mainspring on the right. The mainspring on the left is a good candidate for replacement.

Reassembly
Once all the restorative work is complete, all the parts will make a quick trip through the ultrasonic cleaning machine to remove any contaminants like small brass shavings, grit from the various polishing processes, fingerprints or oil from our hands or oil used in the various repair processes. Once this is accomplished everything must be reassembled.
This photo shows all the parts set into their proper places before the rear plate is put on. When the rear plate is lowered onto the various gears and levers all fifteen pivots must be guided into the appropriate bearing holes and then the nuts or taper pins put in place to hold everything together.
The rear plate is now in position and the clock is ready for the next step, synchronizing.
Synchronize
naturally, each gear has its very specific place where it sits in the plates. Additionally, any gears that are in a strike or chime train must be “synchronized”. This means that these gears must be turned in specific directions so that the gears mesh with each other in just the right place. The gears, levers, pins and cams must be aligned correctly for the gear train to operate properly. Because there are many people who enter this trade that have little or no training, this is another area of failure for many who claim they have the ability to repair a clock.
This part of a rebuild is difficult to show through photos alone in a way that it would make any sense, so I have none to show here.

Fine Tuning of Levers and Escapement
Now that the clock is fully assembled and synchronized there are a few things that must be fine-tuned. Remember when we showed you how we straighten badly bent levers? These levers must now be bent neatly to interact precisely with other levers, as well as pins or cams on the gears. The proper adjustment of these levers will affect whether a strike hammer lifts too high, not high enough or just right. Some levers will need adjusting so that they will properly stop the chime or strike at the end of their sequence without leaving a hammer hung up in the air. Still other levers (in chime clocks) must be adjusted so that the self-synchronization will occur correctly. Also, for chime clocks, the chime cylinder must be aligned so that the clock will play the right sequence of notes. Still other levers control the exact point where the strike train is released. obviously, we want the strike to occur as close to the hour or half hour as possible and for chime clocks, as close to the quarter hours as possible.
We must also fine tune the escapement. We have already polished out the ruts but now we may need to manipulate the pallets for proper “lock, drop and lift”.
We see many, so called “rebuilds” come into our shop with errors in these areas all the time. Remember, as we stated at the top of this page, “all overhauls are not created equally”. There are surely a fair number of well qualified clockmakers who can repair your clock properly but there are far more that cannot. Unfortunately, it is difficult for many clock repair consumers to know one from the other. for this reason, it is important to choose wisely when selecting someone you can trust to work on your clock.

Oiling
If you want to hear a lively, often heated discussion, get in a room full of clockmakers talking about clock oil. There are several well-known makers of quality clock oils. Some clock oils have very specific formulations that work best with certain steel and brass combinations. Some movement manufacturers recommend specific oil types be used with their clocks. for this reason, we have several oil types and brands. In the past, most oils were “fat” based, meaning the oils were derived from the fat of animals, most often whales and sometimes porpoises! These types of oils could spoil or putrefy, often turning green. Most clockmakers today used synthetic oils which do not spoil. Friction, wear and lubrication are very important concepts in the repair of clocks (or indeed any machine). This area of study is called tribology, and many hours can be spent in research and study of this very deep subject.
Now that the clock is assembled, synchronized and fine-tuned the clock must be oiled…with proper oils. No sewing machine oil, 3 in One or WD-40 please! In most cases, a single drop of oil on each pivot point is all that is necessary. too much oil will simply run out of the hole and attract extra dirt.
Mounting the movement into the case
Now it is time to mount the movement into the case. In most instances we will dust out the inside and outside of the case and clean the glass. We offer thorough case cleaning and brass polishing for an additional fee. See our “Before and After Cases” page for examples of this work. Once the movement is secured into the case and the hands aligned and mounted on the hand shafts, there are yet further adjustments that need to be made. The pendulum’s beat must be set for a level surface and any hammers must be adjusted to strike the gongs, bells or chime rods for the clearest tone.
We will then place a maintenance sticker on the clock to encourage our customers to allow us to maintain the clock for them. With regular maintenance (every three to five years) we can prevent the clock from building up excessive amounts of dirt, keep the clock lubricated, recheck the many adjustments previously described and possibly correct future problems before they occur.
Lastly, because we are quite proud of our work, we will place our initials and a date somewhere on the rear of the clock, in very small print with a pencil. This is a tradition that has been followed by clockmakers for hundreds of years. We do not inscribe it permanently onto the movement like some do as we do not wish to scar the clock mechanism. This mark helps the clockmaker, in the absence of a receipt, to know what was done to the clock and when the job was completed.
On the left you can see the movement mounted inside the clock case. On the right you see the front of the case with the movement mounted and the hands attached ready for testing. Although we dusted of this case, the customer did not ask us to polish the case or the brass bezel but it still looks pretty good!


testing The Clock
Testing of the clock after repair is critical. Proper testing allows us to get the clock regulated fairly accurately before the owner takes it home and make sure the clock performs all functions for the full length of the designed run time (one week in most cases). We also want to be sure that at the end of the run the clock is still chiming and or striking in synch with the hand position. Should something fail, we have a chance to make corrections before the clock leaves the shop. In most cases one week of testing is adequate. Sometimes we will find it helpful to run it for several weeks to ensure consistency or proper function.
Before and After Photos
Now we can see examine how our restorative work compares to the un-restored movement. If you have a valued clock, whether antique or modern, and would like to have us perform a quality repair like the one you have seen in this example please give us a call. We love bringing old, tired and worn-out clocks back to their former glory and restoring memories for our valued customers.