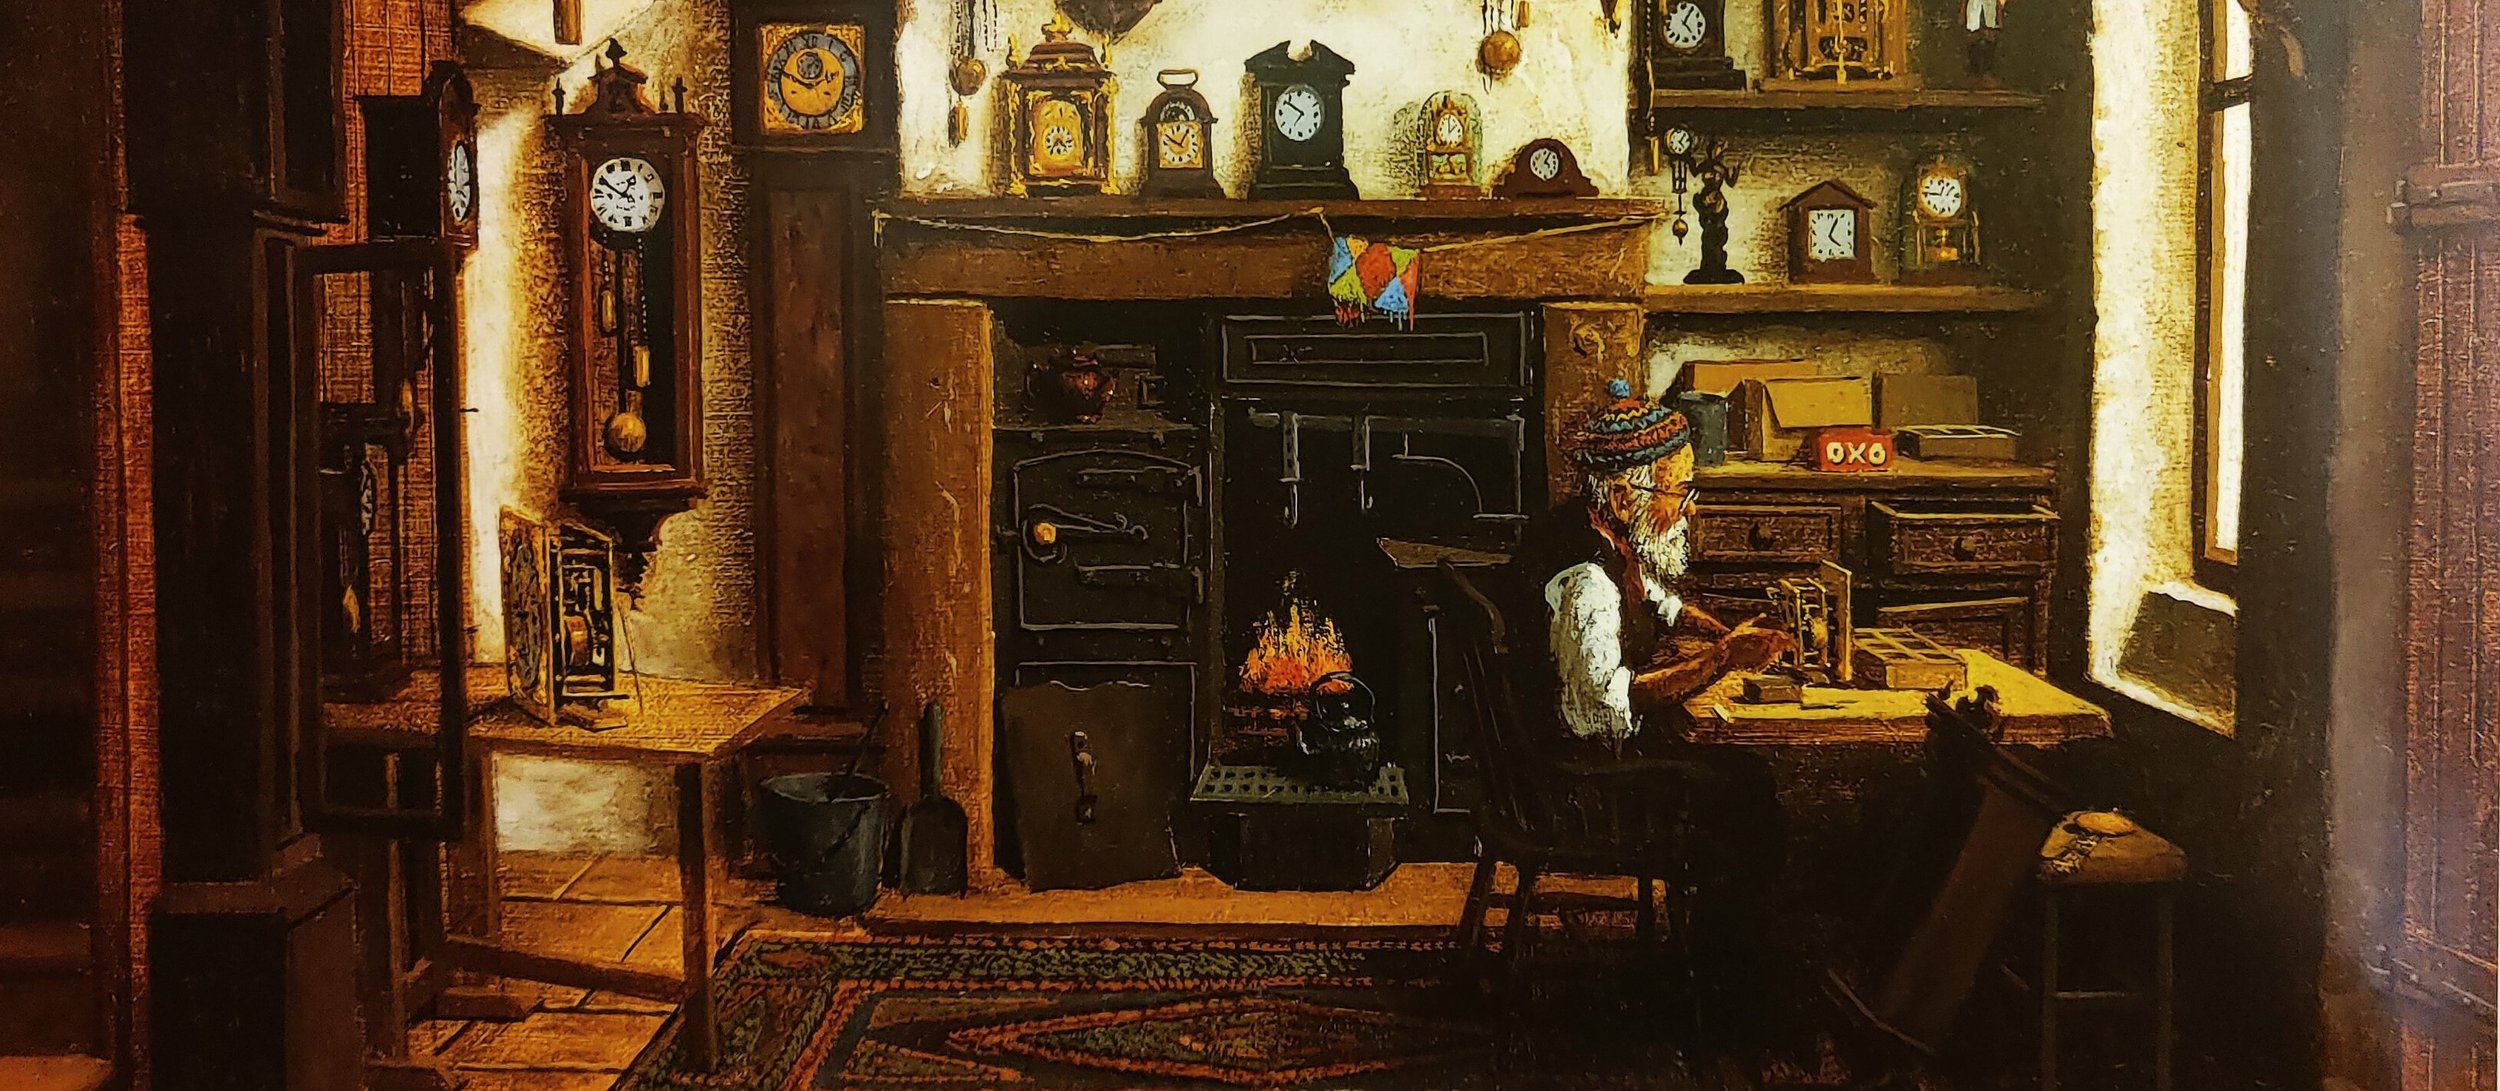
The Art Of Clock Repair

Painting above by Jim Andrew
For some clockmakers, getting the clock to function is their only concern. (For examples of this mind set, see our “Hall of Shame” page.) For other clockmakers, like Michael, there is an attempt to perform repairs, in not only the most durable and functional fashion, but also, in an artful manner. Whether it is drawing, painting, building model kits or repairing clocks, Michael's personality leans toward detail, art and taking great pride in everything he does. For examples of some of his hobbies go to “Michael's Hobbies” page. Below are some examples of work that he has performed that showcase this concept.
Unusual and Extraordinary Repairs
The “Art” of Clock Repair
This page is designed to offer a glimpse into the more difficult and time-consuming aspects of clock repair that the general public rarely sees.
Most of what a clock repair person does on a daily basis is quite routine. Everything we need is there, we just need to rebuild it, clean it, oil it, or adjust it. Occasionally we run into a situation where a part is so badly damaged that it must be completely remade from raw materials, other times, it can be repaired using creative restorative principals. This is often necessary because we simply cannot obtain replacement parts for most antique clocks. Michael is not a machinist, although he surely has some machining skills. For this reason, he does not claim that everything shown here has reached the perfection that he strives for, but I think you will see that the work was done with much more accuracy and skill than the previous person’s work, which Michael is trying to repair.
The teeth on the various gears inside a clock are vulnerable to damage due to shock from dropping, mainsprings breaking or from misguided attempts at repair. Let’s look at a few examples of this type of work.
Teeth replacement
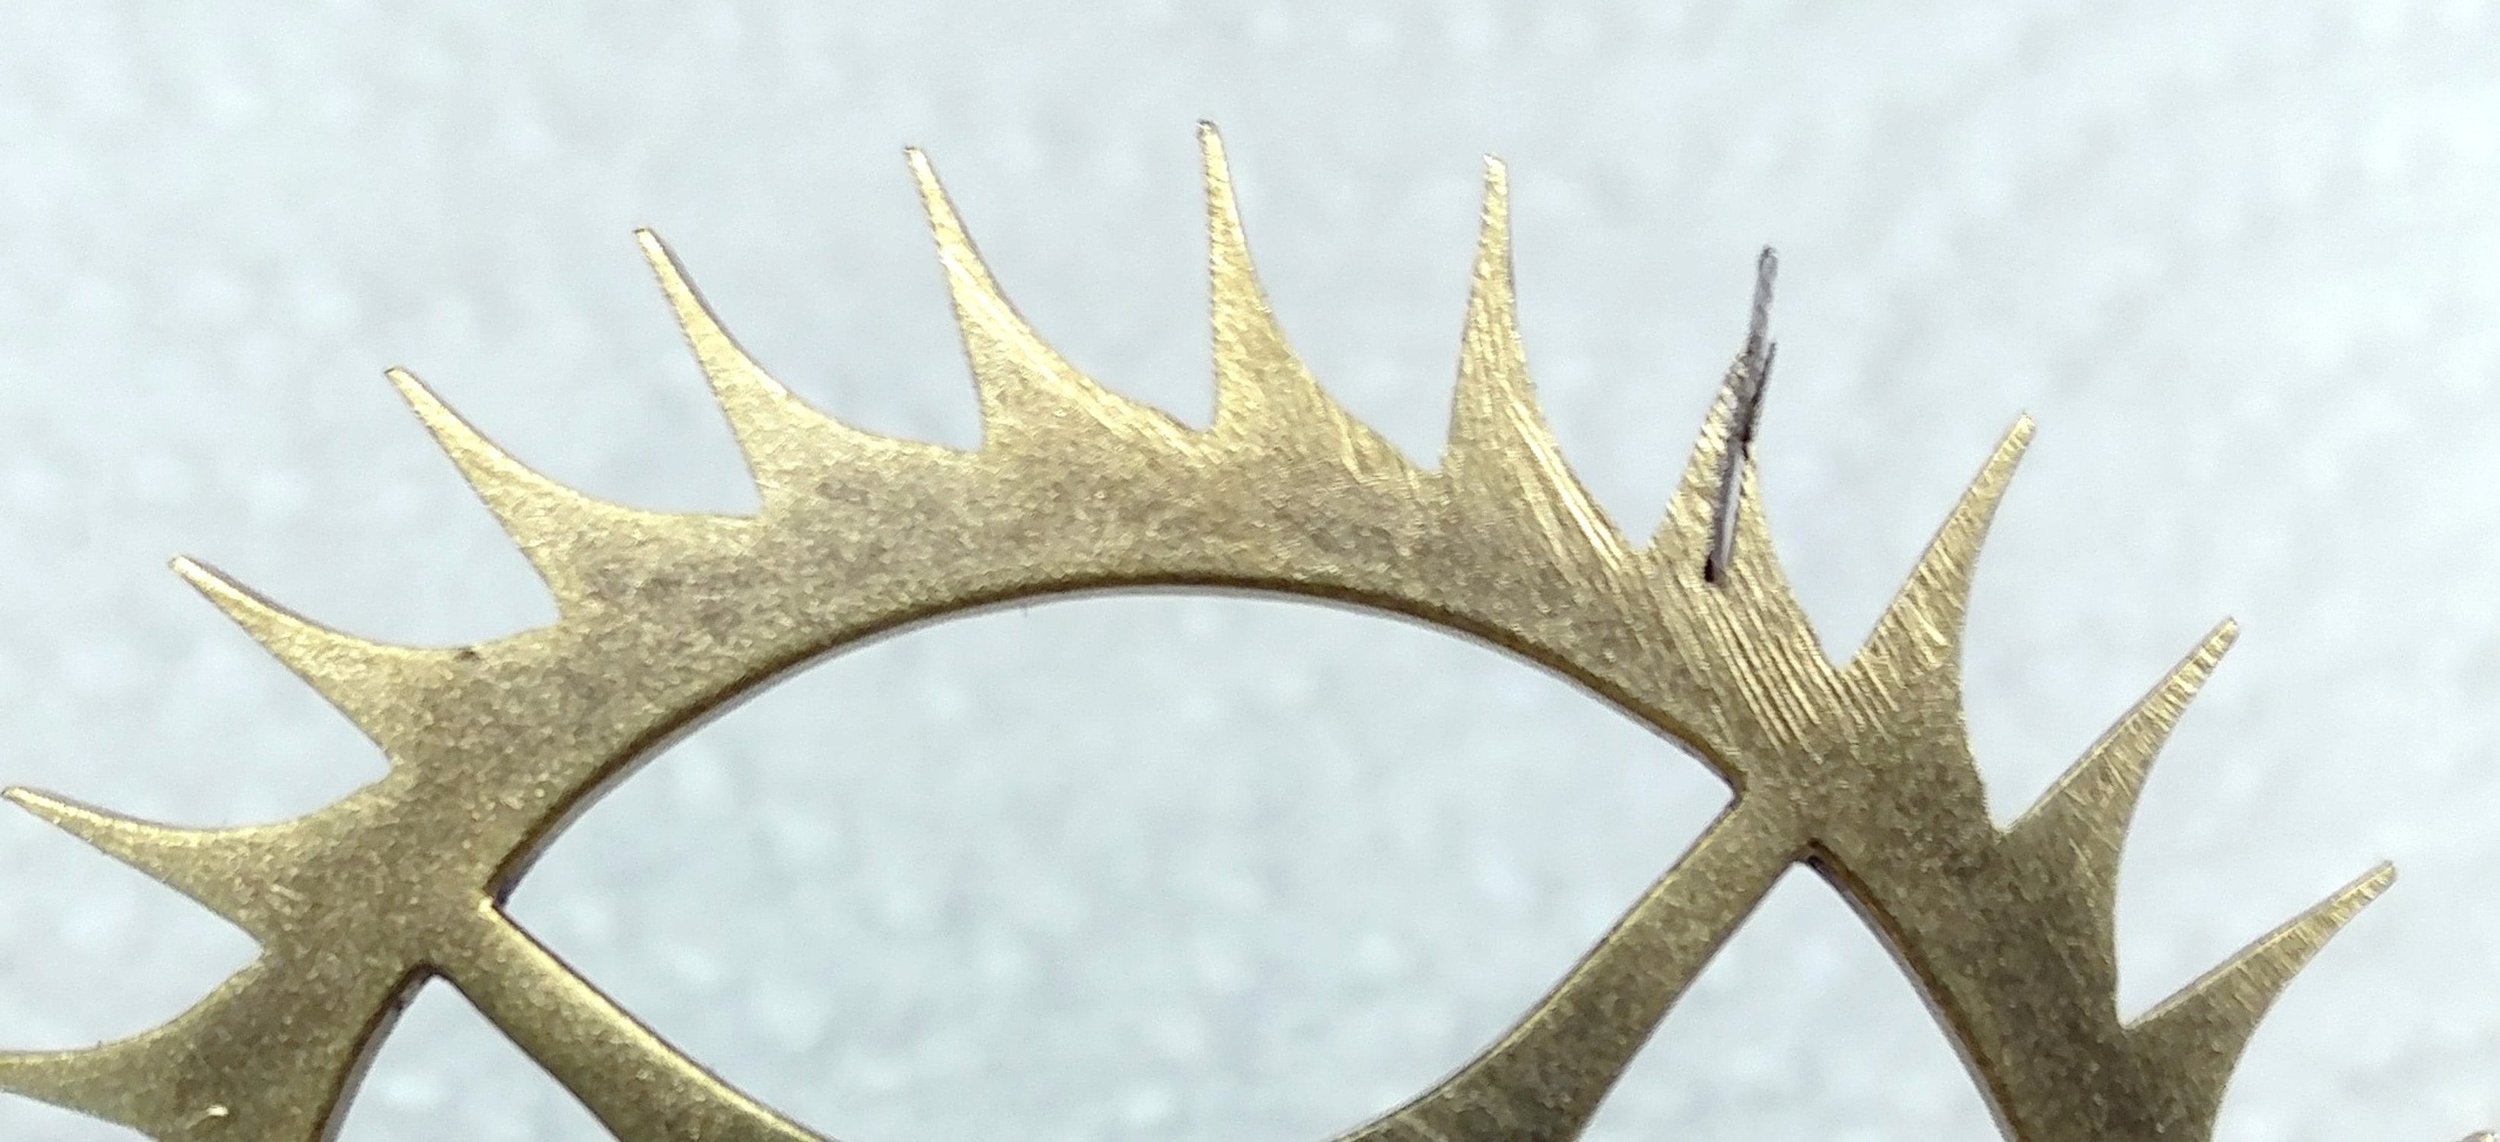

Escape Wheel
The teeth on escape wheels are more vulnerable to damage than most as the teeth are typically much finer and often sharper. On the left below, we see that someone has made a thin slit where the broken tooth tip was and replaced it with a thin sliver of steel, probably a piece of old mainspring. Steel is not the appropriate type of metal to use since the original material, brass, is much preferred. A steel tooth will do more damage to the part that it interacts with, a part called the pallets which are also made of steel. The photo on the right shows the repair done properly and with brass. A wider, neater slit was made, and a piece of brass sized to fit the gap was inserted, soldered in place and then filed to shape. The actual size of this escape wheel is about the size of a quarter. If this photo was the actual size, you likely would never notice that this wheel had ever been repaired.
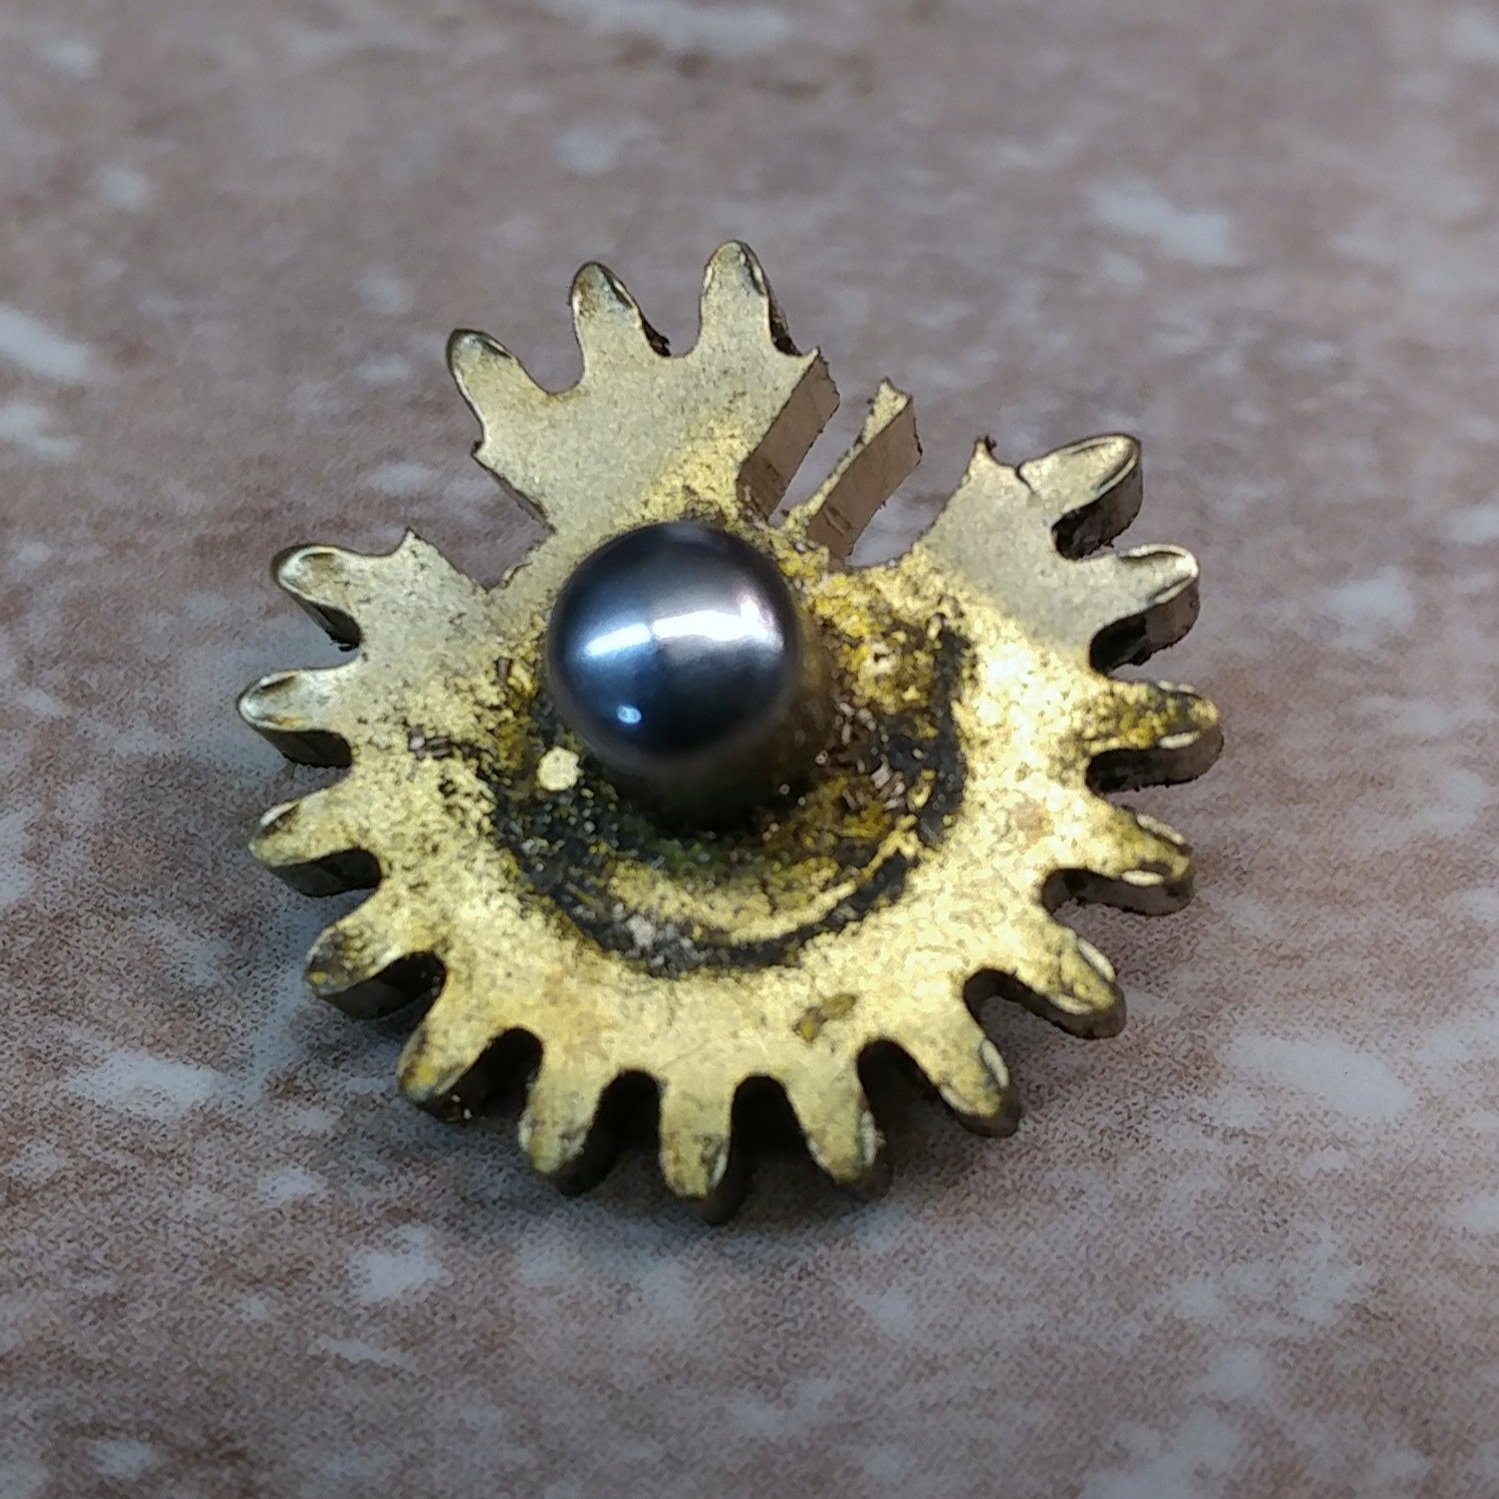
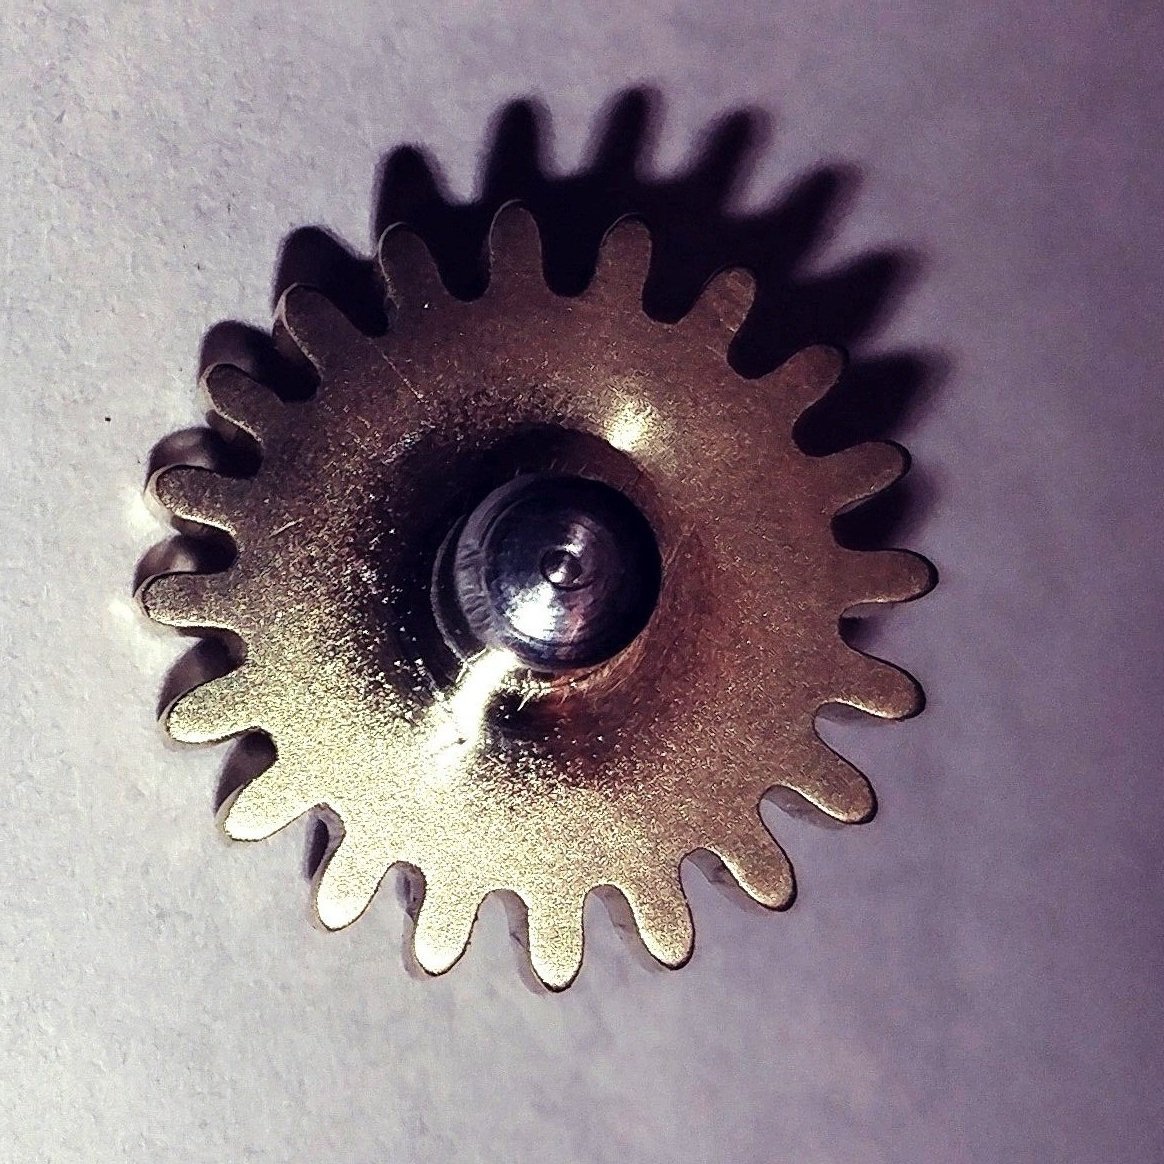
Winding wheel
This is an intermediate wheel used to aid in winding of the clocks’ mainspring. Sometimes, through abuse, these teeth will get bent or break off. The first photo shows rough slits made where the broken teeth used to be. The middle photo shows rough “plugs” inserted and then soldered in place. Notice we did not use “blobs” of solder, like you will see on the “Hall of Shame” page of our web site. The photo on the right shows the plugs filed to proper shape and then the wheel polished to remove any excess solder. You can still see a faint outline from the single tooth, but the two-tooth section is invisible even at this magnification. This winding wheel is about the size of a nickel.

Damaged Mainspring Barrel Teeth Repair
Slide Show
-
![In home grandfather clock repair near me. Master Clock Repair Columbus, Ohio]()
Before repair. Poorly Repaired Barrel Teeth
-
![Clock Repair Near Me by Master Clock Repair of Columbus, Ohio]()
After Repair. Beautiful right? Now let's see how it was done!
-
![Clock Repair Near Me by Master Clock Repair of Columbus, Ohio]()
Poorly Repaired Teeth intruding on the Inside of the Barrel
-
![Clock Repair Near Me by Master Clock Repair of Columbus, Ohio]()
Bad Teeth Removed
-
![Clock Repair Near Me by Master Clock Repair of Columbus, Ohio]()
Slits made to receive replacement teeth
-
![Clock Repair Near Me by Master Clock Repair of Columbus, Ohio]()
Plugs Inserted Awaiting Solder
-
![Clock Repair Near Me by Master Clock Repair of Columbus, Ohio]()
Our plugs intrude into the barrel as well but we will remove the excess material before the job is done.
-
![Clock Repair Near Me by Master Clock Repair of Columbus, Ohio]()
Plugs soldered in place. The process of removing extra material from the plugs begins.
-
![Clock Repair Near Me by Master Clock Repair of Columbus, Ohio]()
Showing the plugs on the side of the round barrel. We must remove excess material here as well.
-
![Clock Repair Near Me by Master Clock Repair of Columbus, Ohio]()
More material removed, the plugs are beginning to take their proper shape.
-
![Clock Repair Near Me by Master Clock Repair of Columbus, Ohio]()
Showing almost all the material removed from the round part of the barrel and the overall tooth height has been shortened
-
![Clock Repair Near Me by Master Clock Repair of Columbus, Ohio]()
In my effort to blend the teeth with the flat part of the barrel, I went a little too deep. This will cost me extra work later.
-
![Clock Repair Near Me by Master Clock Repair of Columbus, Ohio]()
Showing the side of the barrel again as the plugs on the side are starting to disappear. The teeth being repaired are still flat at their tips.
-
![Clock Repair Near Me by Master Clock Repair of Columbus, Ohio]()
Beginning to form the tips of the teeth into their proper shape. This is done by hand with a fine file.
-
![Clock Repair Near Me by Master Clock Repair of Columbus, Ohio]()
A view of the teeth tips showing them rounded, yet with a dull "knife edge" at the very top to match the other teeth.
-
![Clock Repair Near Me by Master Clock Repair of Columbus, Ohio]()
All excess material has been removed, the teeth tips are properly formed and all the work has been sanded and polished smooth.
-
![Clock Repair Near Me by Master Clock Repair of Columbus, Ohio]()
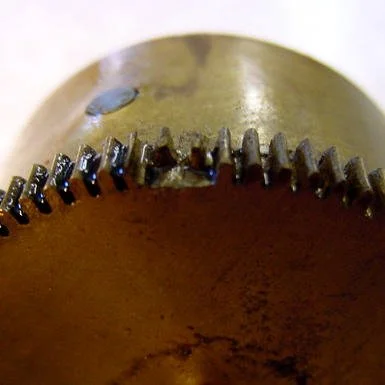
Close up of the completed work. Very minor imperfections are visible at this extreme magnification. Overall, I am very pleased. The work was completed neatly and artfully.
-
![Clock Repair Near Me by Master Clock Repair of Columbus, Ohio]()
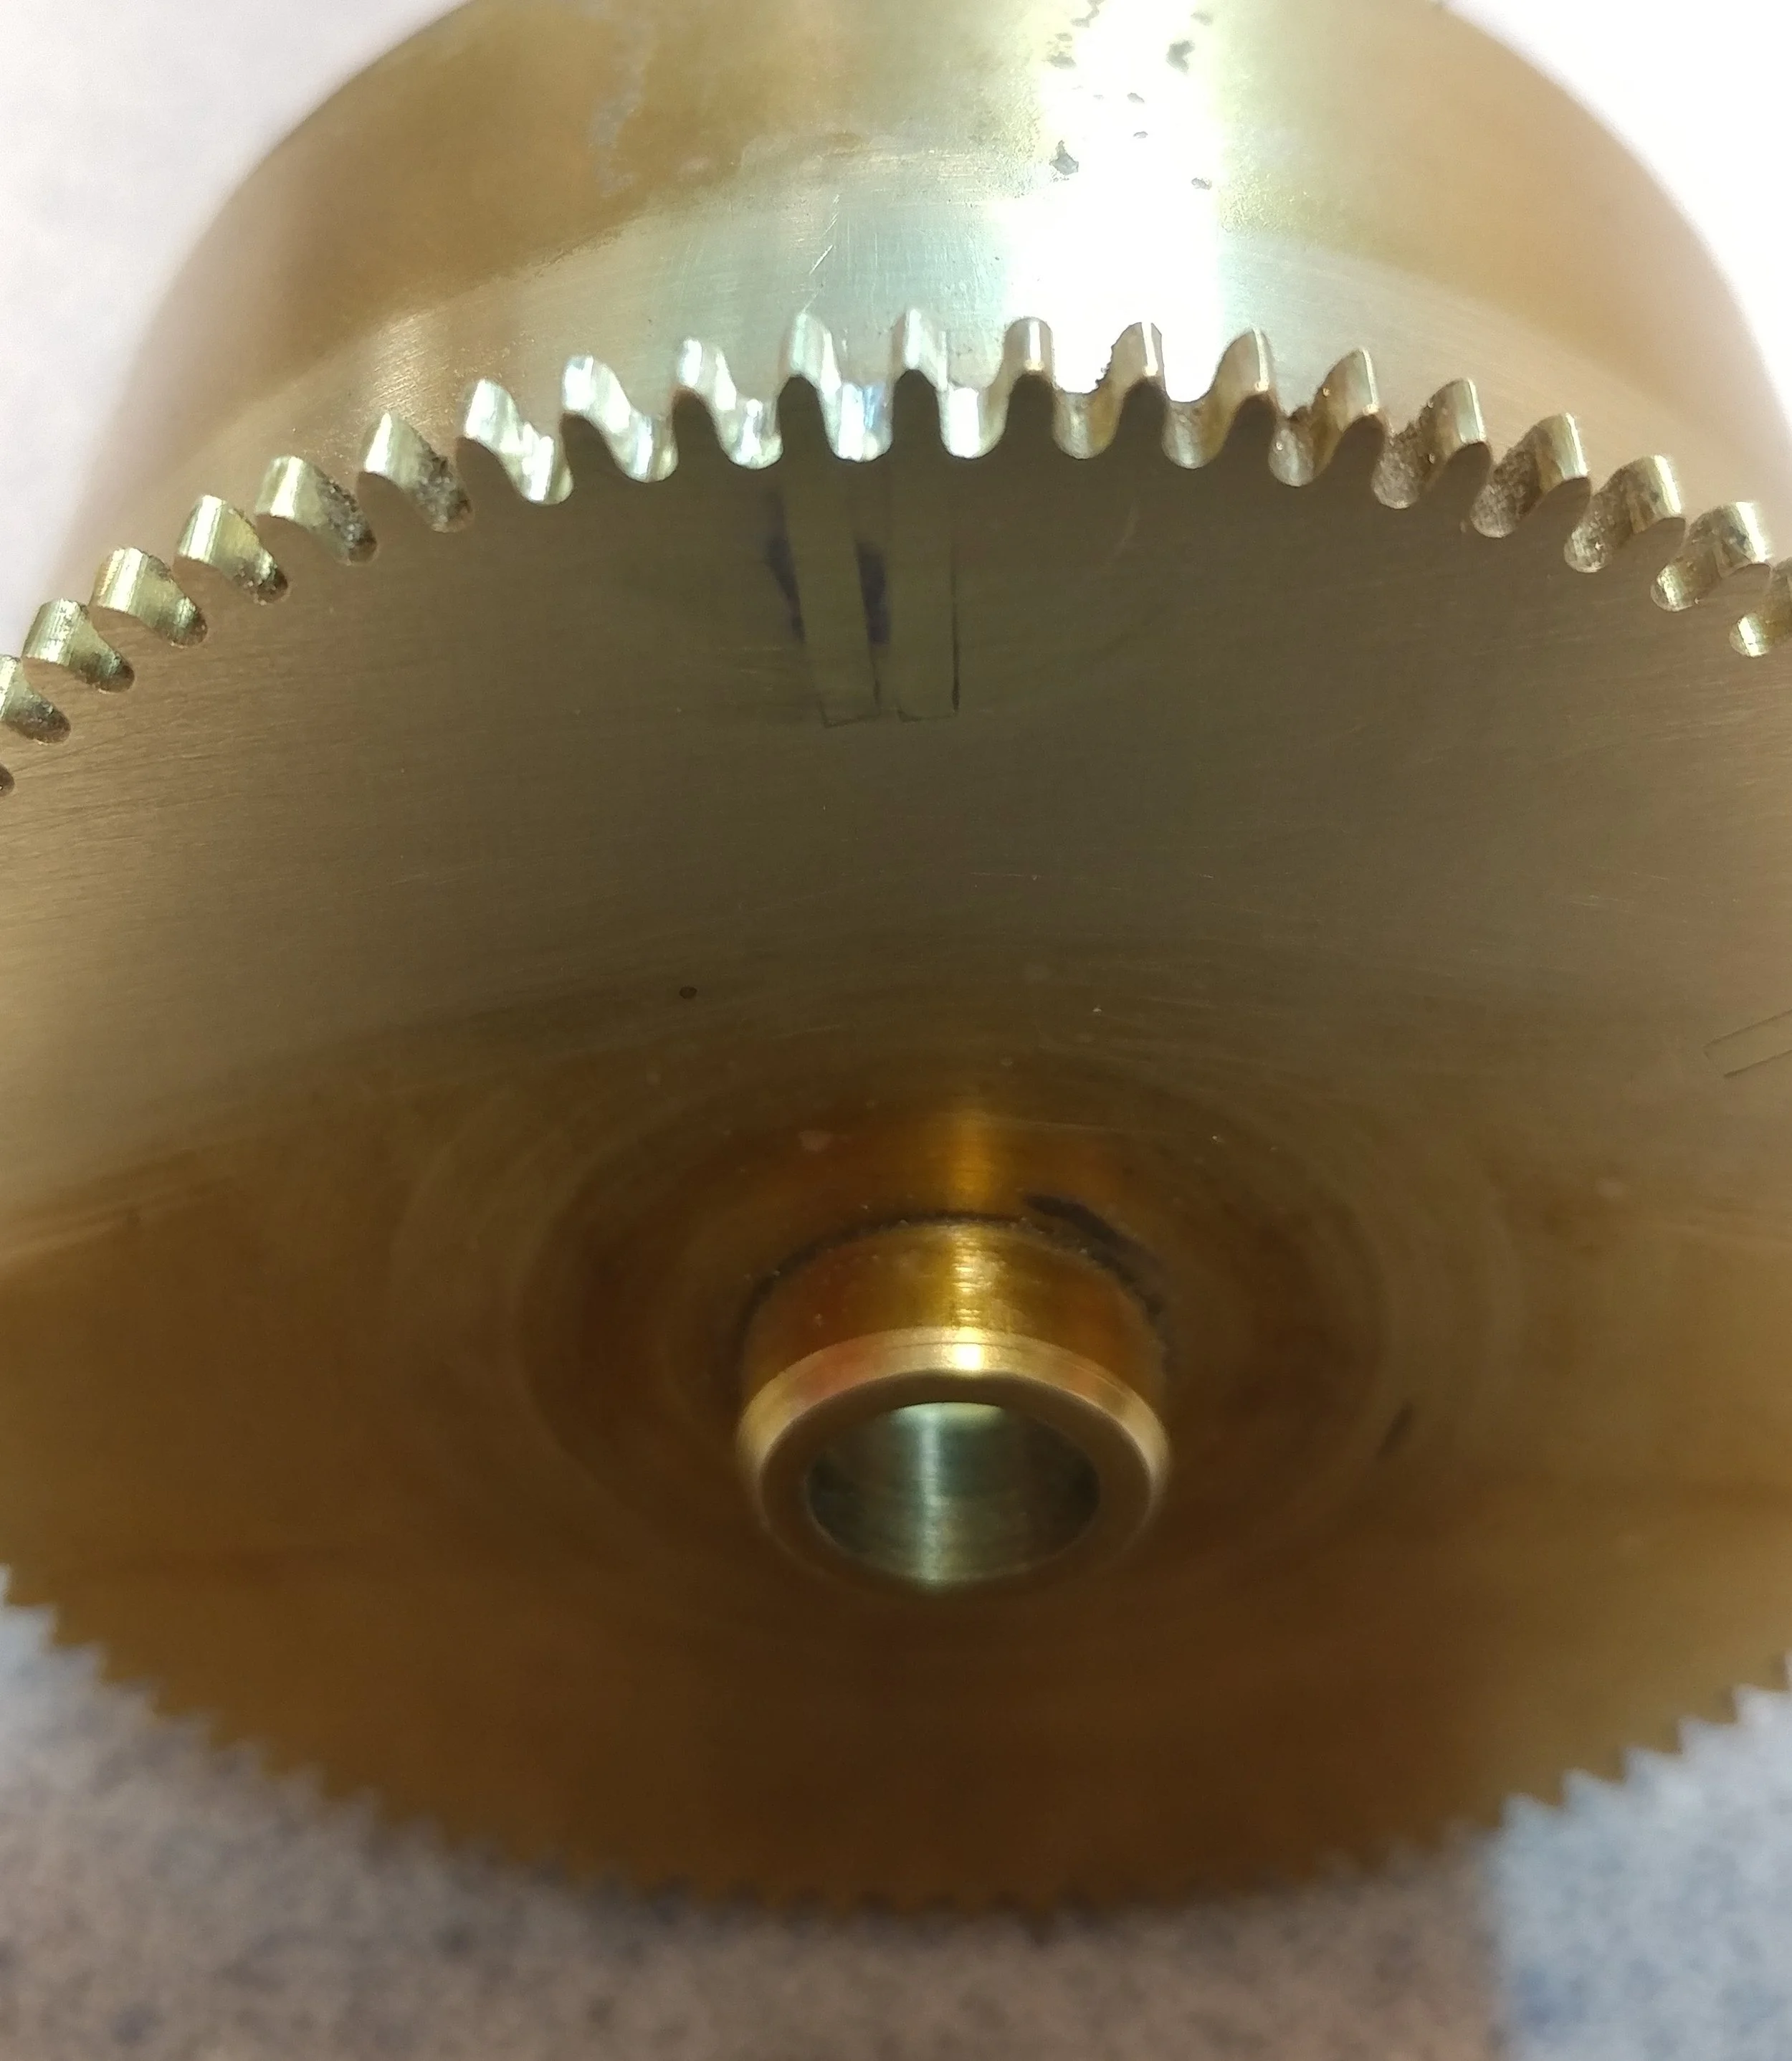
Showing the finish on the side of the barrel. The rectangular lines where the plugs were inserted are barely visible near the top of the photo.


Replacing Teeth on an Hour Wheel attached to a Snail
This part of the clock, close to 200 years old, tells the clock how many times to strike on the hour. You can see that the brass piece on top actually looks like a snail shell, hence the term “snail”.
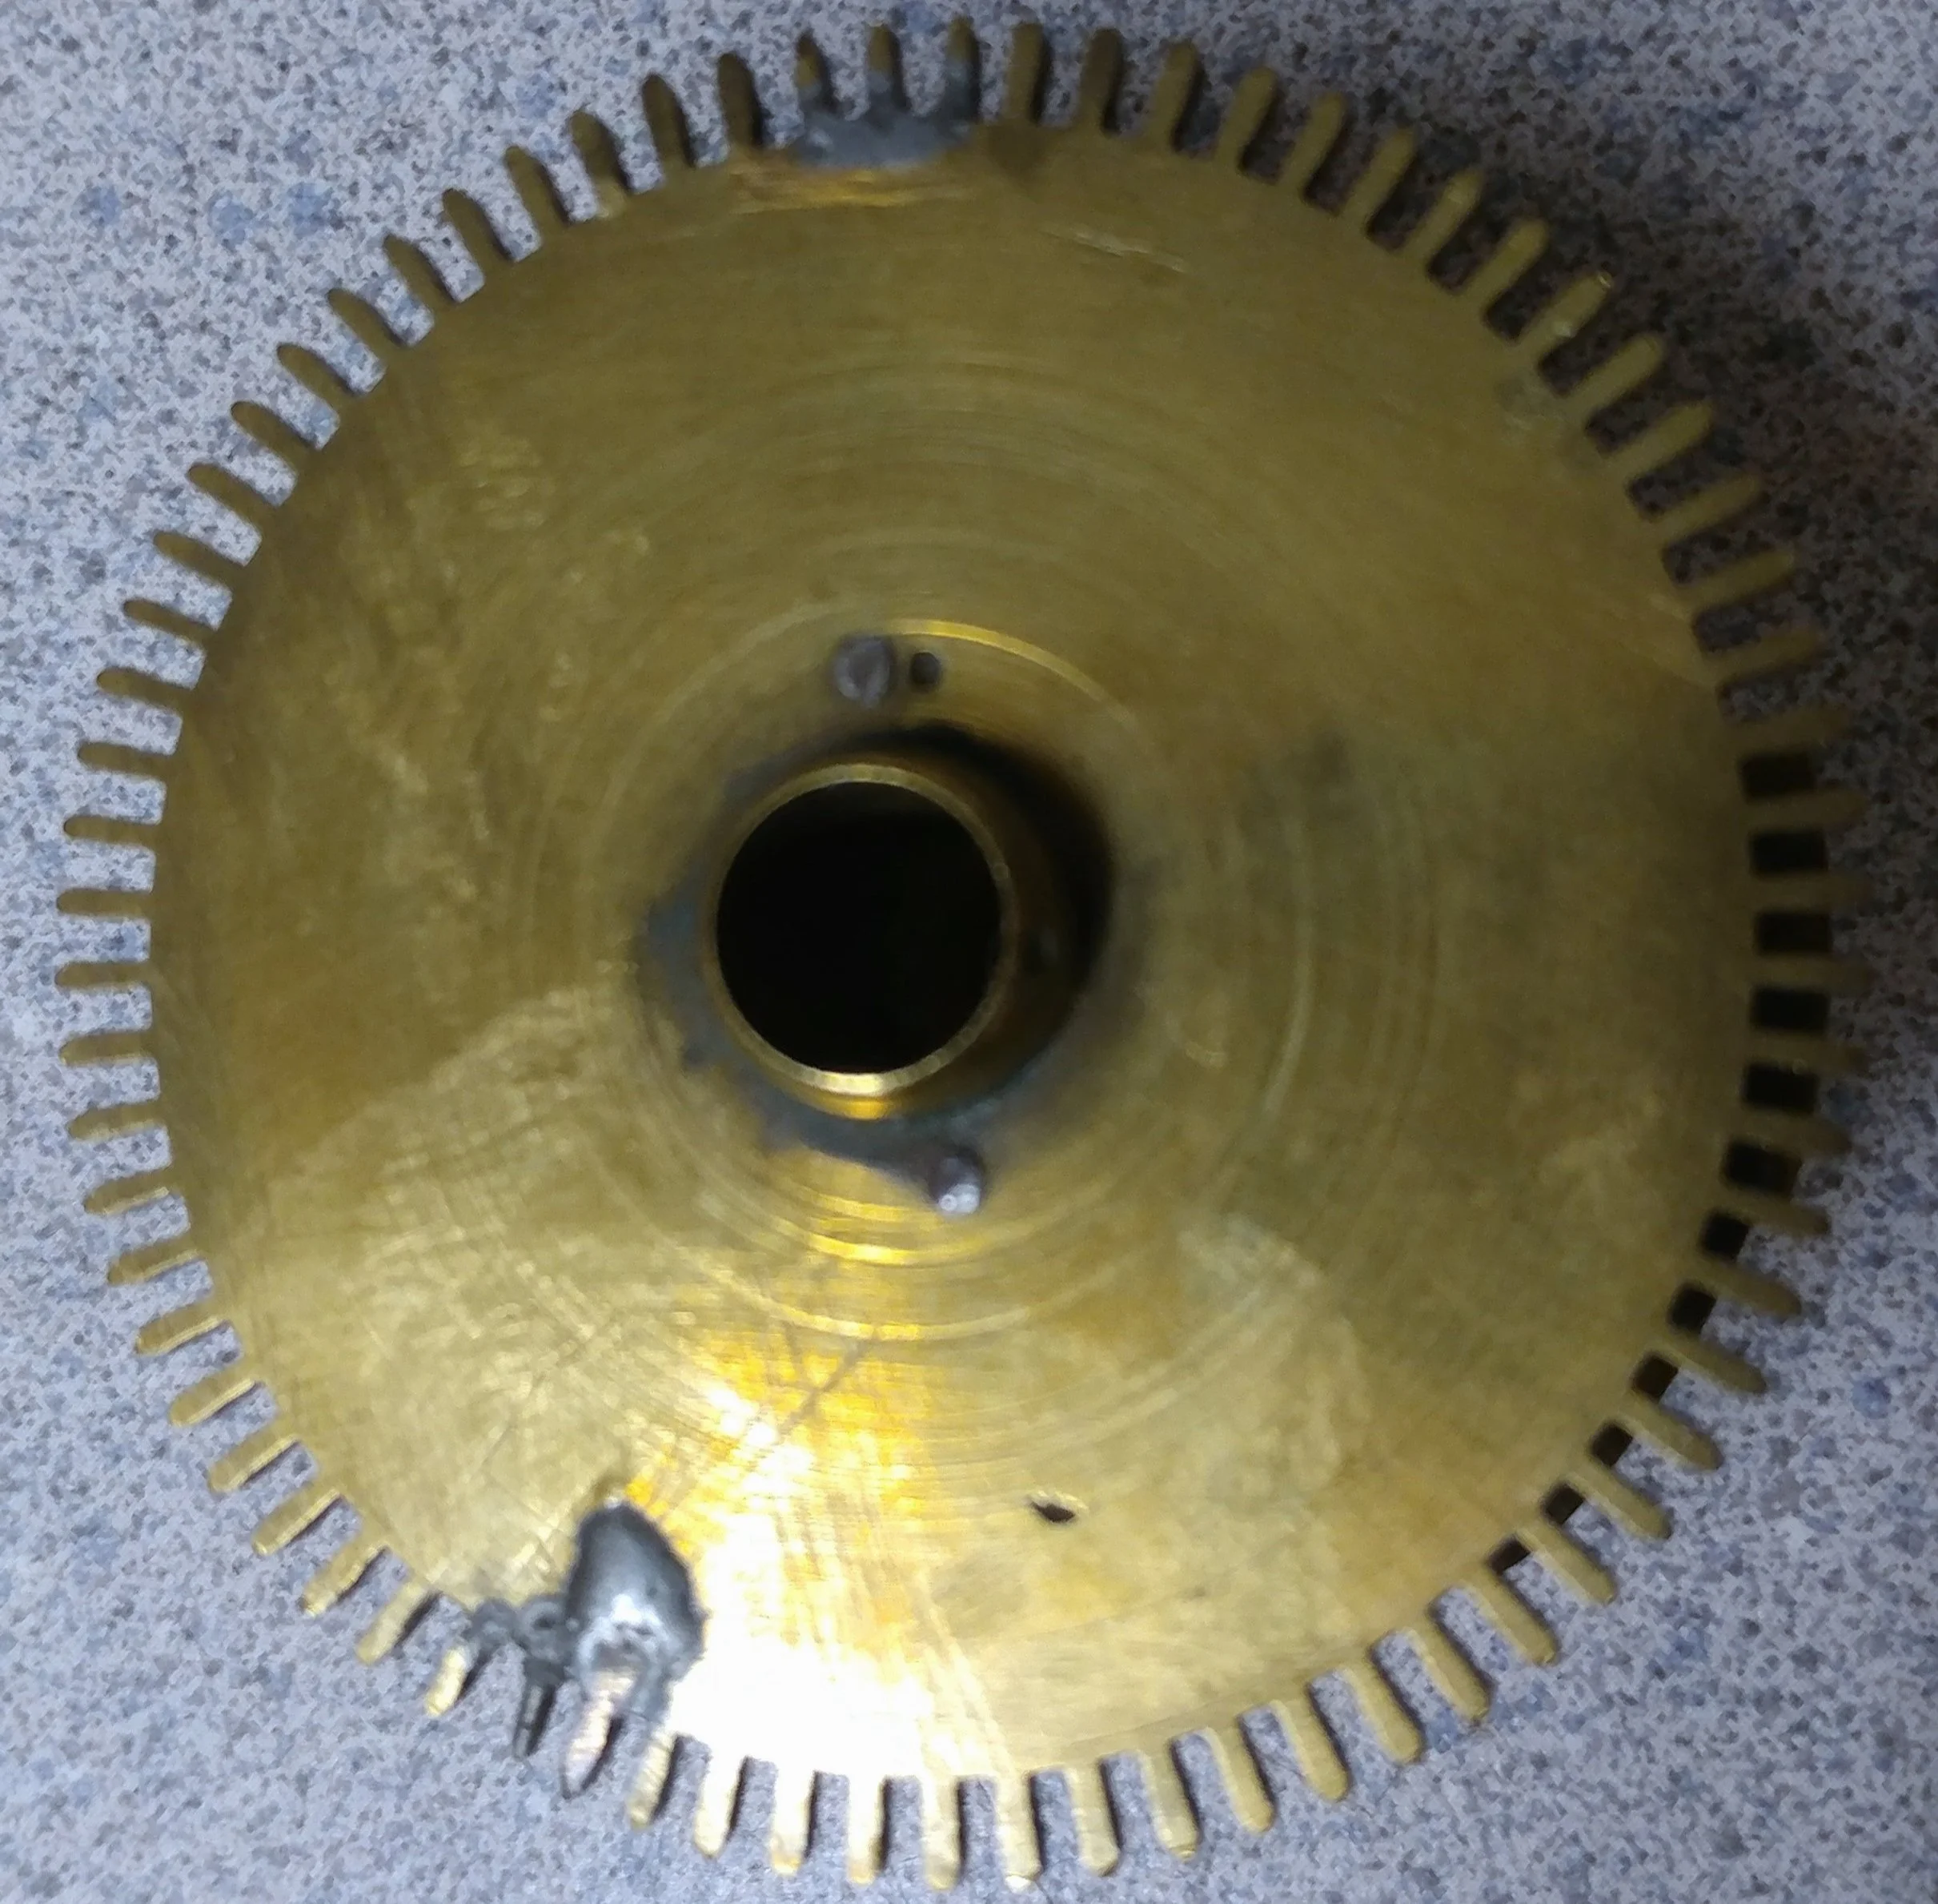
photo one shows the poorly repaired teeth visible by the solder near the top and bottom.
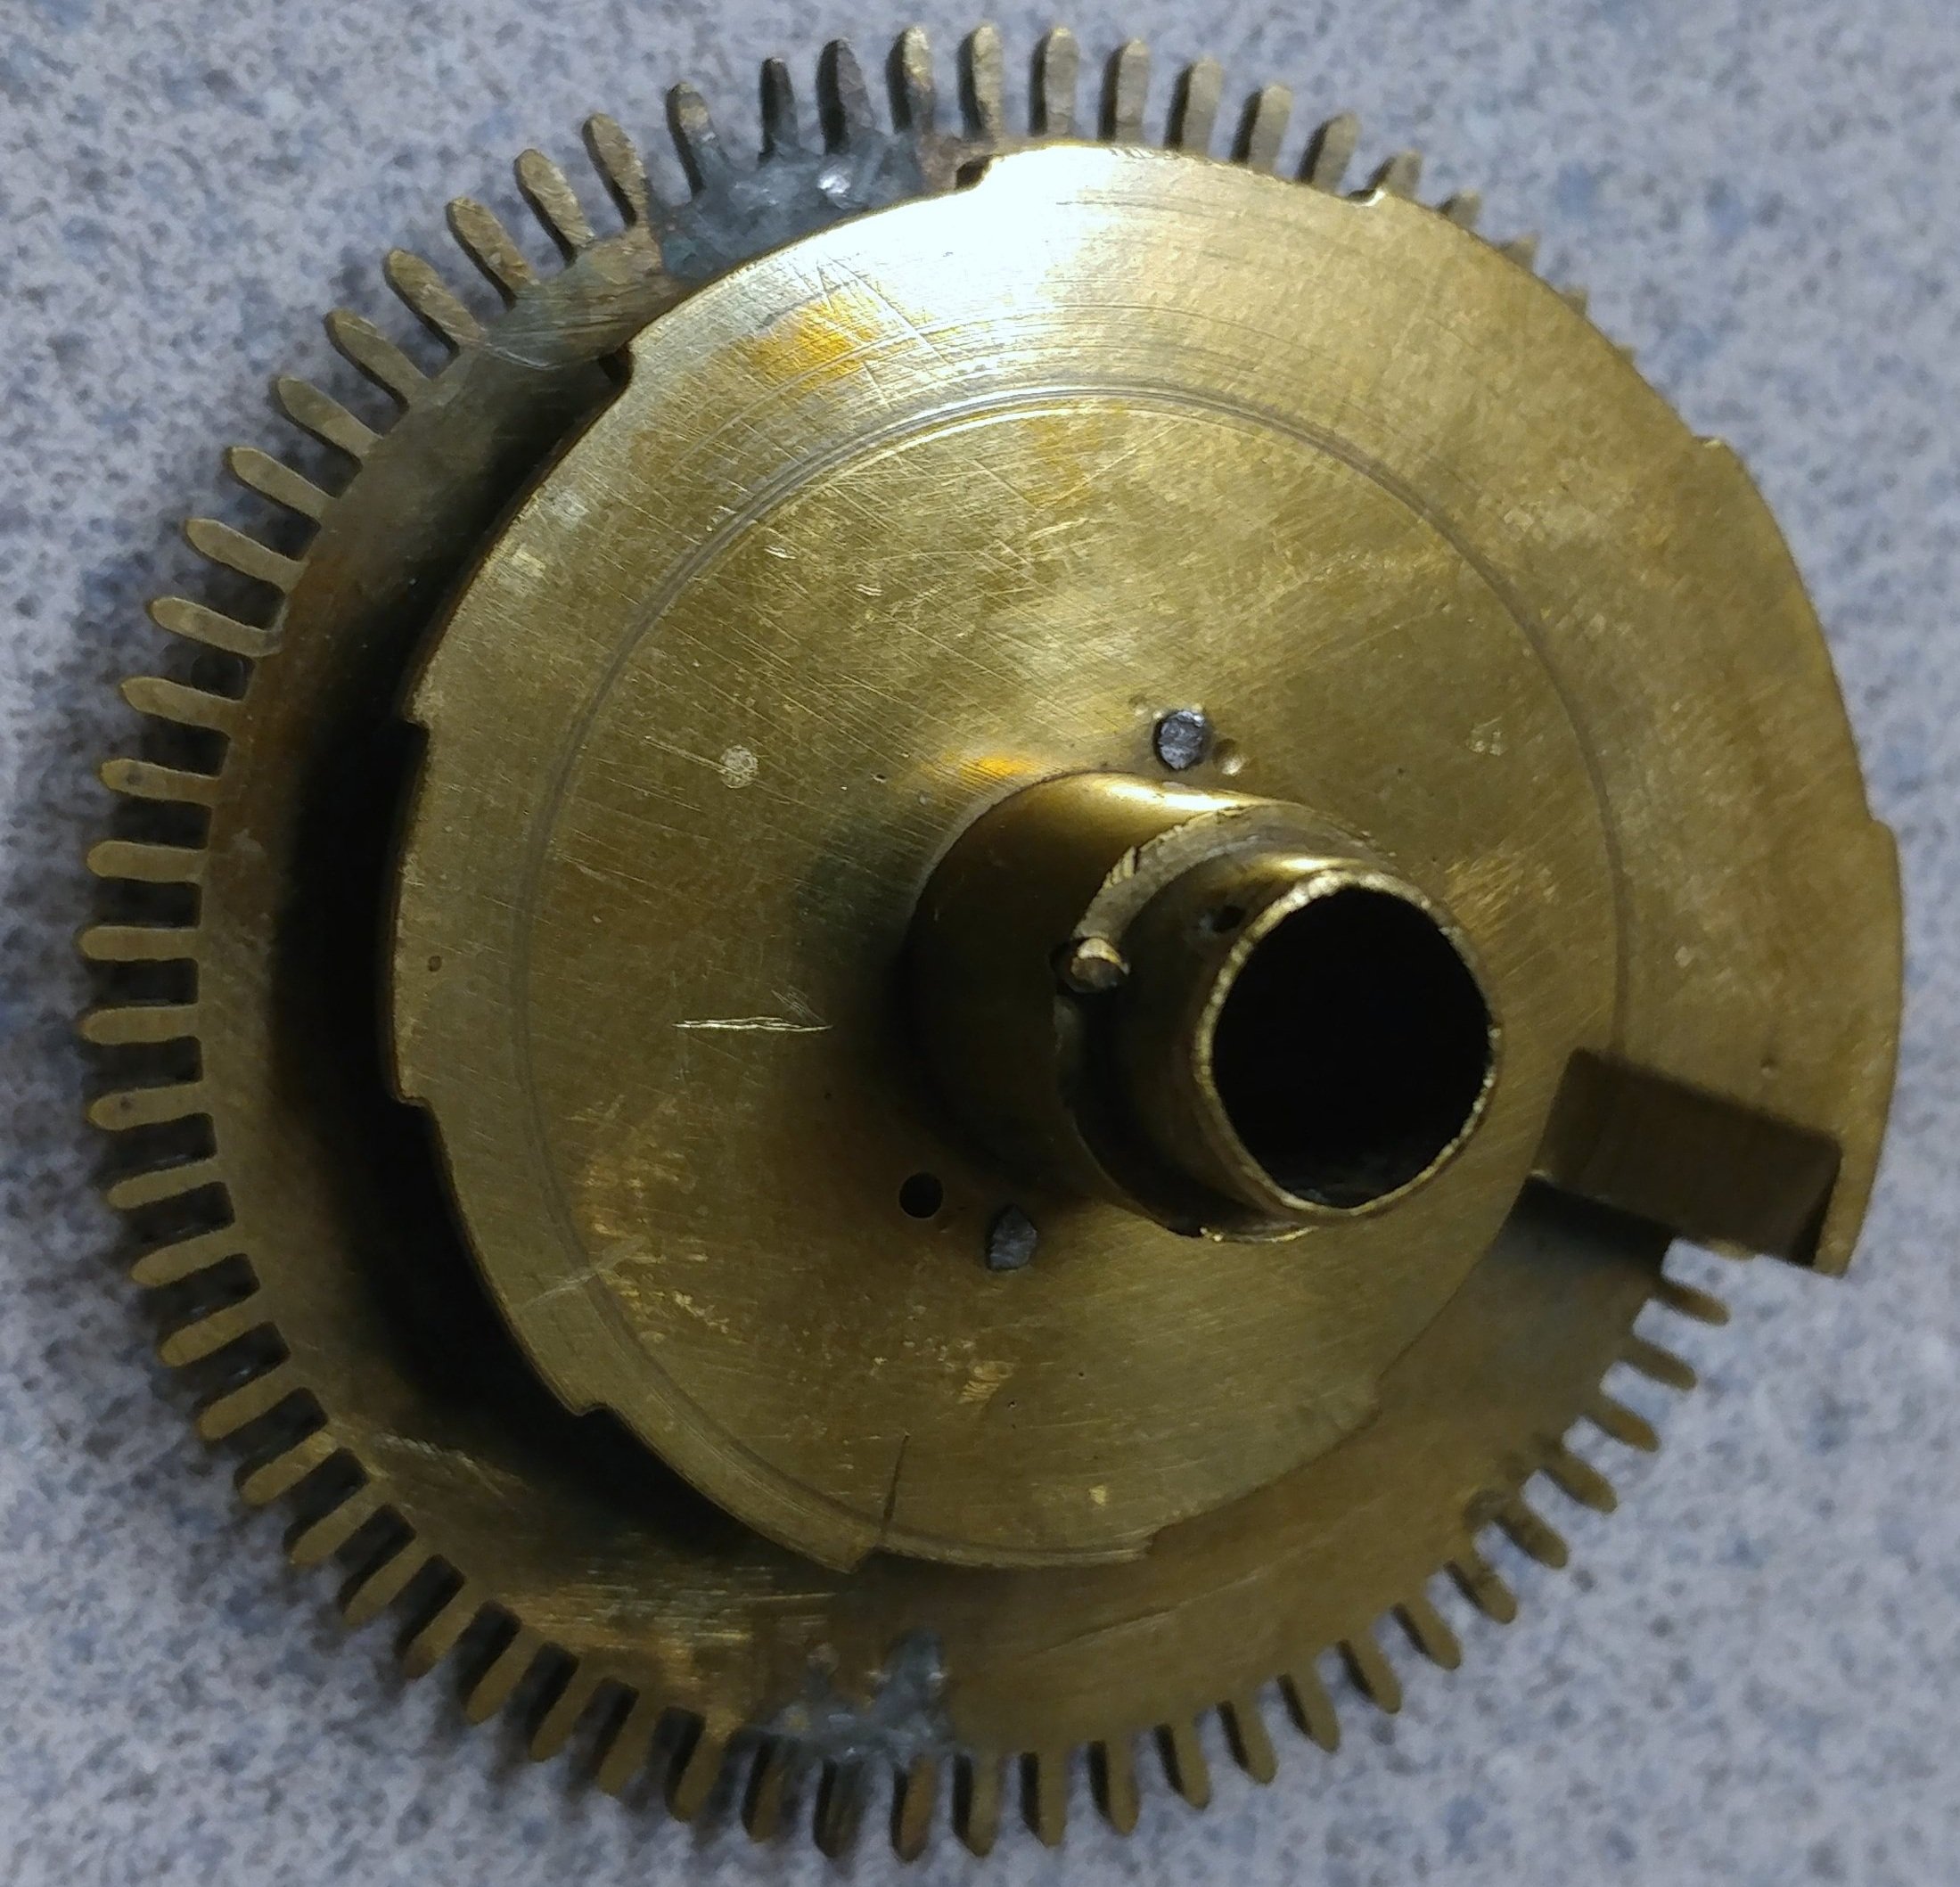
Photo two shows the bottom of the hour wheel where the poorly repaired teeth can be plainly seen. The snail had to removed in order to perform the repair.
Photo three shows the newly replaced teeth barely visible at the 12 and 5 position.
Photo Four shows the snail reattached and all the parts cleaned. You can barely see the repaired teeth at the bottom of the photo near the 6 position.

Making a New Snail Pipe
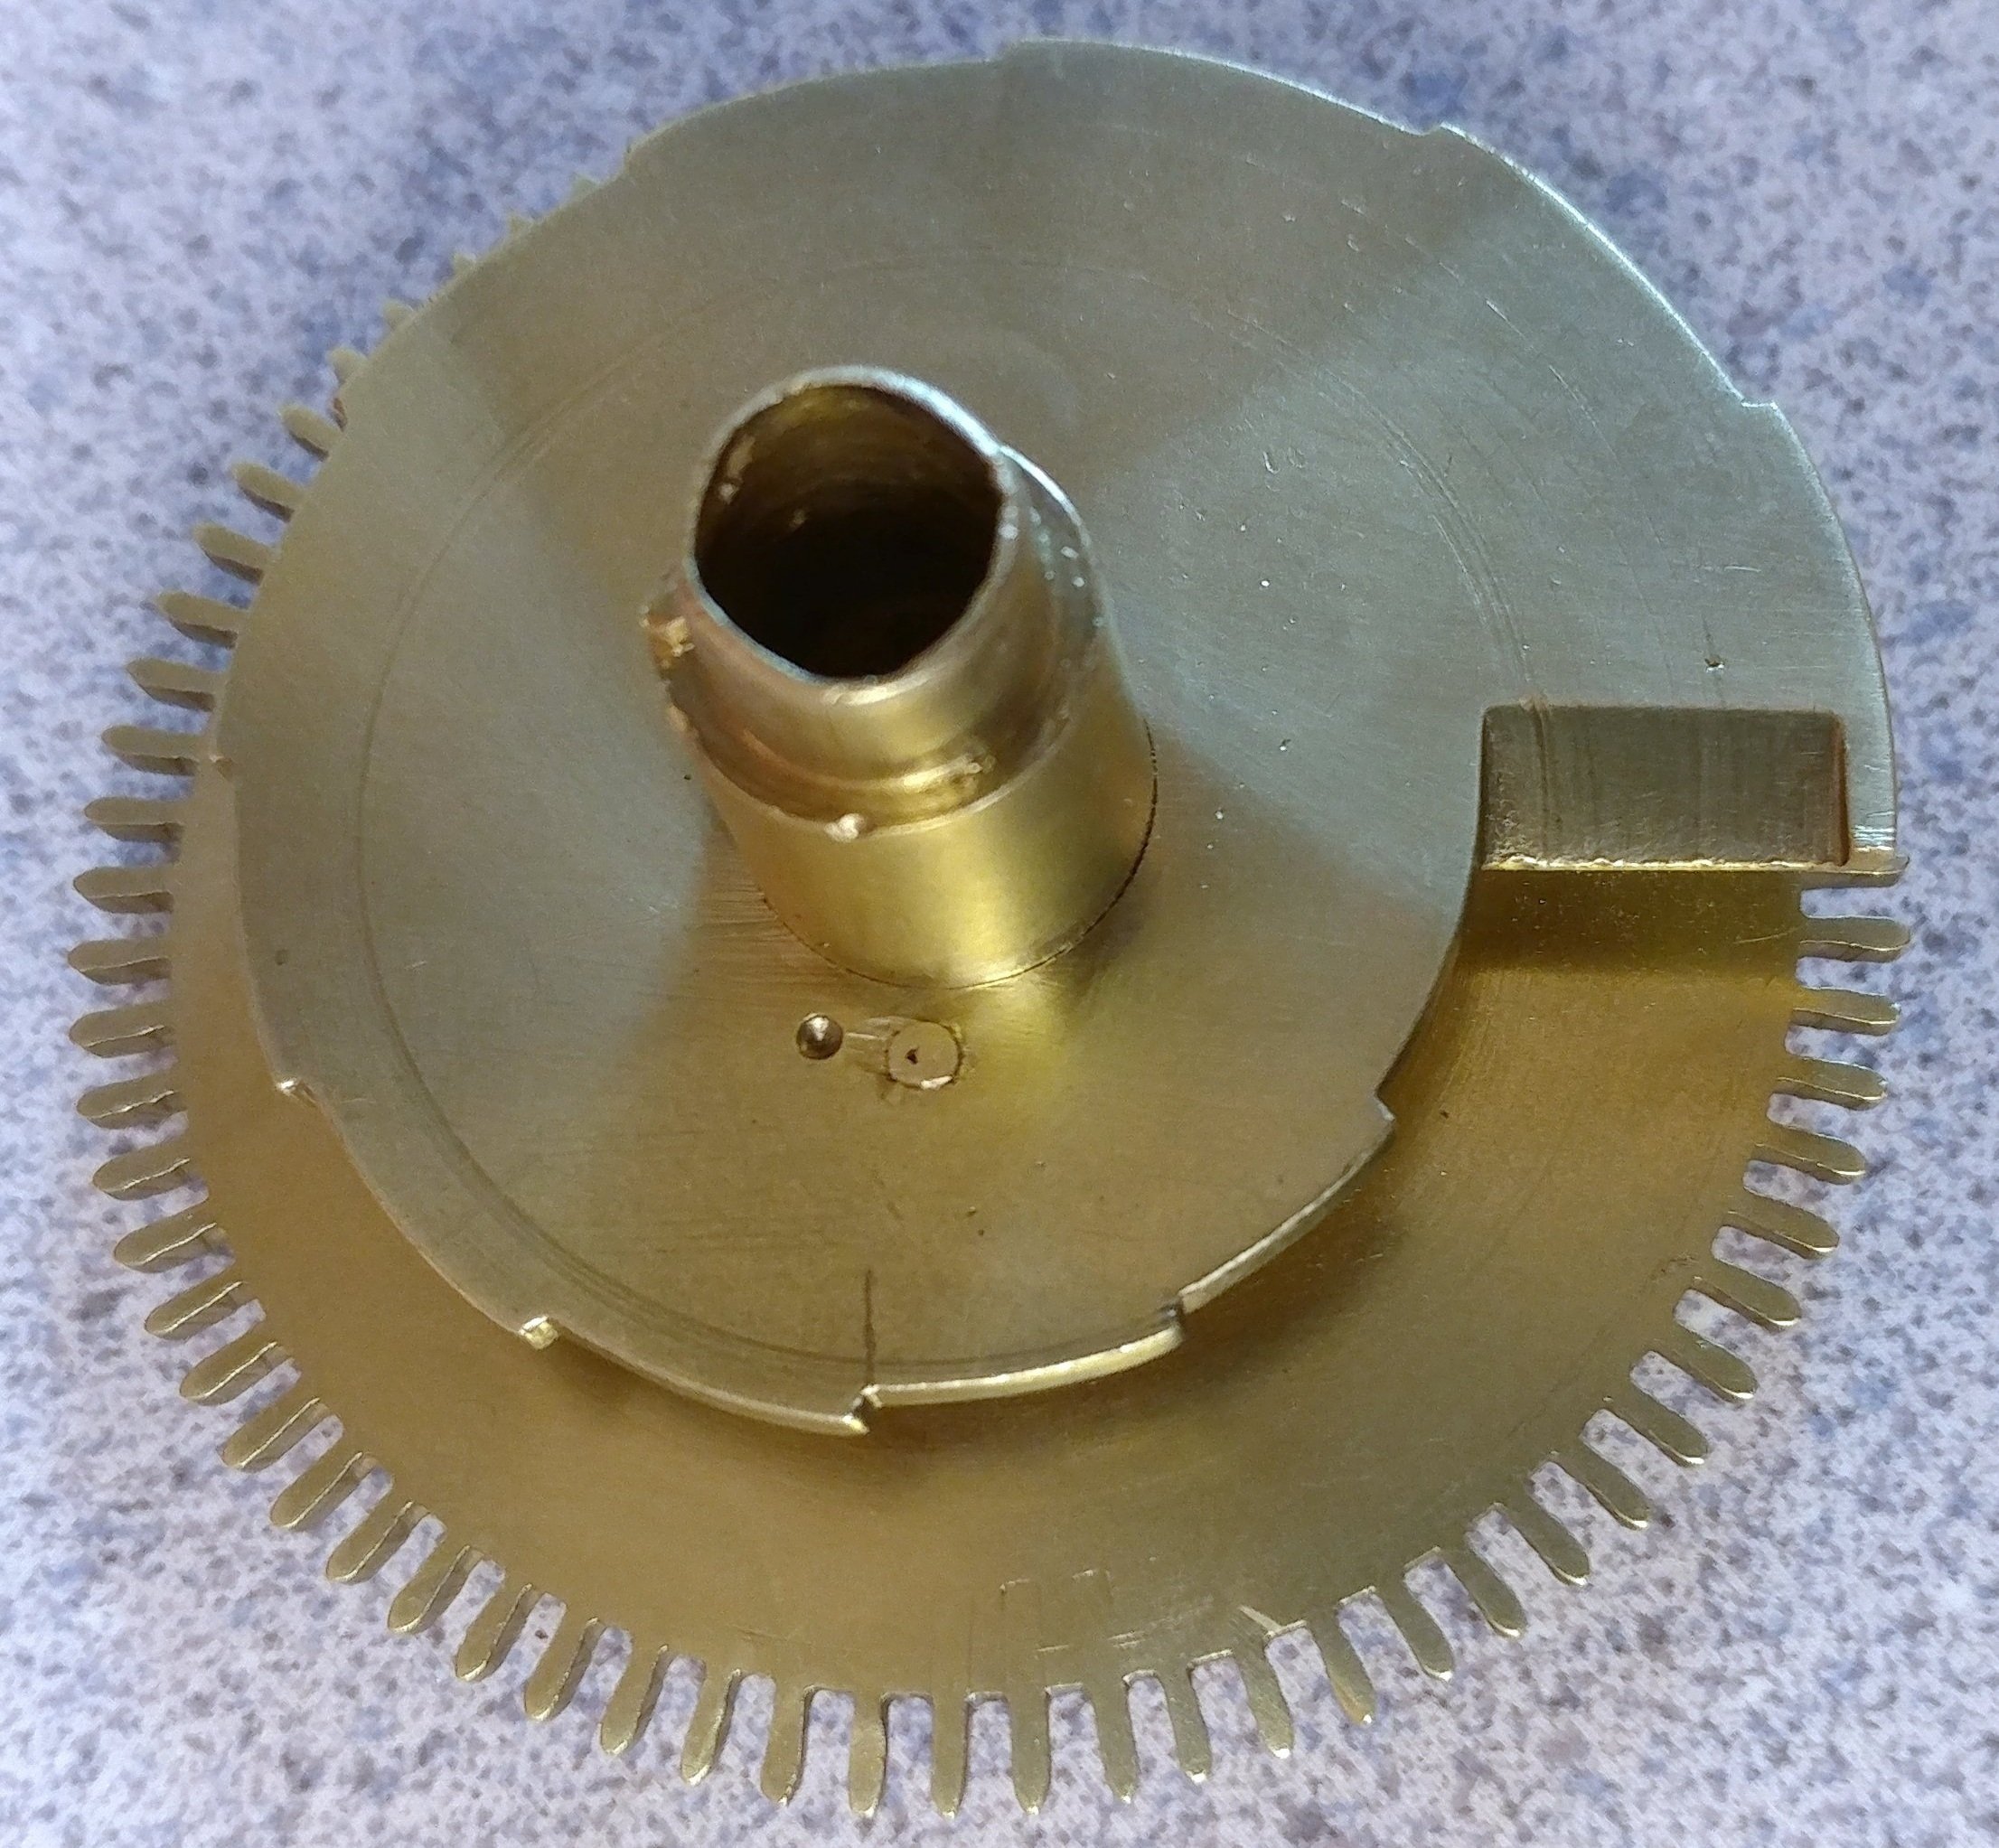
The part below was damaged when the clock movement was shipped to me for repair. You can’t order a part like this from a catalog, you either make it or repair it. I chose to repair it. The dimensions of the new pipe must match the dimensions of the old one in order for it to function correctly. it also must be mounted perfectly perpendicular to the bridge plate that sits under it.
Slide Show
-
![Clock Shop Near Me by Master Clock Repair of Columbus, Ohio]()
The flat part on top is called the "bridge plate". The round part below protruded from the hole in the bridge plate. You can see the jagged broken edge.
-
![Clock Shop Near Me by Master Clock Repair of Columbus, Ohio]()
a new pipe has been formed on the lathe from solid brass rod with a slight taper. The wider diameter on the right side must fit perfectly into the hole on the bridge plate.
-
![Clock Shop Near Me by Master Clock Repair of Columbus, Ohio]()
The solid brass rod has now been center drilled as this part must be hollow. The next step is to cut the piece from the larger raw stock.
-
![Clock Shop Near Me by Master Clock Repair of Columbus, Ohio]()
The new pipe has been cut from the raw stock and is waiting to be mounted. It must be soldered inside the hole and perpendicular to the bridge plate.
-
![Clock Shop Near Me by Master Clock Repair of Columbus, Ohio]()
The work has been completed. A minimum of solder was used to make the job as neat as possible
-
![Clock Shop Near Me by Master Clock Repair of Columbus, Ohio]()
Here is the repaired part mounted onto an antique bell striking floor clock movement that is at least 150 years old!


Lever Repair
Clock movements contain many parts other than gears and wheels, levers being the most common. Levers, most often, are there to control the functions of chiming or striking. Although levers don’t typically wear in the same way that bearing holes wear, they often need adjusting and this often leads to damage when not done correctly. Below see some examples of repairing damaged levers as well as making entire levers from raw material.
Making a New Rack Tail
The slide show below shows the process of making a new “rack tail” for an antique bell striking tall case clock. This type of clock dates before 1870 and can go back as far as the early to mid 1700’s. The “rack” is the part of the clock that controls the number of strikes that will occur on the hour. The rack tail is thin and vulnerable and can be abused, unknowingly, by the owner or by less than adequately skilled clockmakers. In this instance, the rack tail, although damaged and weak, was of the proper size and shape so I did not have to guess at its design like I often do in other situations.
Making a New Rack Tail
Slide Show
-
![Clock Shop Near Me by Master Clock Repair of Columbus, Ohio]()
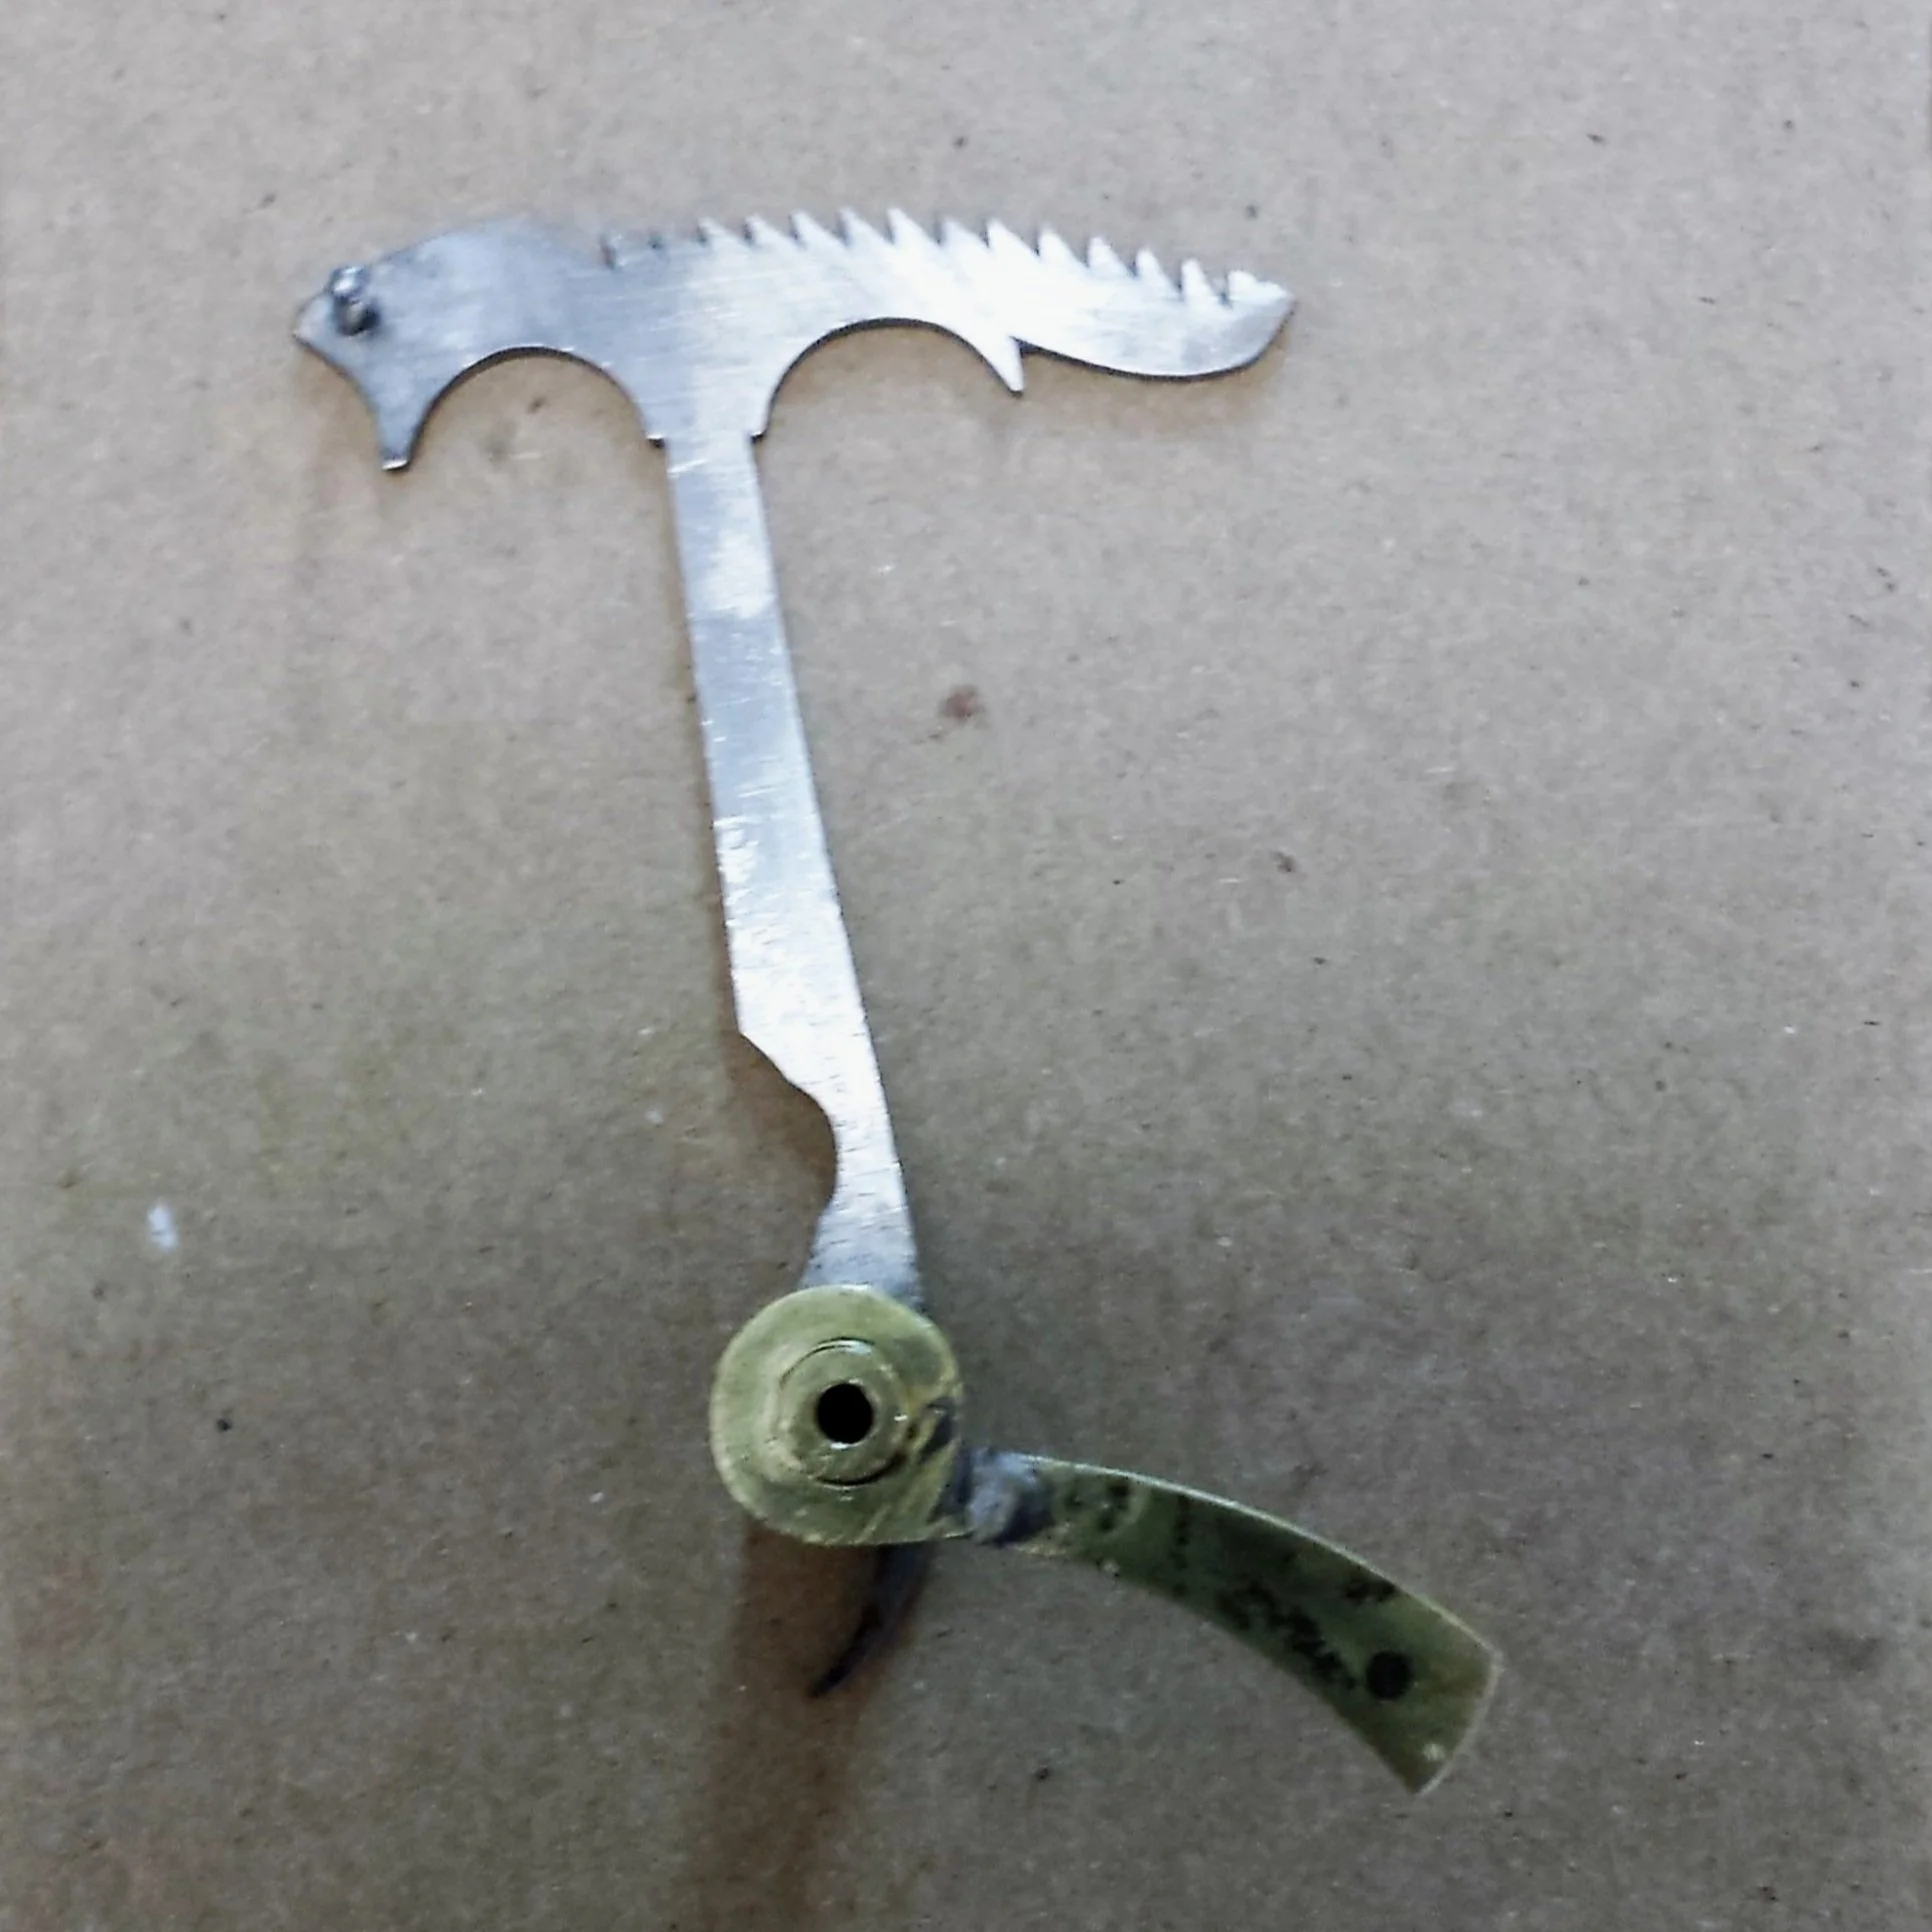
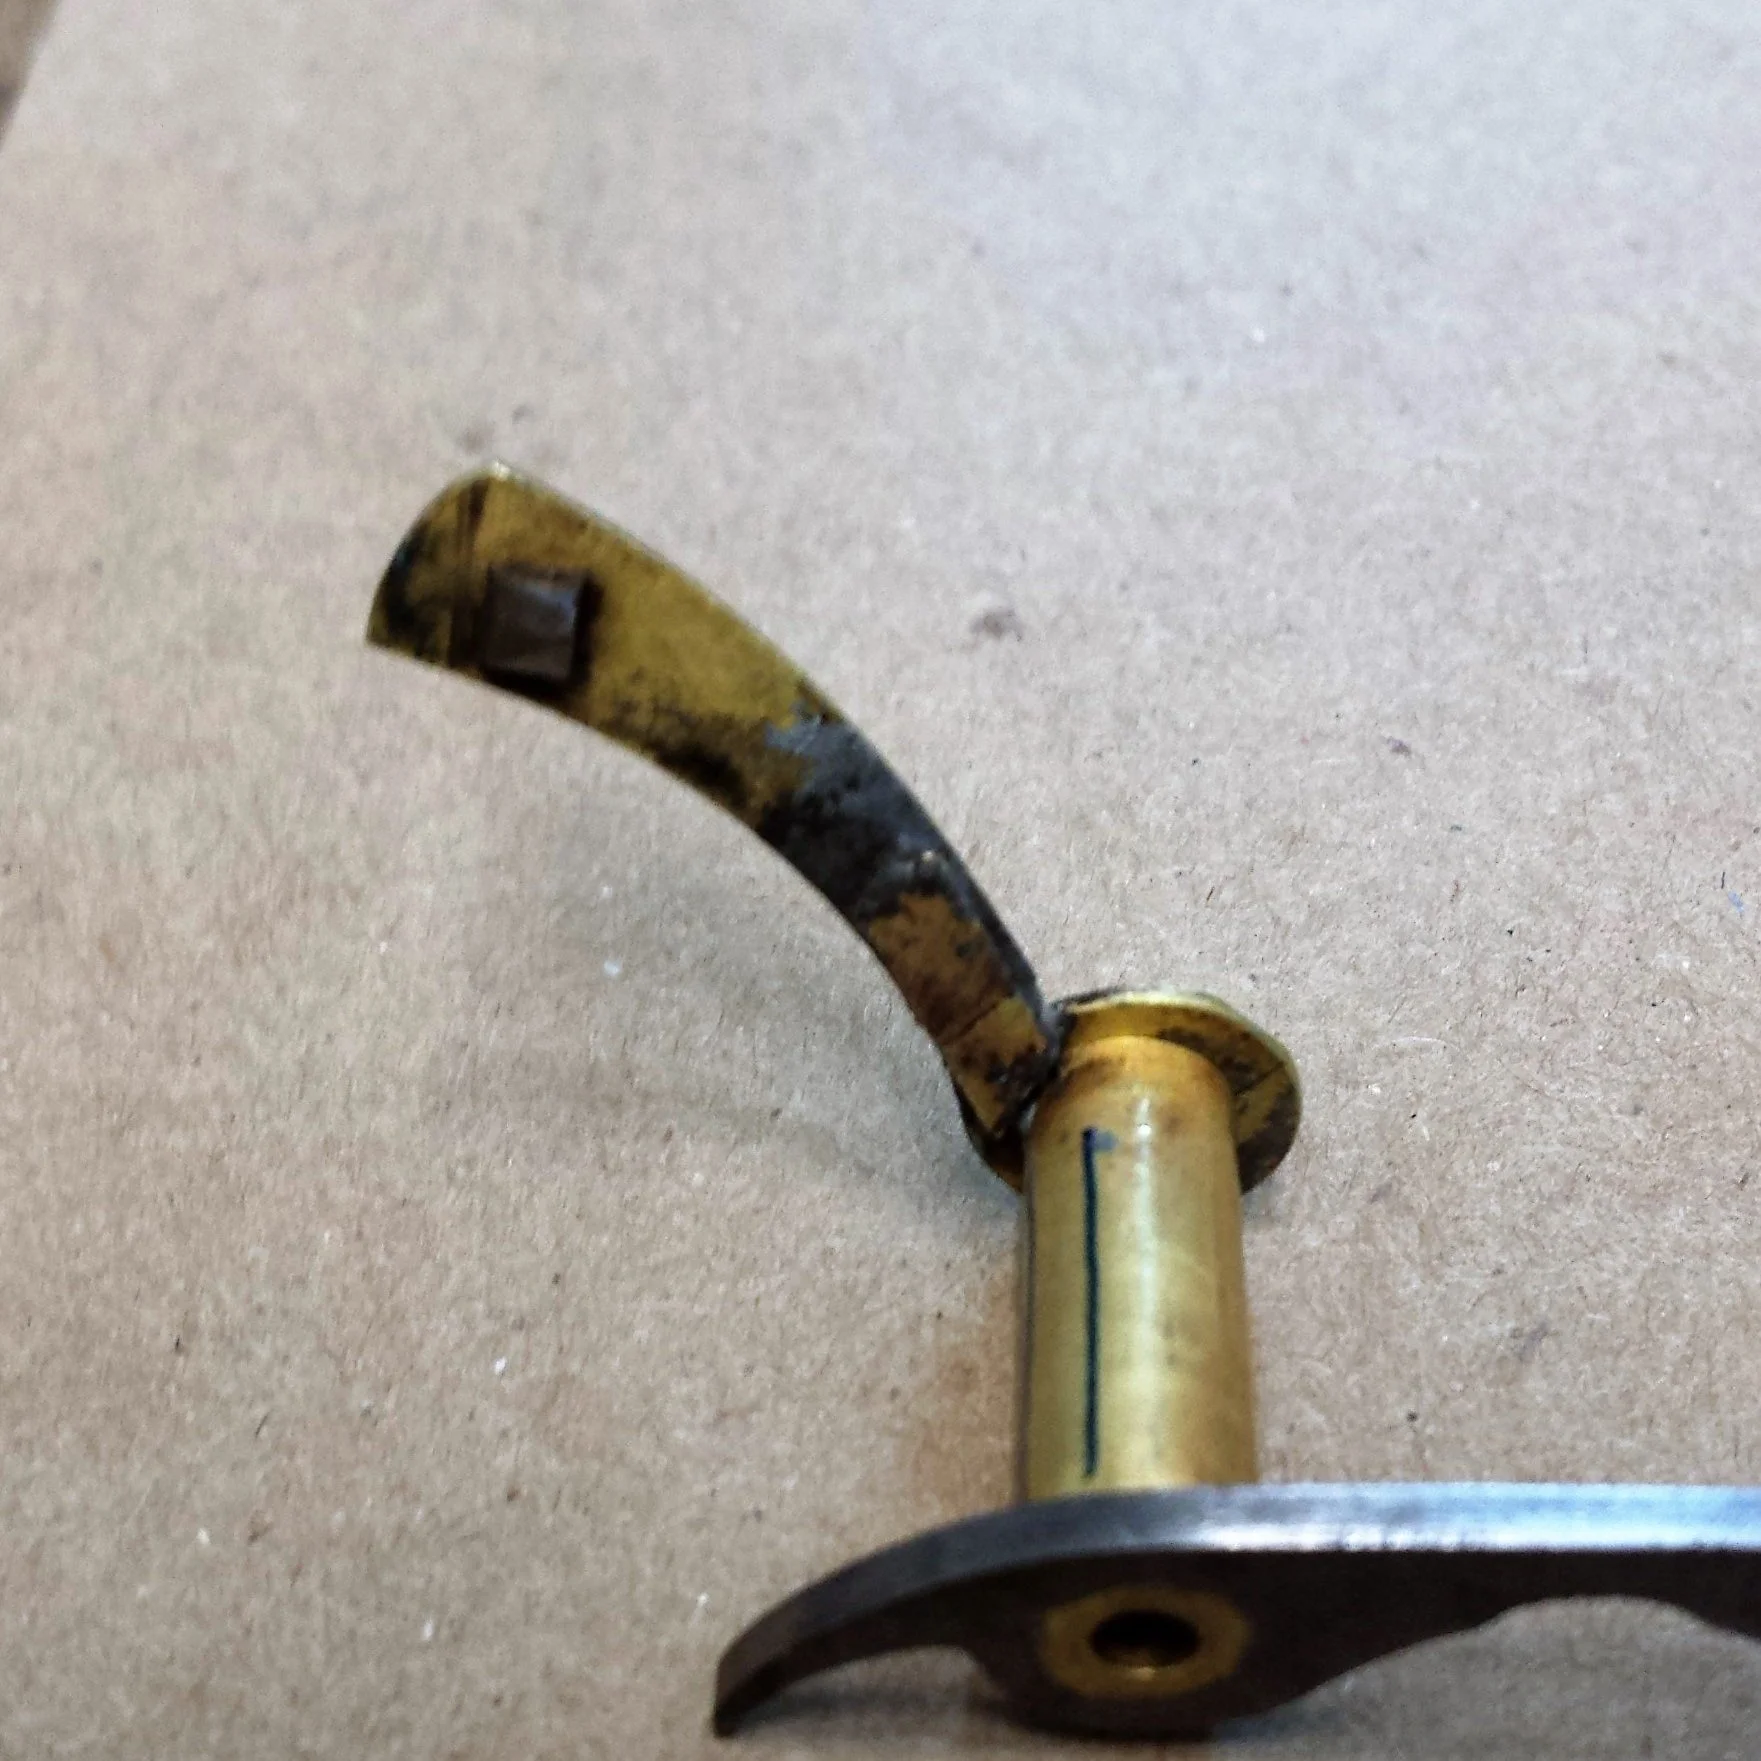
Before repair. The steel piece is called the rack. The brass piece is called the rack tail. Where the round brass part meets the curved part, the tail has been broken and re-soldered.
-
![Clock Shop Near Me by Master Clock Repair of Columbus, Ohio]()
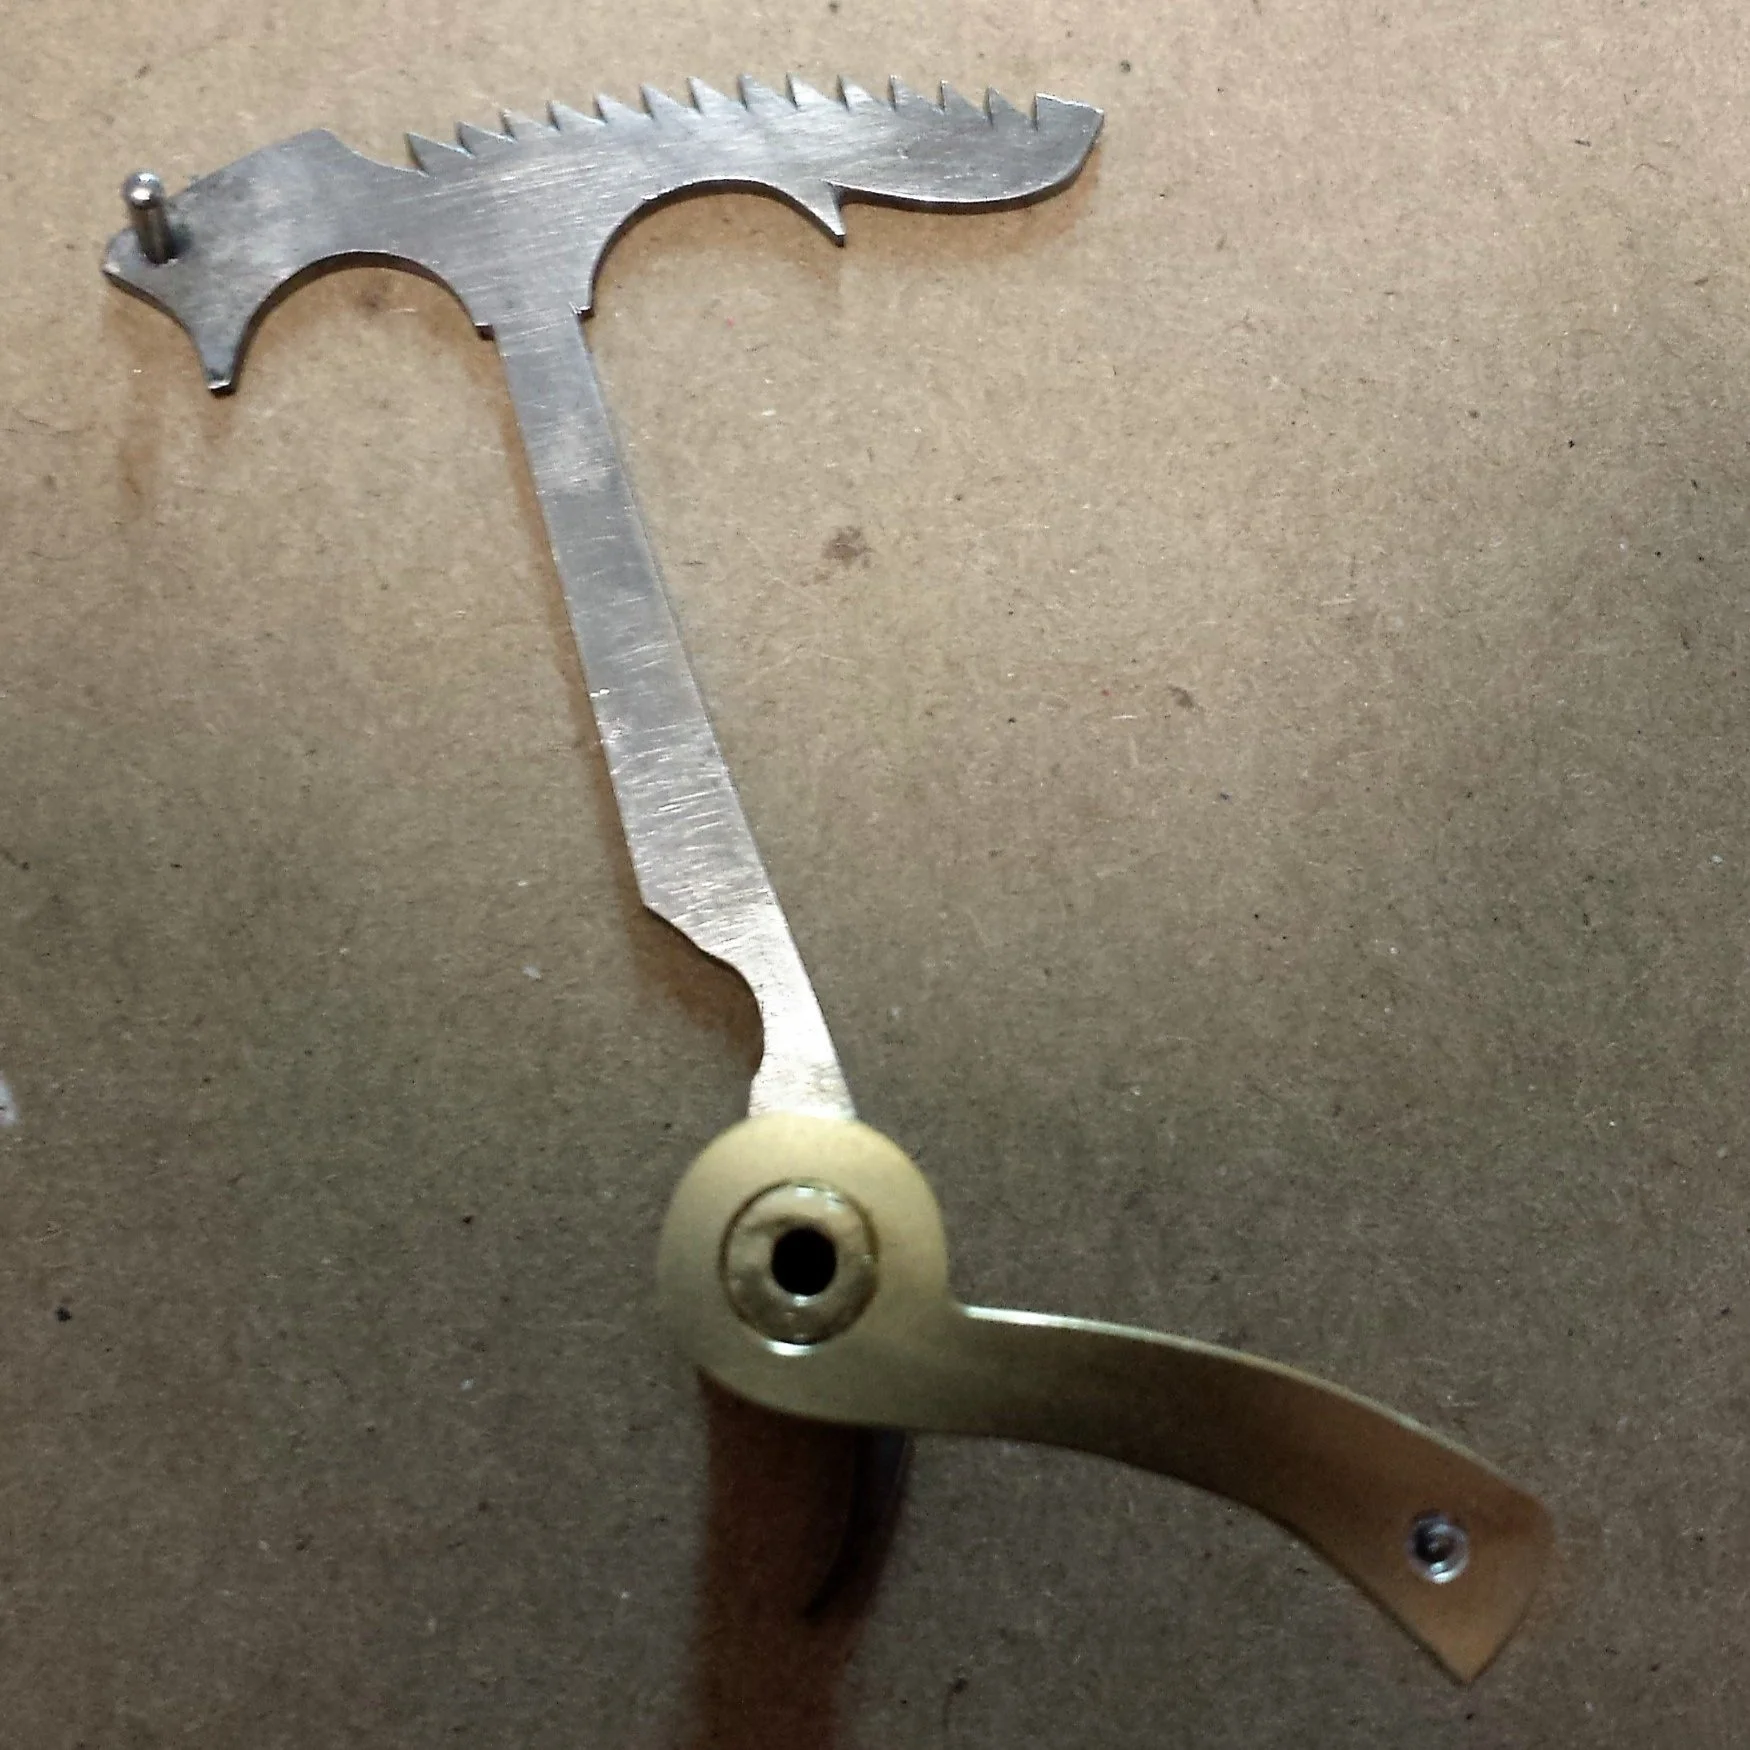
After Repair. Now let's see how it was done.
-
![Clock Shop Near Me by Master Clock Repair of Columbus, Ohio]()
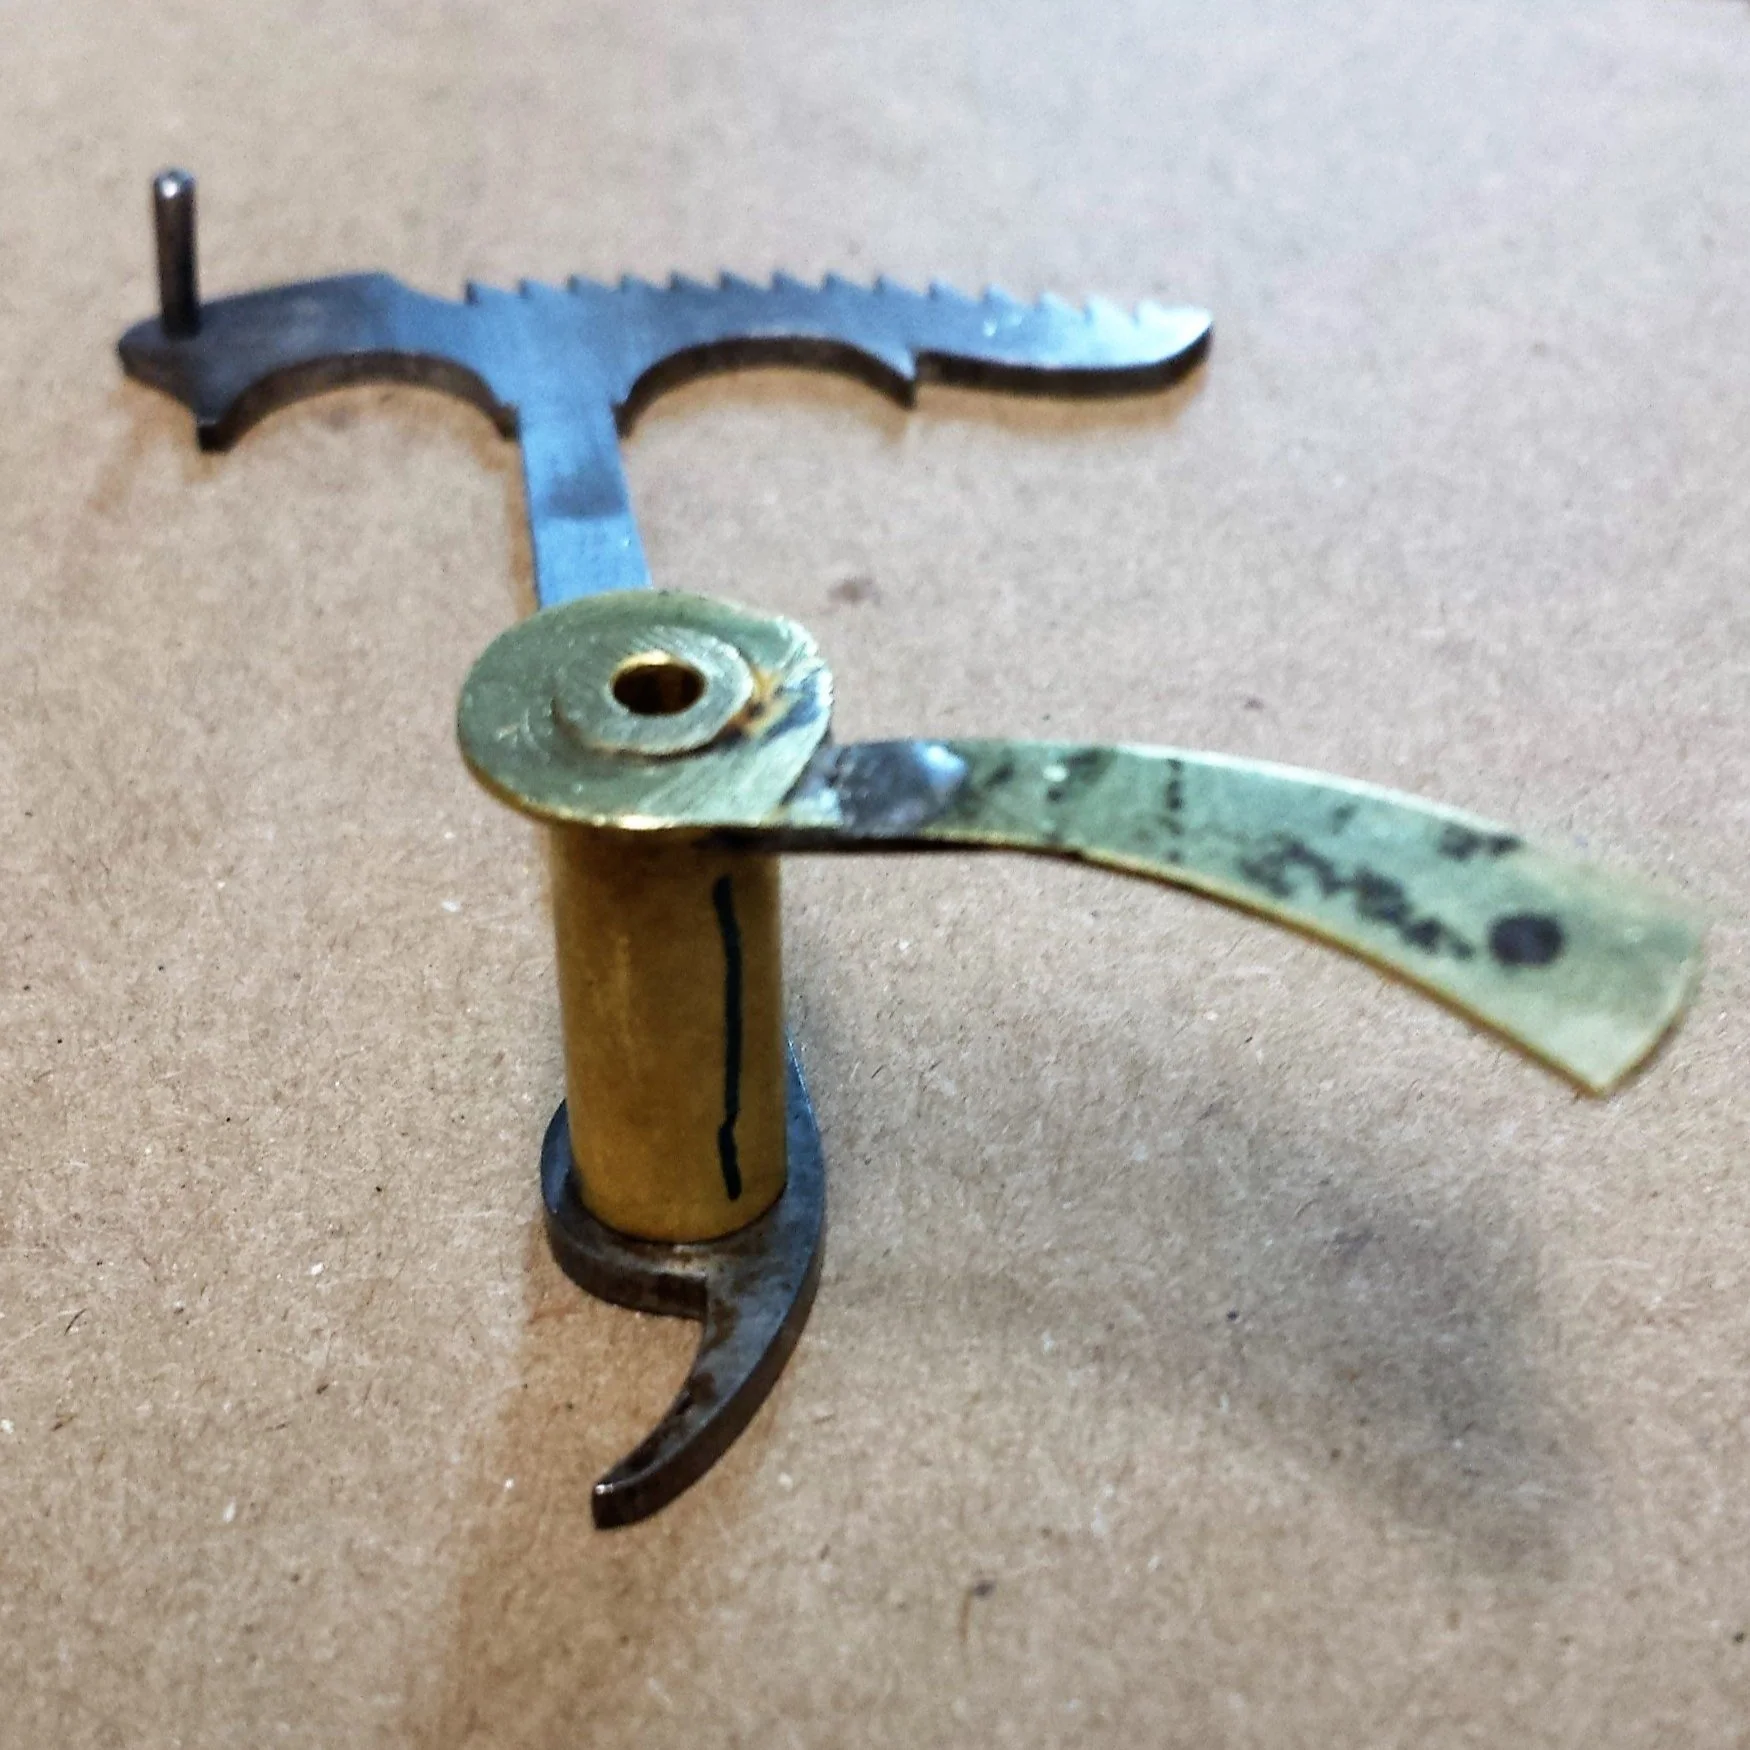
Another view of the damaged rack tail. Not only is the repair ugly, the repair is weak and could break.
-
![Clock Shop Near Me by Master Clock Repair of Columbus, Ohio]()
This is the back side of the poorly repaired rack tail showing the shim that holds the broken pieces together.
-
![Clock mechanism replacement by Master Clock Repair of Columbus, Ohio]()
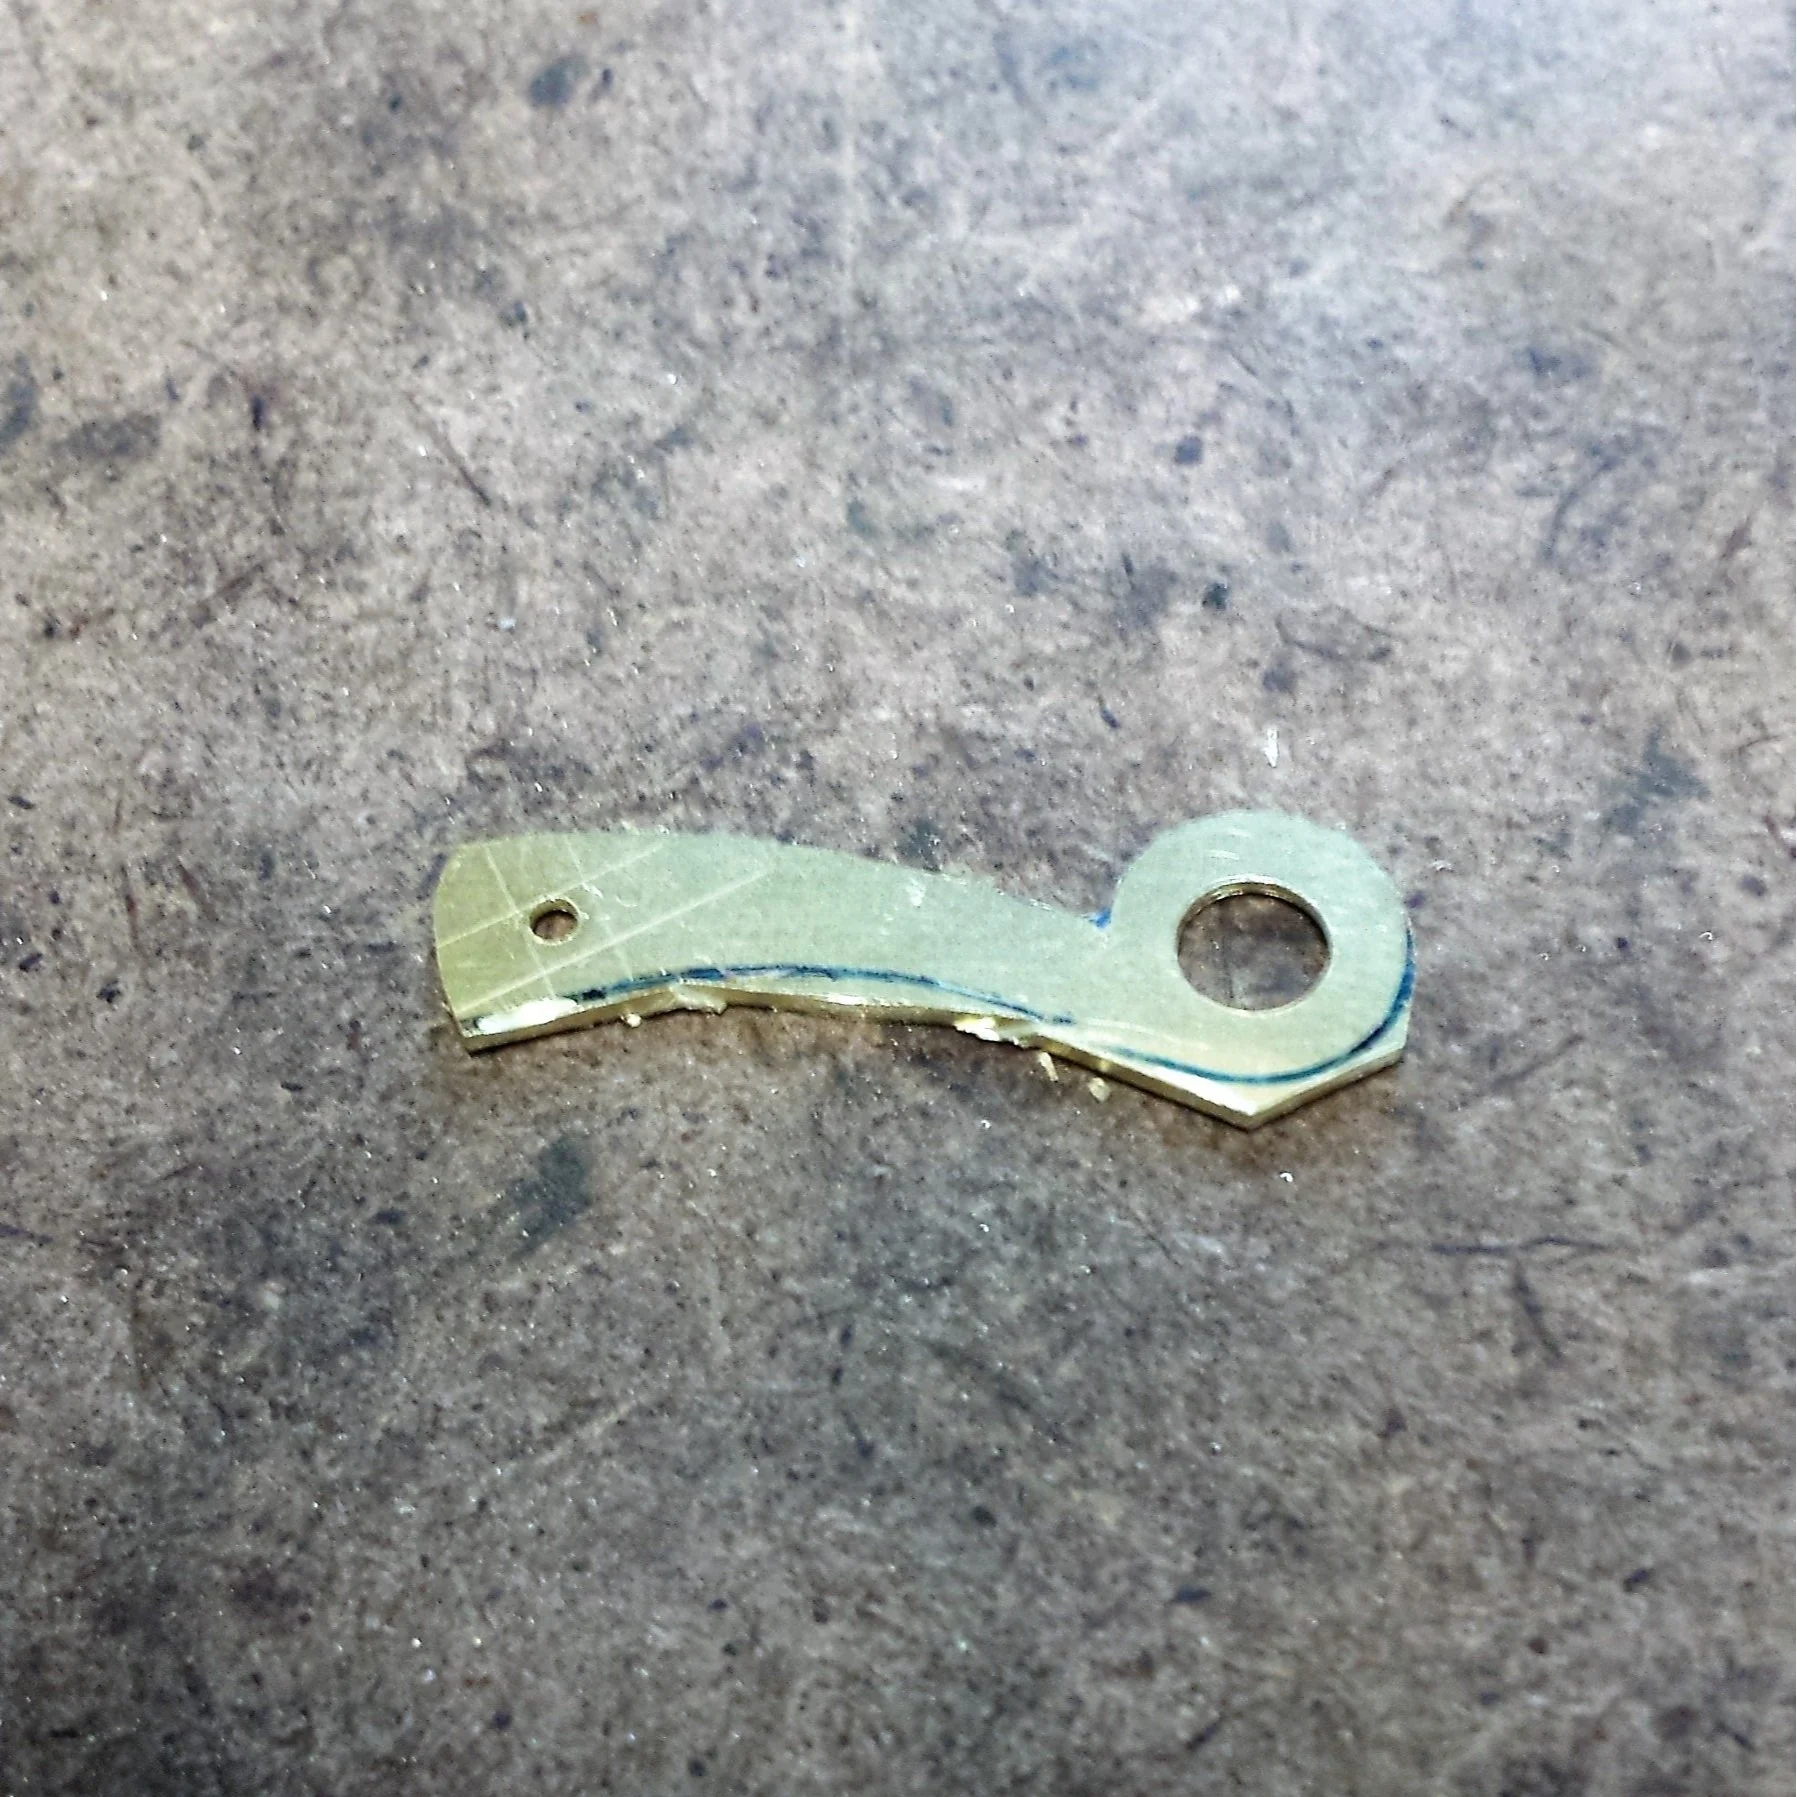
I have removed the damaged rack tail and used it to trace the shape onto a new piece of flat brass stock. I then made a punch mark where I will drill one of the two holes.
-
![Clock mechanism replacement by Master Clock Repair of Columbus, Ohio]()
The smaller hole is for the rack tail pin that will fall onto a piece called the snail. I am able to use the original pin, which in this instance, is square instead of round.
-
![Cuckoo Clock Repair near me by Master Clock Repair of Columbus, Ohio]()
The "tic tac toe" marks are to help me align the square pin properly to the overall tail. Using a cut off disc, I have begun to cut away excess material around the tracing.
-
![Cuckoo Clock Repair near me by Master Clock Repair of Columbus, Ohio]()
The new tail has now been separated from the larger piece of brass stock.
-
![Cuckoo Clock Repair near me by Master Clock Repair of Columbus, Ohio]()
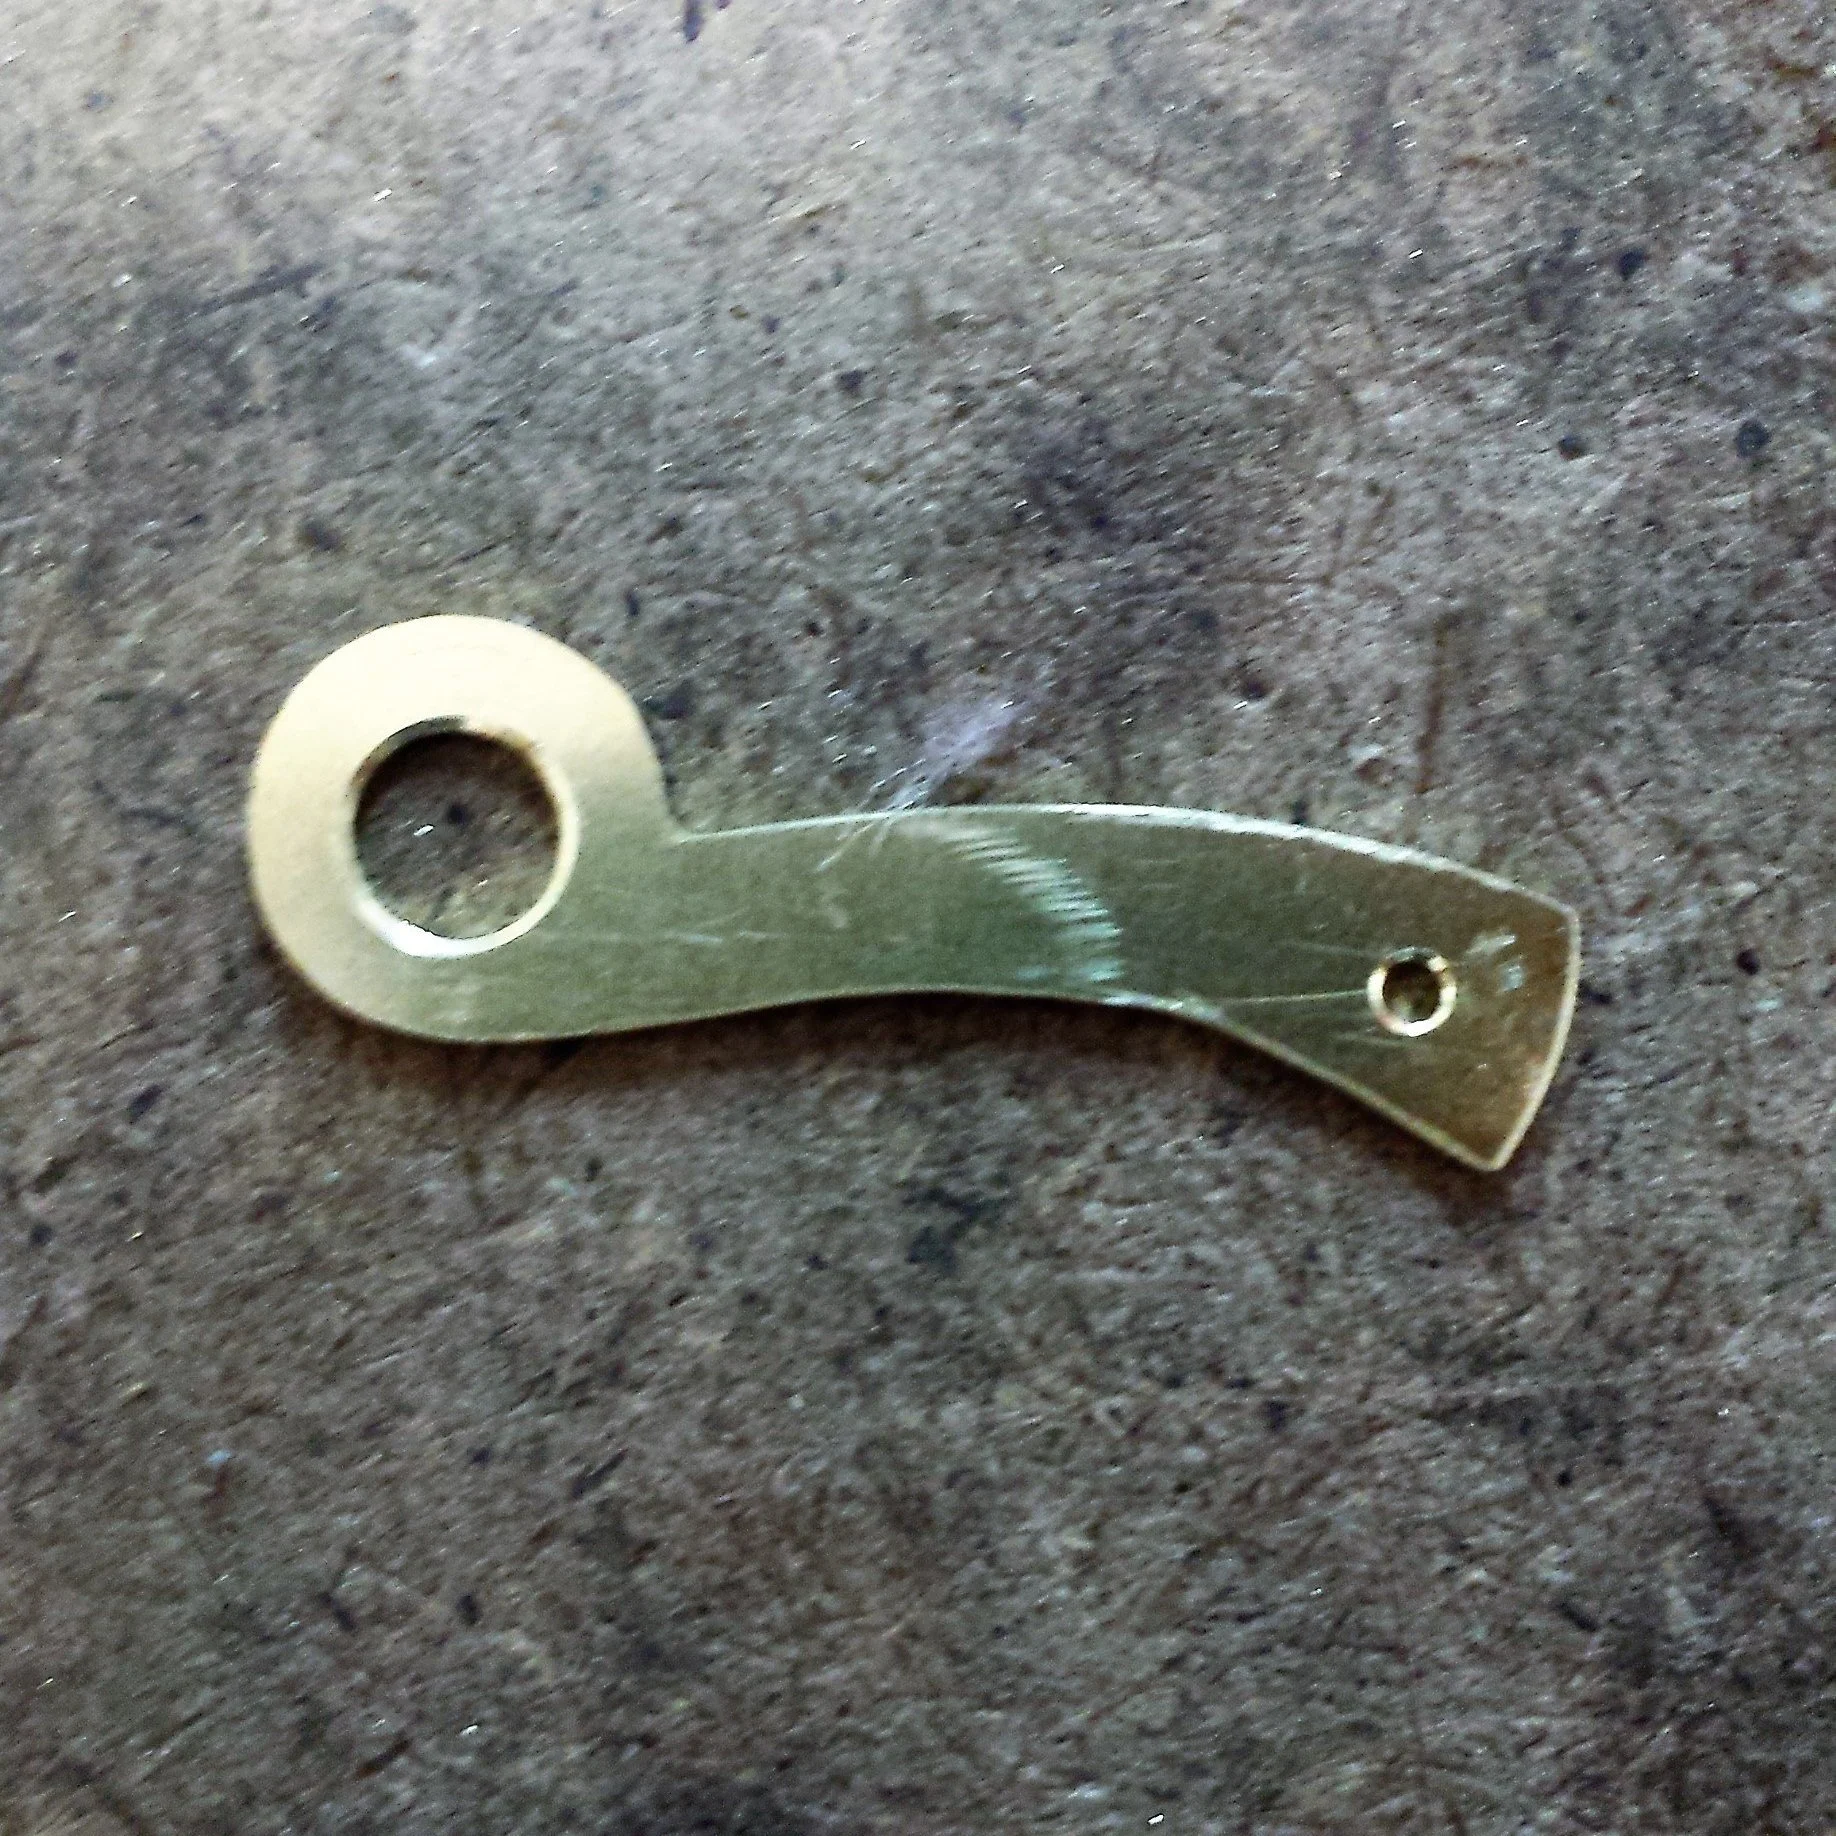
Beginning to file the piece into its proper shape.
-
![Cuckoo Clock Repair near me by Master Clock Repair of Columbus, Ohio]()
Both holes have been chamfered on their edges to aid the grip of the riveted fit when attaching the new piece to the larger rack.
-
![Cuckoo Clock Repair near me by Master Clock Repair of Columbus, Ohio]()
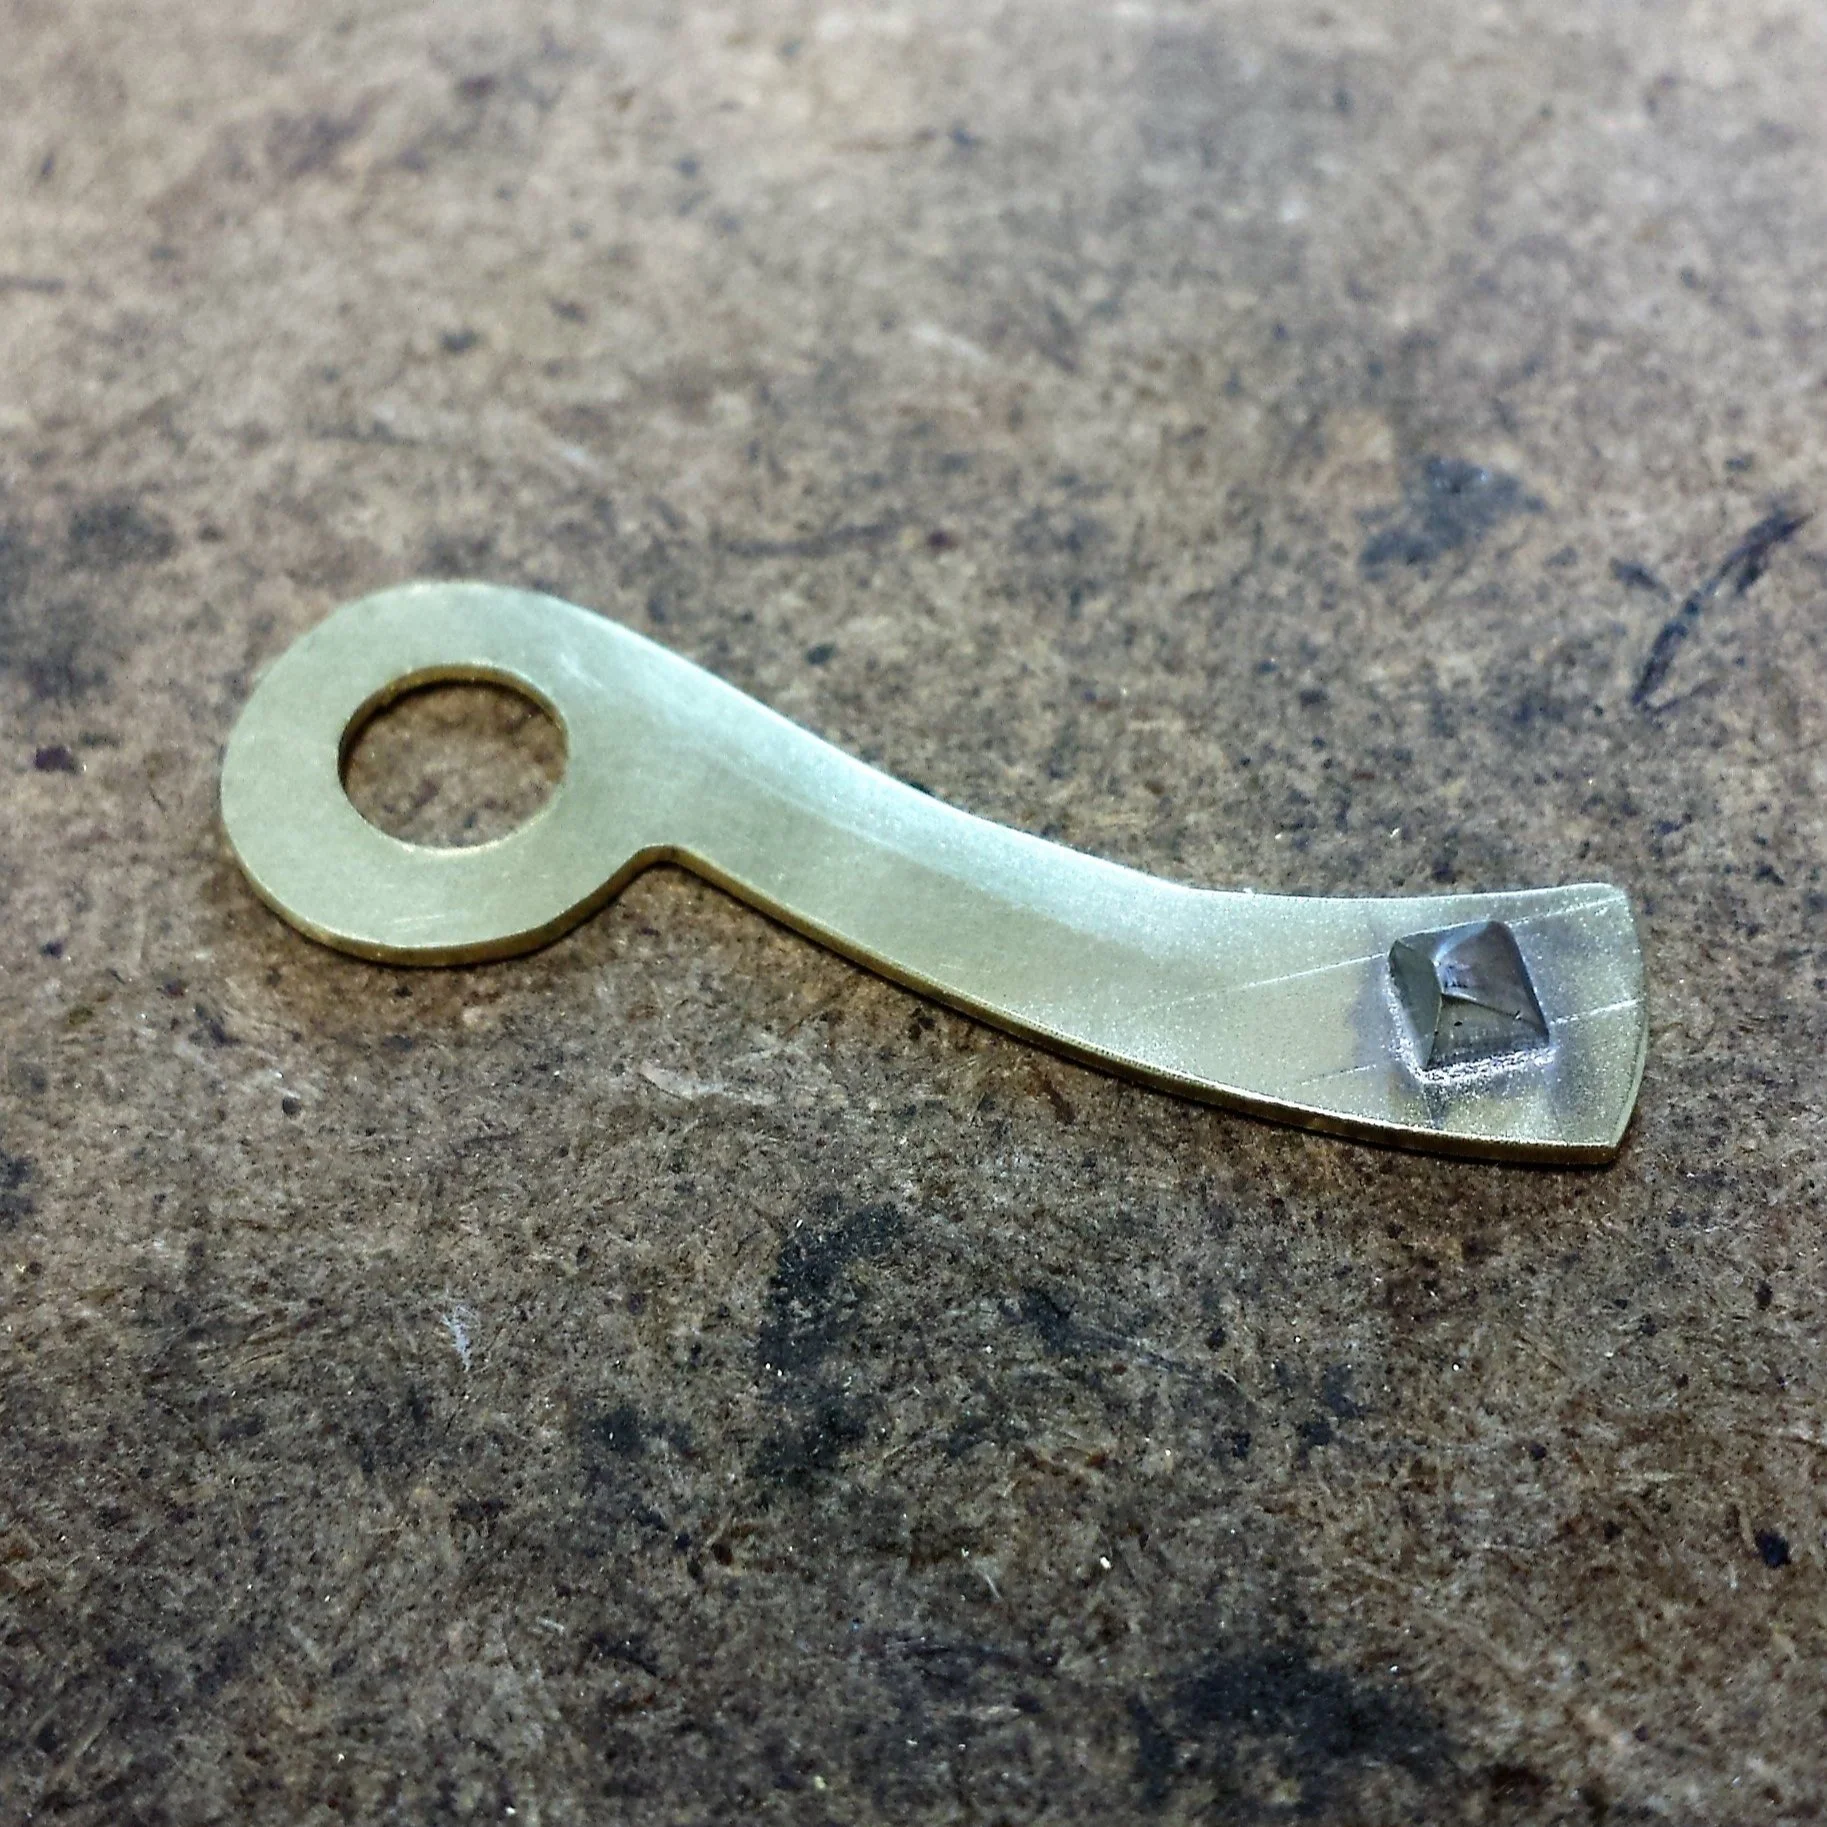
The rack tail has been polished and is ready to receive the original pin.
-
![Cuckoo Clock Repair near me by Master Clock Repair of Columbus, Ohio]()
From the other side, you can see that the square pin has been aligned with the marks previously made.
-
![Cuckoo Clock Repair near me by Master Clock Repair of Columbus, Ohio]()
The rack tail has now been riveted to the larger steel rack. Lightly, at first, until I had the angle between the two pieces properly set. Note that no solder was needed at this location as the rivet created a strong bond.
-
![Cuckoo Clock Repair near me by Master Clock Repair of Columbus, Ohio]()
View from underneath. No solder blobs necessary!
-
![Cuckoo Clock Repair near me by Master Clock Repair of Columbus, Ohio]()
The new rack tail gets its close up!
-
![Cuckoo Clock Repair near me by Master Clock Repair of Columbus, Ohio]()
Fully repaired rack; professional, functional, artful.


Another Example of Making a New Rack Tail
-
![Clock mechanism replacement by Master Clock Repair of Columbus, Ohio]()
Before repair. You can see the discolored brass rack tail has been shimmed to hold it together and has received a nasty solder job.
-
![Clock mechanism replacement by Master Clock Repair of Columbus, Ohio]()
After Repair. Keep scrolling to the right to see how it was done.
-
![Clock mechanism replacement by Master Clock Repair of Columbus, Ohio]()
The raw brass is colored with a marker to make the scribed lines more visible.
-
![Clock mechanism replacement by Master Clock Repair of Columbus, Ohio]()
The new part, below, has been rough cut and separated from the larger brass stock.
-
![Clock mechanism replacement by Master Clock Repair of Columbus, Ohio]()
The new tail is now filed down to the scribed lines to form the proper shape.
-
![Clock mechanism replacement by Master Clock Repair of Columbus, Ohio]()
The new rack tail is now polished.
-
![Grandfather Clock Movement Replacement by Master Clock Repair Columbus, Ohio]()
The larger steel rack is prepared to receive the new tail. Notice the slightly raised ring on top of the brass cylinder. This will form the rivet.
-
![Grandfather Clock Movement Replacement by Master Clock Repair Columbus, Ohio]()
The new tail is riveted in place after making sure the angle between the two pieces is correct for proper striking. The new pin, to go into the smaller hole on the right has been cut on the lathe.
-
![Grandfather Clock Movement Replacement by Master Clock Repair Columbus, Ohio]()
The new pin has been cut to length and riveted in place. The job is complete. Note than no solder was needed to attach any of the pieces as the rivet fit created a strong bond.


Making a Rack Tail without knowing where the Rack Tail pin should be located.
There are several adjustments that are critical for proper strike function: the angle between the steel rack and the brass rack tail, the position of the rack tail pin that falls on the snail and the positioning of the snail itself over the hand shaft. If any of these are wrong, it will not work correctly. All of the rack repair examples are from very old antique floor clock movements from the late 1700’s thru the late 1800’s. These clocks have a fairly strong spring that throws the rack down a few minutes before the hour. All of this hard falling over the centuries, along with improper setting of the hands and poor attempts at repair, mean that this part is often badly damaged or broken. The following slide show shows how the position of the rack tail pin is determined when the original part is missing or badly damaged.
Important Note
In the example of the work below, I am willing to admit my mistake of using brass when I should have used steel to make the replacement piece at top left. You should always use material that is like the piece you are repairing. At the time, about ten years ago, I mistakenly chose brass knowing it would be easier to cut and file. This has not affected the strength or function of the repair since this part does not receive wear. The replaced brass part is there to hold the pin that causes the strike sequence to stop. This part, I did make from steel, because it needs to be durable against the force of the gathering pallet that lands there to stop the strike sequence.
Determining the position of the rack tail pin
-
![Grandfather Clock Movement Replacement by Master Clock Repair Columbus, Ohio]()
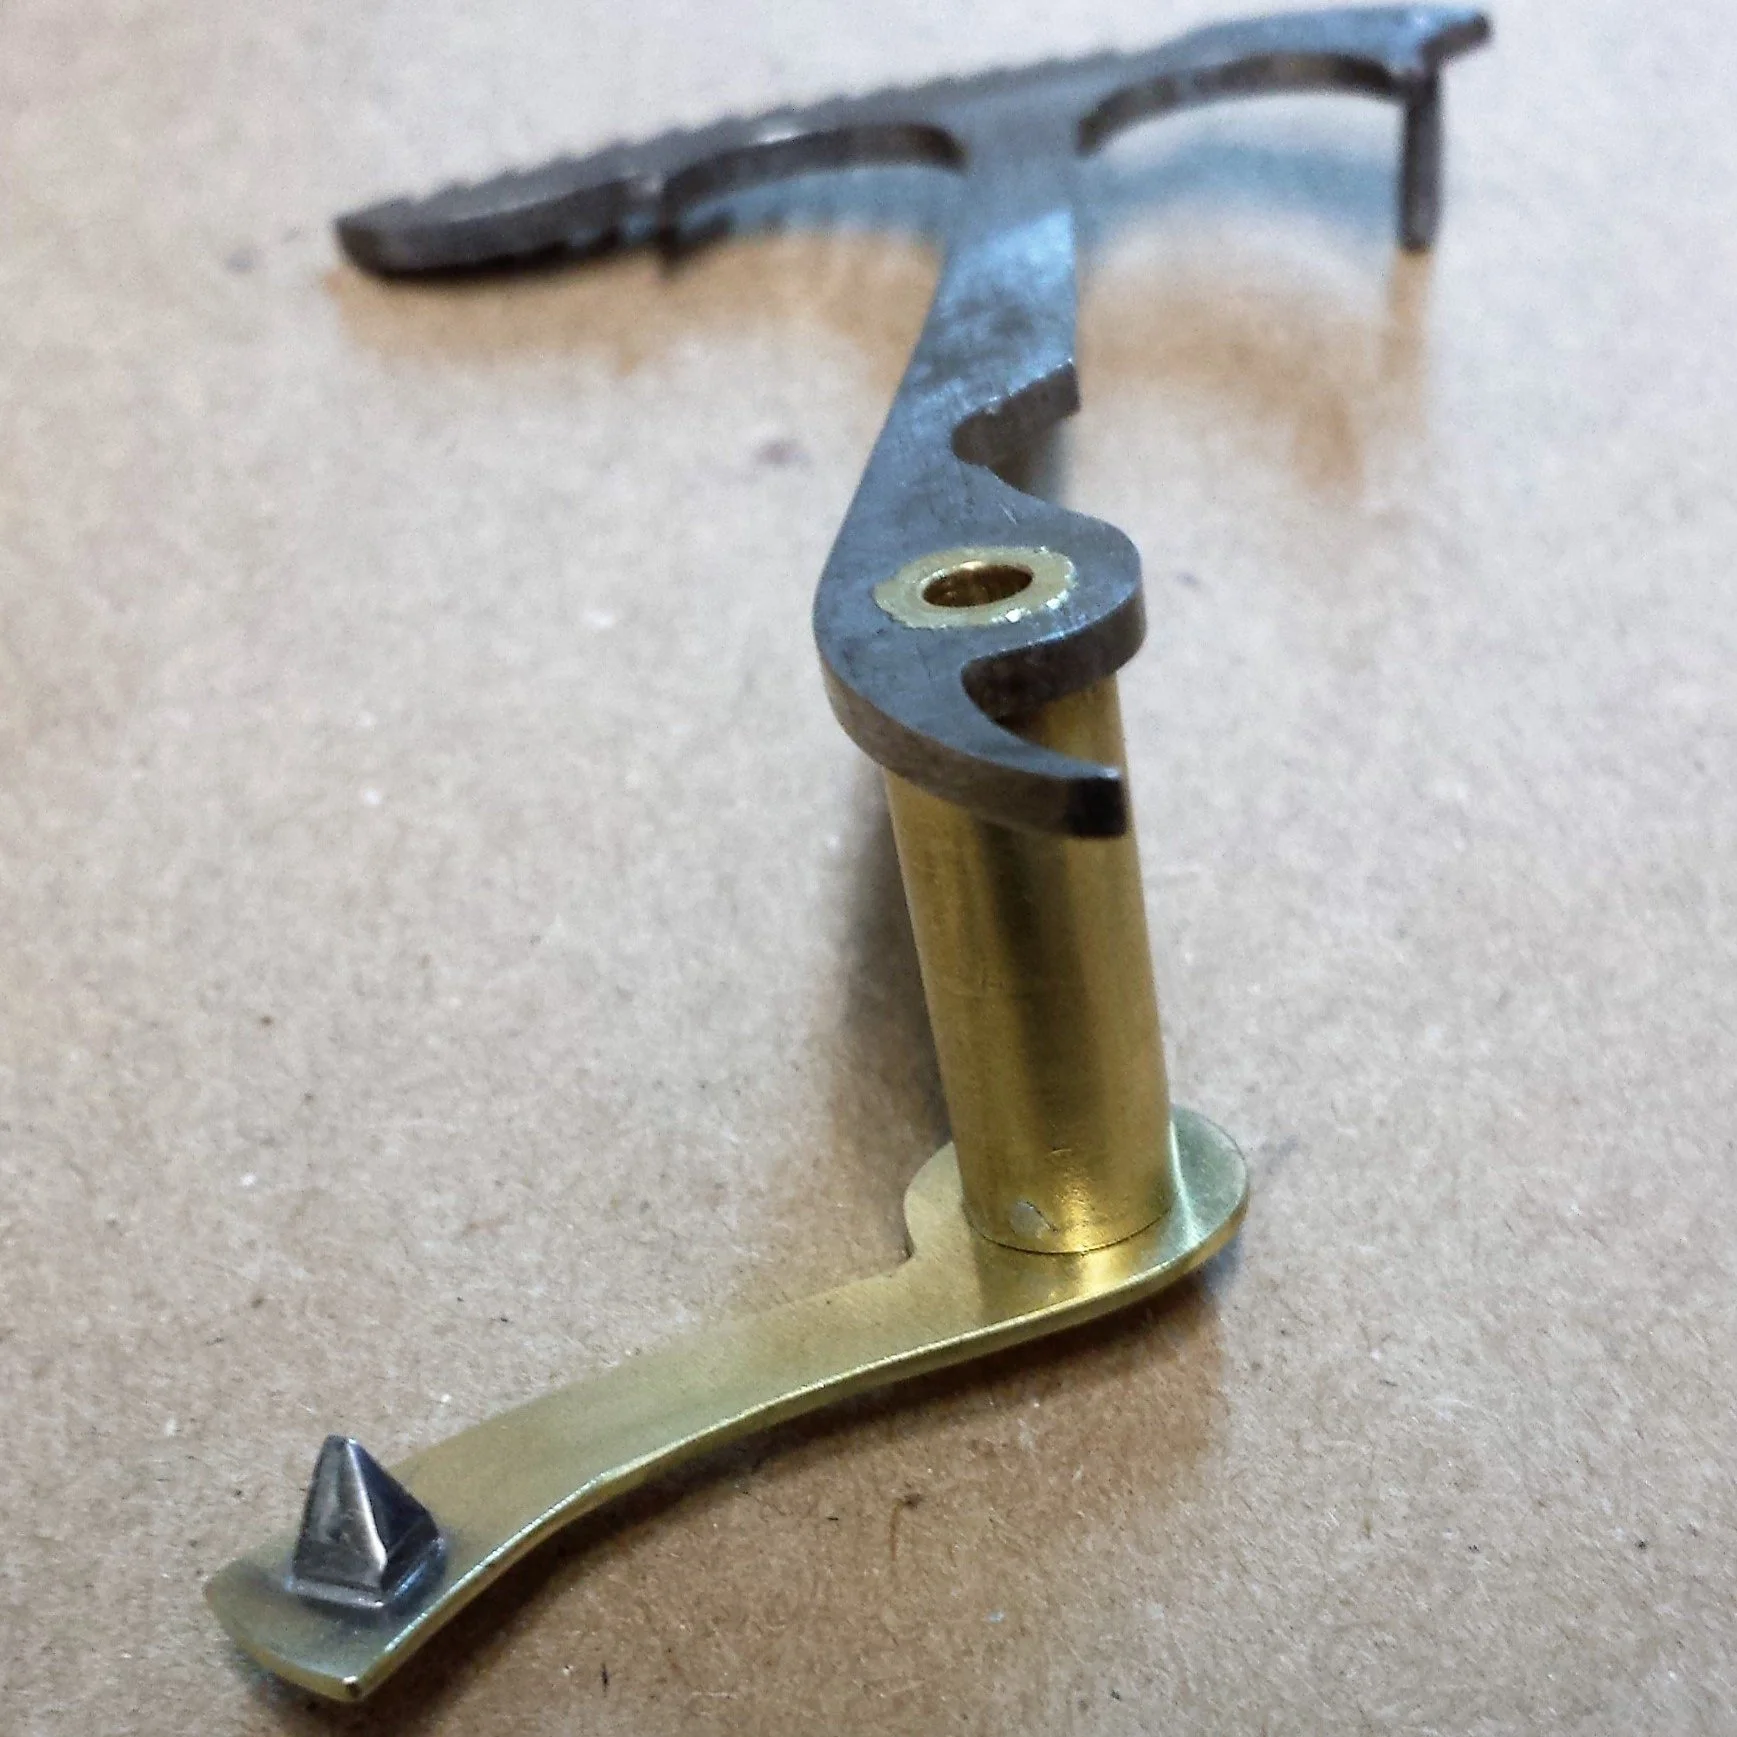
A strike rack broken in two places. Without the complete original brass rack tail at bottom we will have to go through quite a process to re-engineer and make a new rack tail. We must also repair the area at top left.
-
![Grandfather Clock Movement Replacement by Master Clock Repair Columbus, Ohio]()
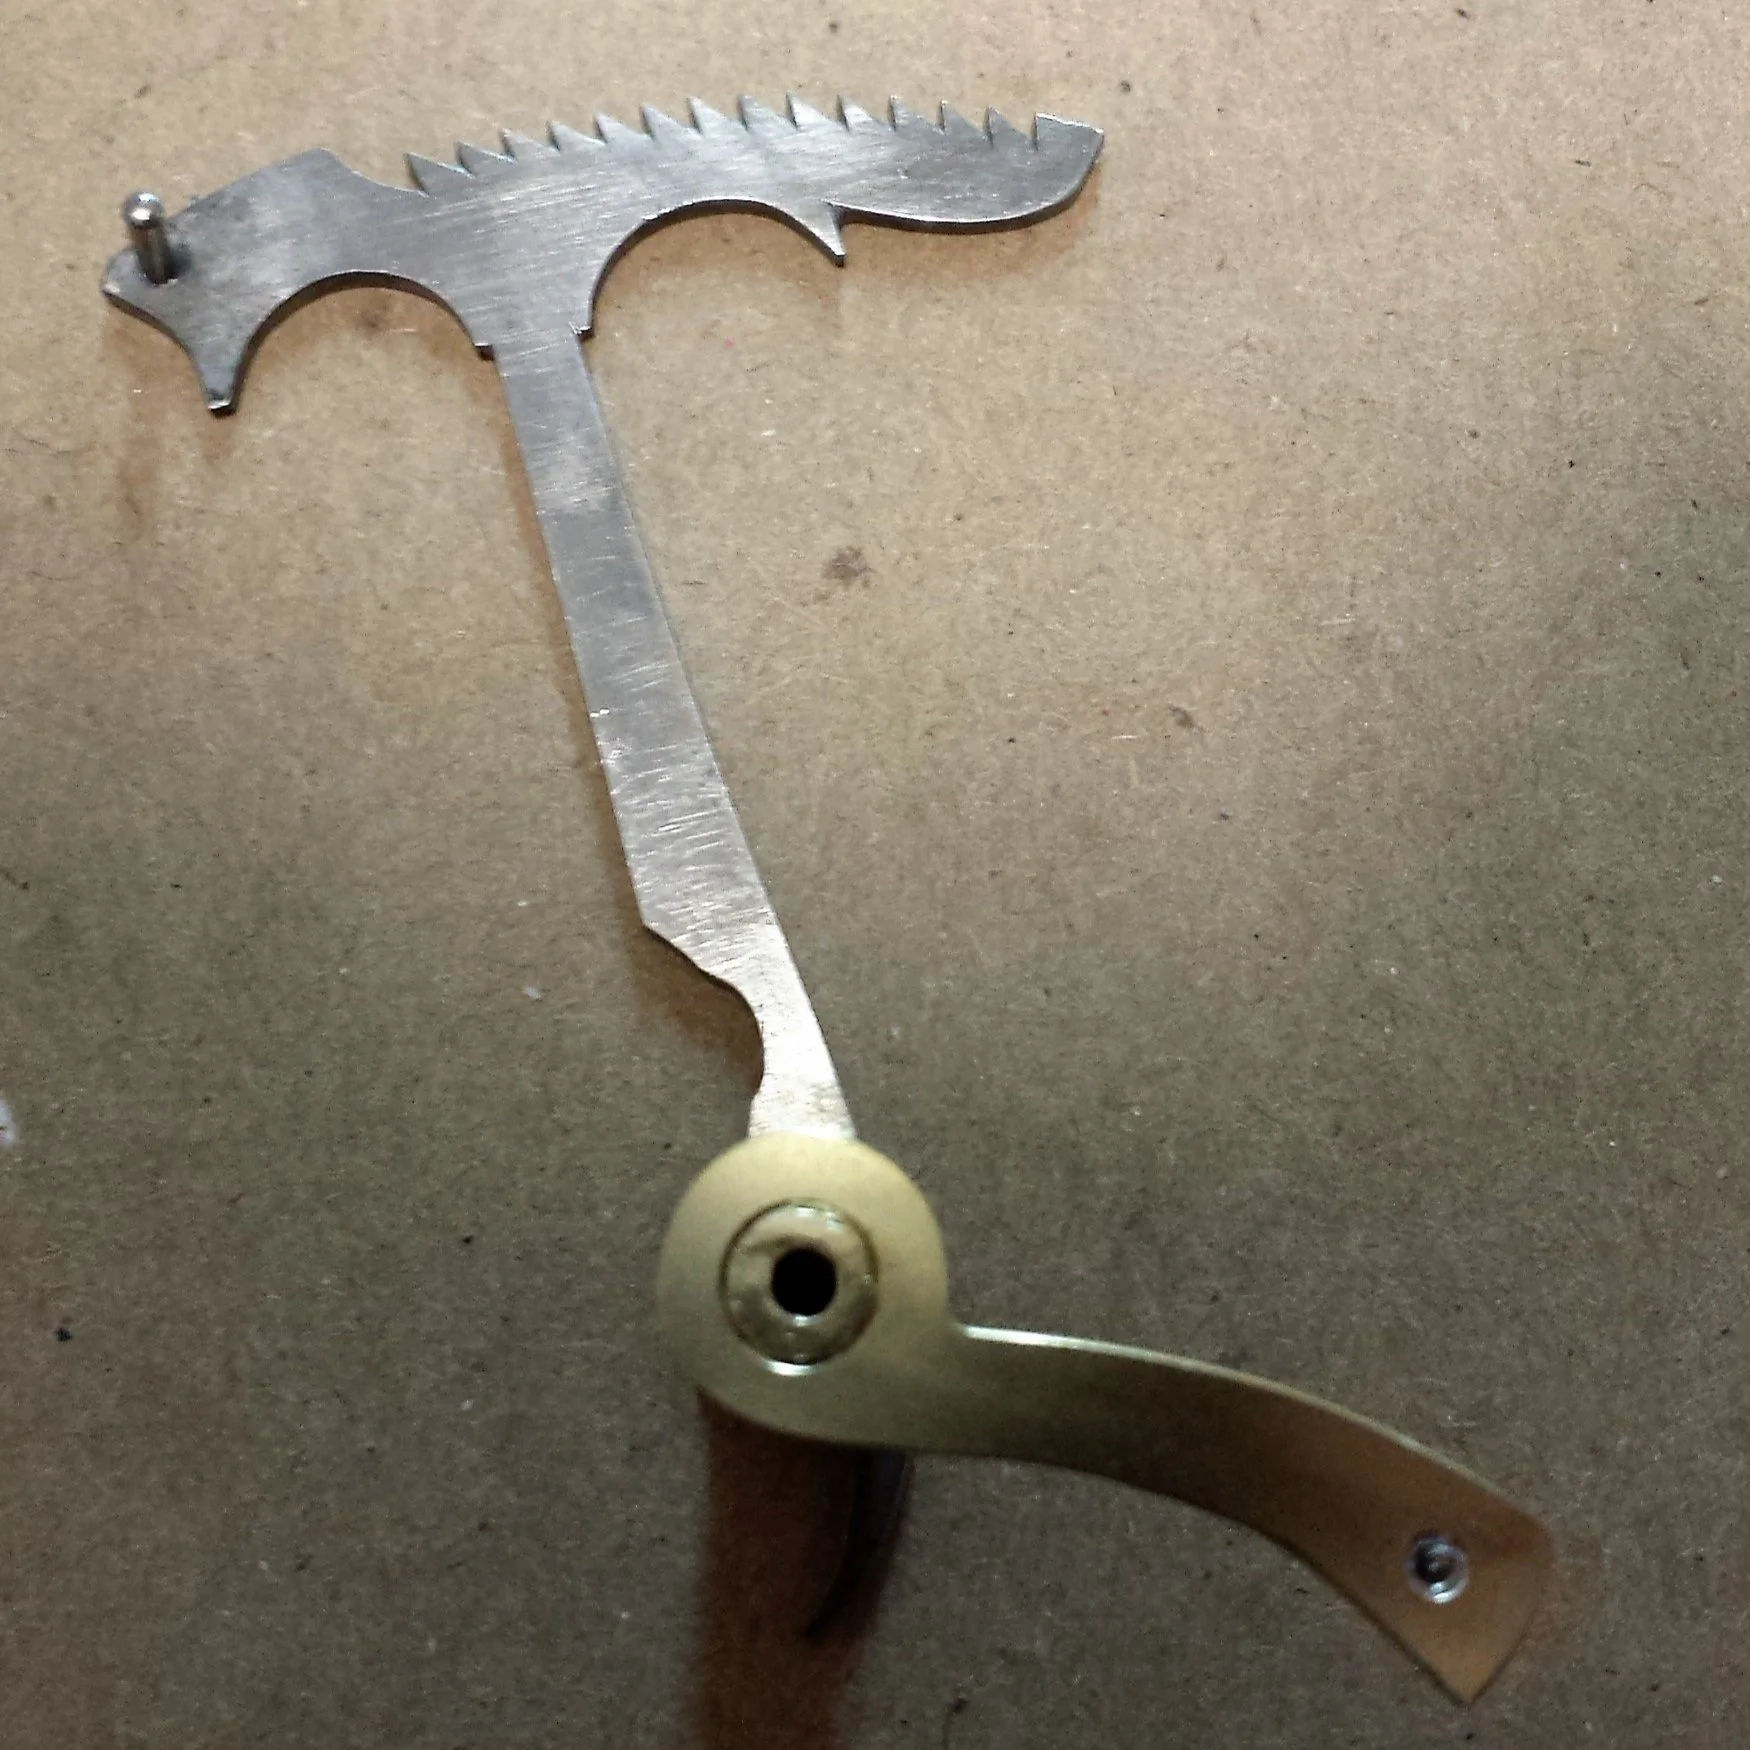
The previously repaired piece at top left was shaped improperly, so it was necessary for me to engineer a different design based on other rack samples from similar clocks. Please see important note above in the description. The current shape is still not defined properly. You can see the lines I drew to create the correct shape and the hole where the steel stop pin will go.
-
![Grandfather Clock Movement Replacement by Master Clock Repair Columbus, Ohio]()
The replacement piece at top left has been riveted and soldered to the original rack top and the pin has been inserted. This area is now finished. I have made a very raw rack tail to replace the broken piece seen in the first photo.
-
![Grandfather Clock Movement Replacement by Master Clock Repair Columbus, Ohio]()
The hole is drilled on the left side that will allow me to rivet it to the main body of the rack. Several small holes have been drilled along the top edge on the right side to facilitate a trial and error method of finding the proper position for the rack tail pin. .
-
![Grandfather Clock Movement Replacement by Master Clock Repair Columbus, Ohio]()
The rack tail is now temporarily placed onto the main body of the rack for trial fitting and adjustment.
-
![Grandfather Clock Movement Replacement by Master Clock Repair Columbus, Ohio]()
An alignment mark has been made where the rack tail is temporarily riveted to the main body and a temporary pin has been inserted in one of the small holes on the right.
-
![Master Clock Repair of Columbus, Ohio offers a friendly, honest, and professional clock service near Lancaster, Ohio 43130]()
To aid in determining how far the rack is falling, I have written temporary, even numbers along the bottom of the rack. You can also see small lines on the snail showing where the rack pin is landing so I will have a reference to compare to.
-
![Master Clock Repair of Columbus, Ohio offers a friendly, honest, and professional clock service near Lancaster, Ohio 43130]()
I have had to try the pin in each of the small holes while also changing the rack tail angle and snail position until I found the hole that works best. Now that I know which works best I have scribed a line with a compass to the center of the raw rack tail and drilled a new hole to recieve the pin.
-
![Master Clock Repair of Columbus, Ohio offers a friendly, honest, and professional clock service near Lancaster, Ohio 43130]()
Here you can clearly see the scribed arc and the new hole drilled and chamfered to receive the new steel pin that I turned on the lathe. The trial holes will be removed when the rack tail is reshaped.
-
![Master Clock Repair of Columbus, Ohio offers a friendly, honest, and professional clock service near Lancaster, Ohio 43130]()
The rack tail pin has been riveted in place and the rack tail has been shaped correctly while also removing the temporary holes I drilled. The thinner middle of the rack tail is designed to allow for flexibility and keeps the rack from jamming in case the clock is allowed to run down.
-
![Master Clock Repair of Columbus, Ohio offers a friendly, honest, and professional clock service near Lancaster, Ohio 43130]()
This is the back side of the repaired rack showing the extent of the brass piece I made at the top.
-
![Master Clock Repair of Columbus, Ohio offers a friendly, honest, and professional clock service near Lancaster, Ohio 43130]()
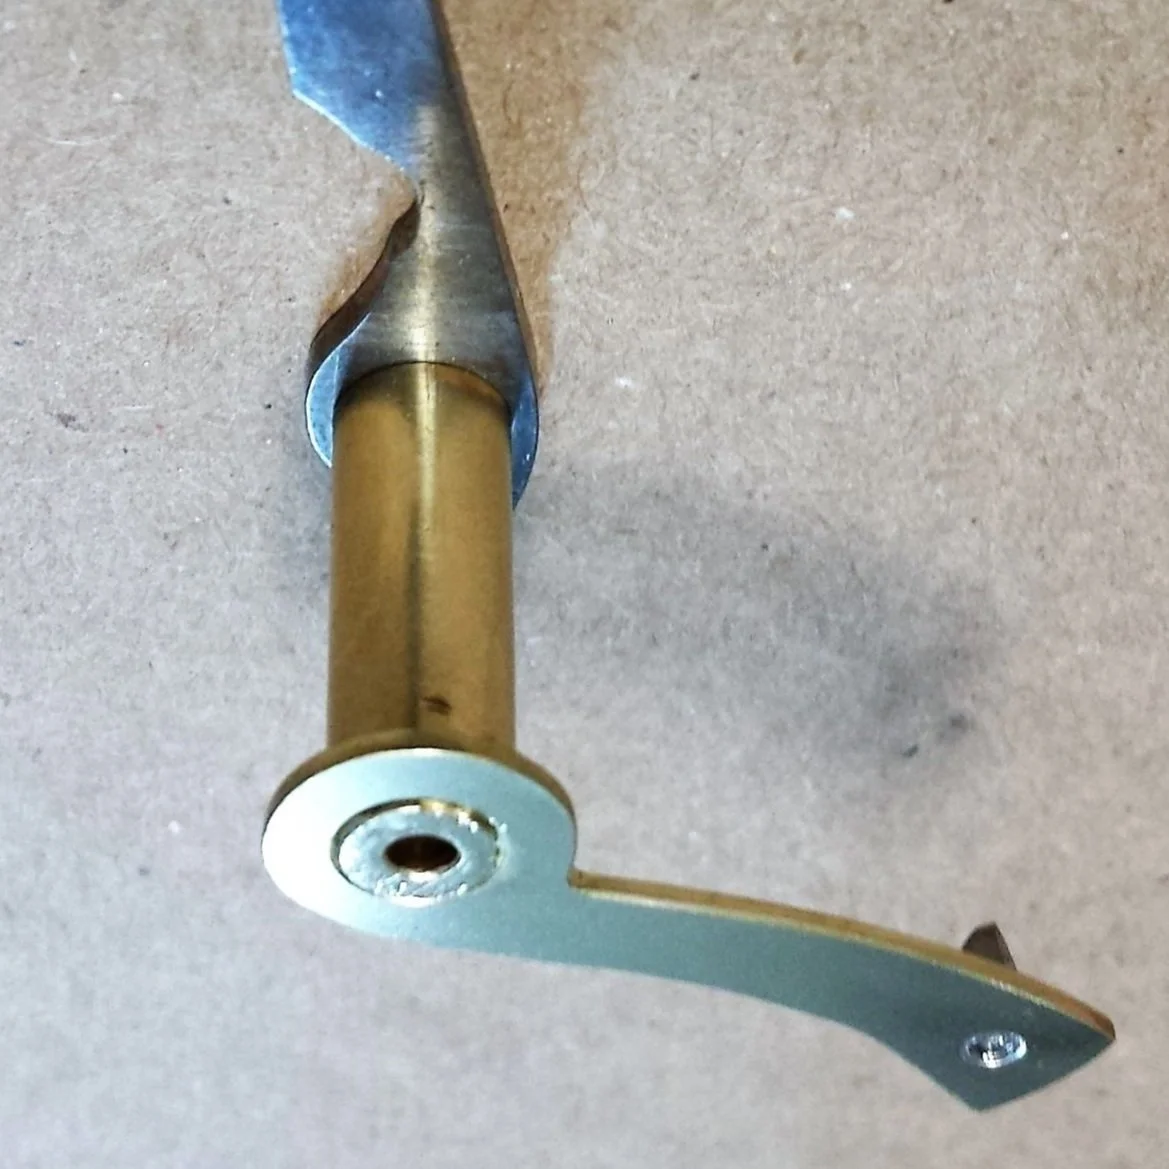
Close up of the new rack tail showing minimal use of solder to attach the brass rack tail to the brass rack sleeve.
-
![Master Clock Repair of Columbus, Ohio offers a friendly, honest, and professional clock service near Lancaster, Ohio 43130]()
The finished product mounted on the clock and all the temporary marks removed.


Replacing a Missing Count wheel Lever
This antique bell striking tall-case clock came to me missing an important lever, the one that controls the strike function. After doing some research, I found a photo of a similar clock to get an idea of the shape of the lever. View the slide show below to see how I made the new lever.
Slide Show
-
![Master Clock Repair of Columbus, Ohio offers a friendly, honest, and professional clock service near Lancaster, Ohio 43130]()
Because the original lever was missing, I started by making a mockup out of brass to test the shape for functionality. I quickly determined that the outside edge on the right side had to be rounded in order for the rotating count wheel under it to lift the lever up and out of the way.
-
![Master Clock Repair of Columbus, Ohio offers a friendly, honest, and professional clock service near Marysville, Ohio 43040]()
The shape of the brass mockup was then transferred to a piece of steel. The position of the square hole was critical for proper alignment of the new lever to interact with the count wheel.
-
![Master Clock Repair of Columbus, Ohio offers a friendly, honest, and professional clock service near Marysville, Ohio 43040]()
Cutting steel by hand with a jewelers saw is difficult at best so I drilled a series of holes along the edge to speed up the process.
-
![Master Clock Repair of Columbus, Ohio offers a friendly, honest, and professional clock service near Marysville, Ohio 43040]()
A combination of grinding and sawing got me to this point. Most of the excess material has been removed.
-
![Master Clock Repair of Columbus, Ohio offers a friendly, honest, and professional clock service near Marysville, Ohio 43040]()
I left a piece of the stock steel attached to the new lever as long as possible to provide something to hold on to while filing and shaping the piece.
-
![Master Clock Repair of Columbus, Ohio offers a friendly, honest, and professional clock service near Marysville, Ohio 43040]()
The new lever is just about complete. The edges are smooth and most of the surface has been polished. It is ready to be separated from the raw stock.
-
![Master Clock Repair of Columbus, Ohio offers a friendly, honest, and professional clock service near Marysville, Ohio 43040]()
Once the piece was removed from the stock i was able to make a trial fit. At this point it was determined that the square hole was off just a bit. I would have to come up with a way that would make it adjustable so I made a brass collet to hold it onto the clock.
-
![Master Clock Repair of Columbus, Ohio offers a friendly, honest, and professional clock service near Marysville, Ohio 43040]()
I hand filed a square hole in the collet i turned on the lathe and then riveted the brass collet to the steel lever.
-
![Master Clock Repair of Columbus, Ohio offers a friendly, honest, and professional clock service near Marysville, Ohio 43040]()
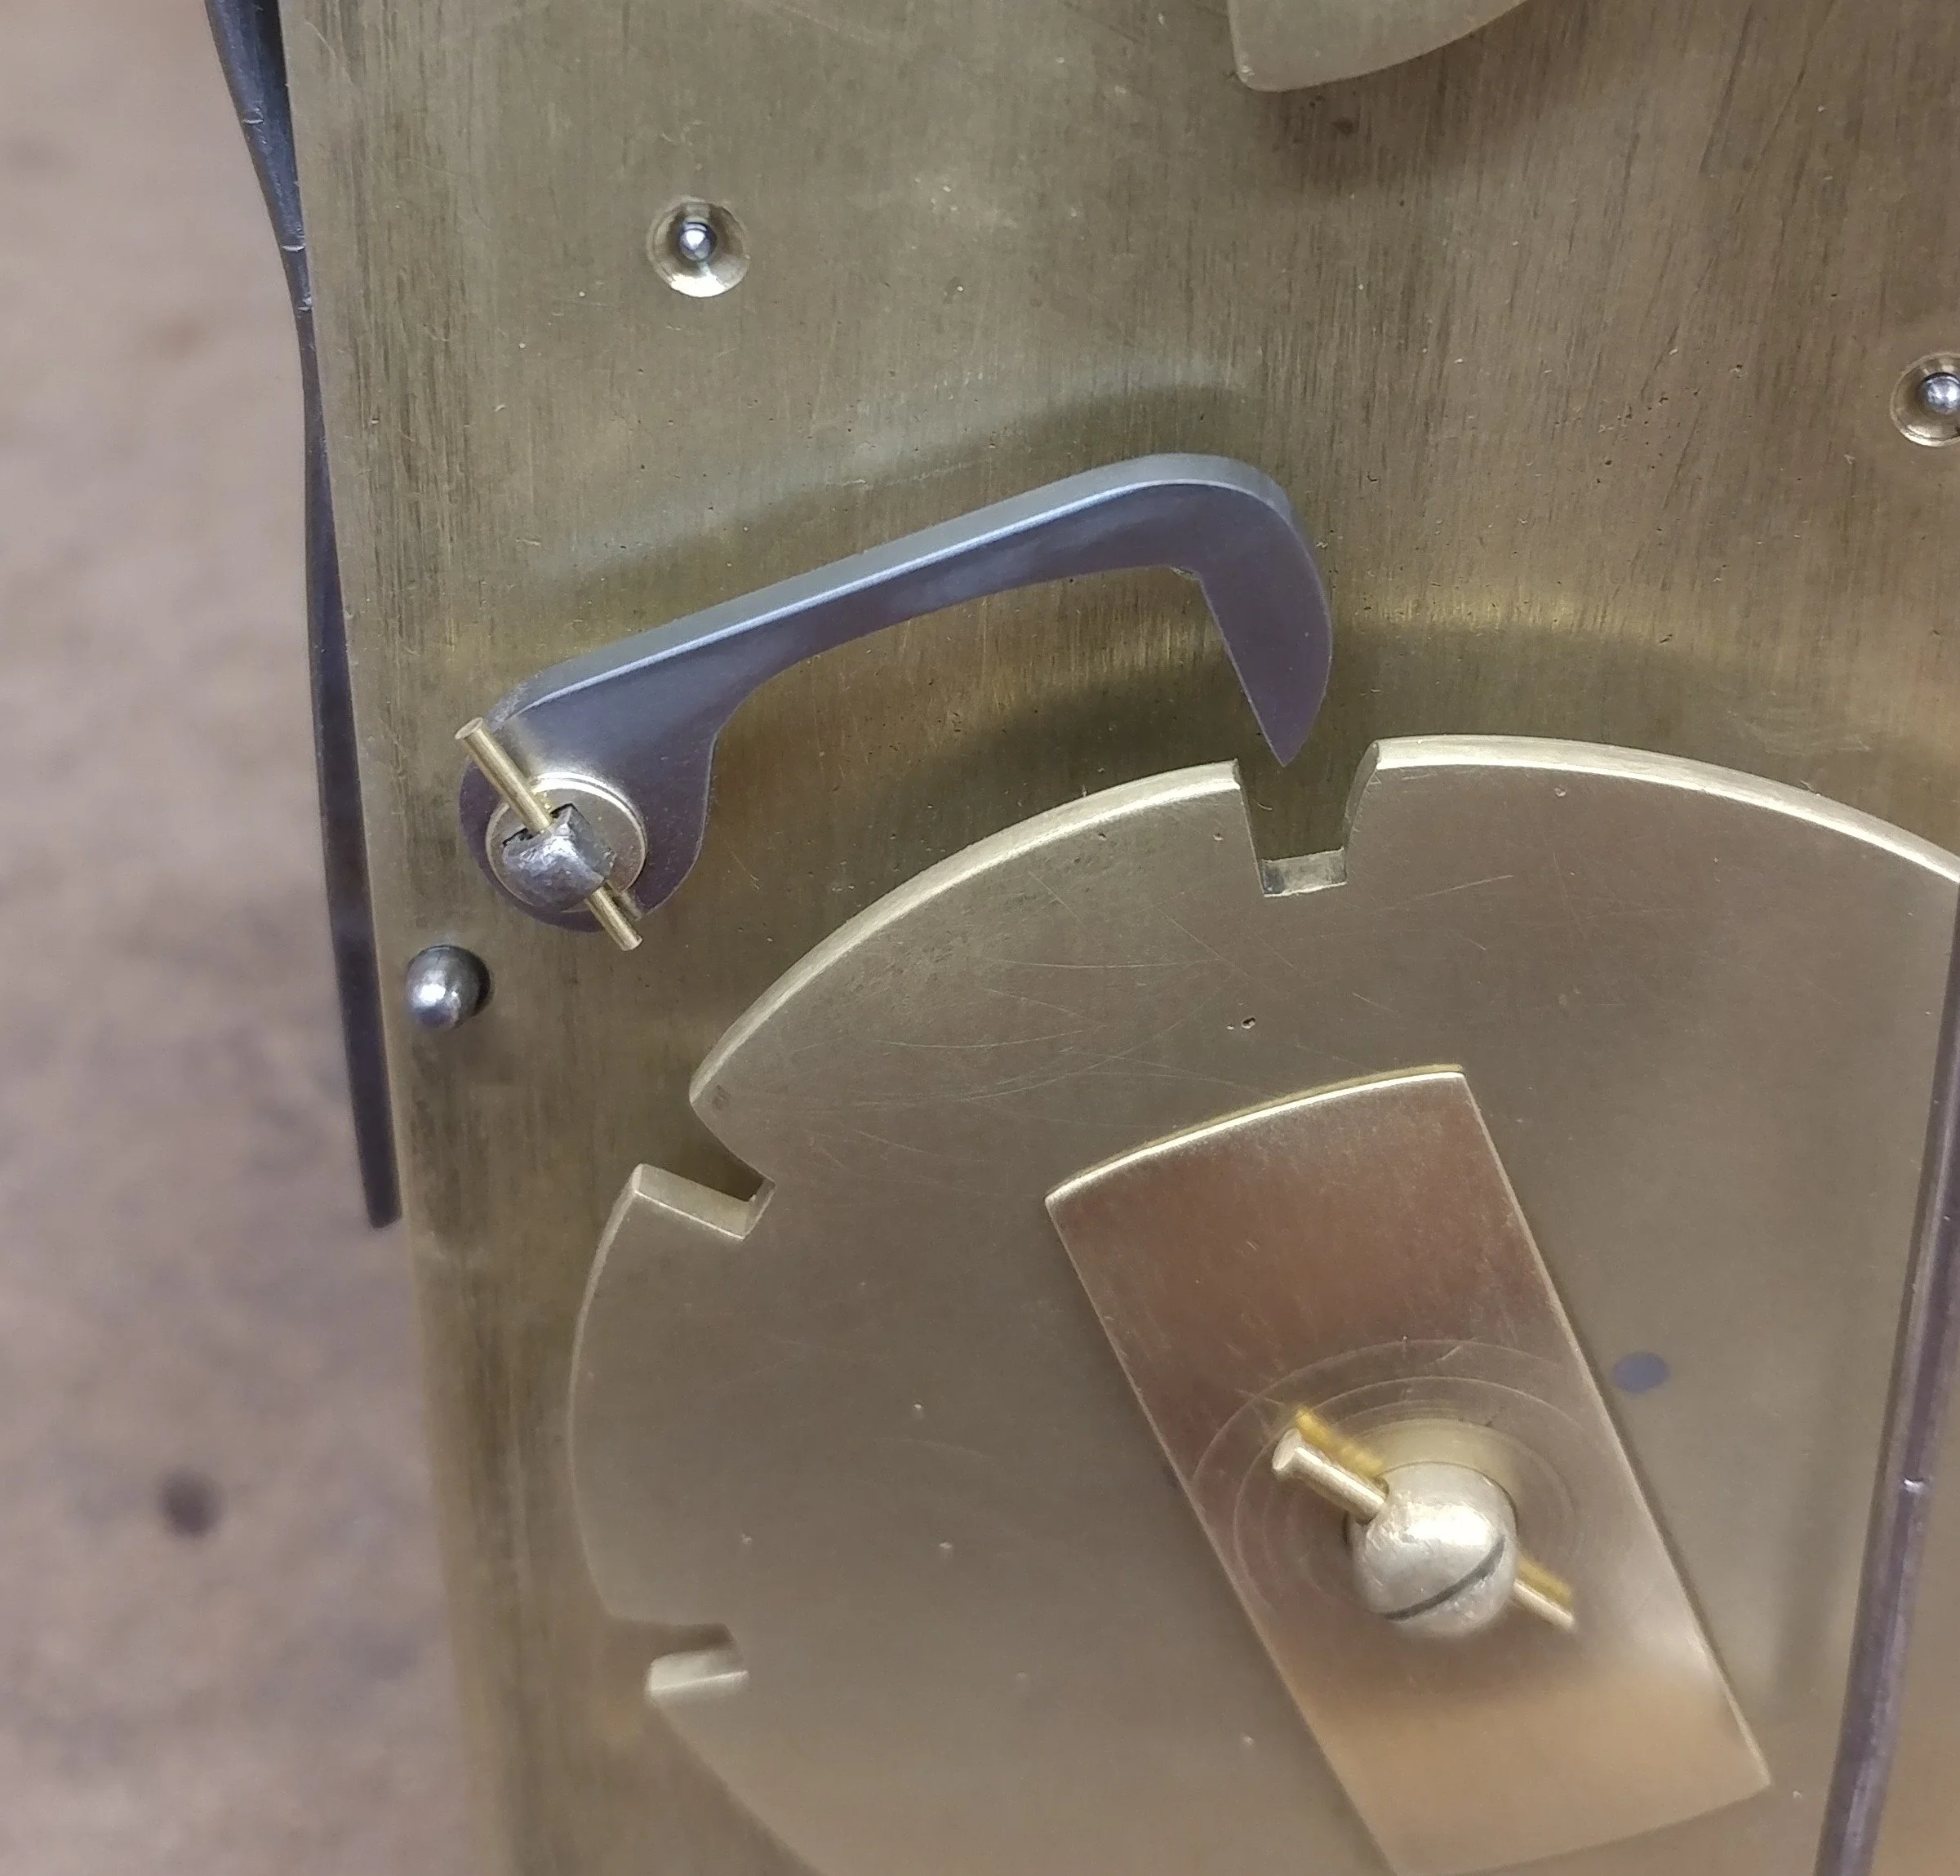
The finished piece polished, adjusted and mounted on the clock. The two rounded edges work together to lift the new lever out of the dip in the count wheel. As long as the lever is riding on the high part of the wheel the clock will keep striking.
-
![Master Clock Repair of Columbus, Ohio offers a friendly, honest, and professional clock service near Marysville, Ohio 43040]()
This photo shows the connection of the lever just made to the levers inside the clock movement.


Repairing a poorly repaired Bell Striker Lever
-
![Master Clock Repair of Columbus, Ohio offers a friendly, honest, and professional clock service near Chillicothe, Ohio 45601]()
This lever had been broken, and instead of making a new brass piece, they soldered and riveted a shim over top of the broken one to hold it together. This clock deserved a better repair than this.
-
![Master Clock Repair of Columbus, Ohio offers a friendly, honest, and professional clock service near Chillicothe, Ohio 45601]()
The lever was taken apart and a replacement brass piece was rough cut to match the broken original.
-
![Master Clock Repair of Columbus, Ohio offers a friendly, honest, and professional clock service near Chillicothe, Ohio 45601]()
The new brass lever has been filed to shape.
-
![Master Clock Repair of Columbus, Ohio offers a friendly, honest, and professional clock service near Chillicothe, Ohio 45601]()
the fully repaired lever reassembled with all the parts cleaned up and the excess solder removed.


Making New Levers for an Antique Striking Mantle Clock
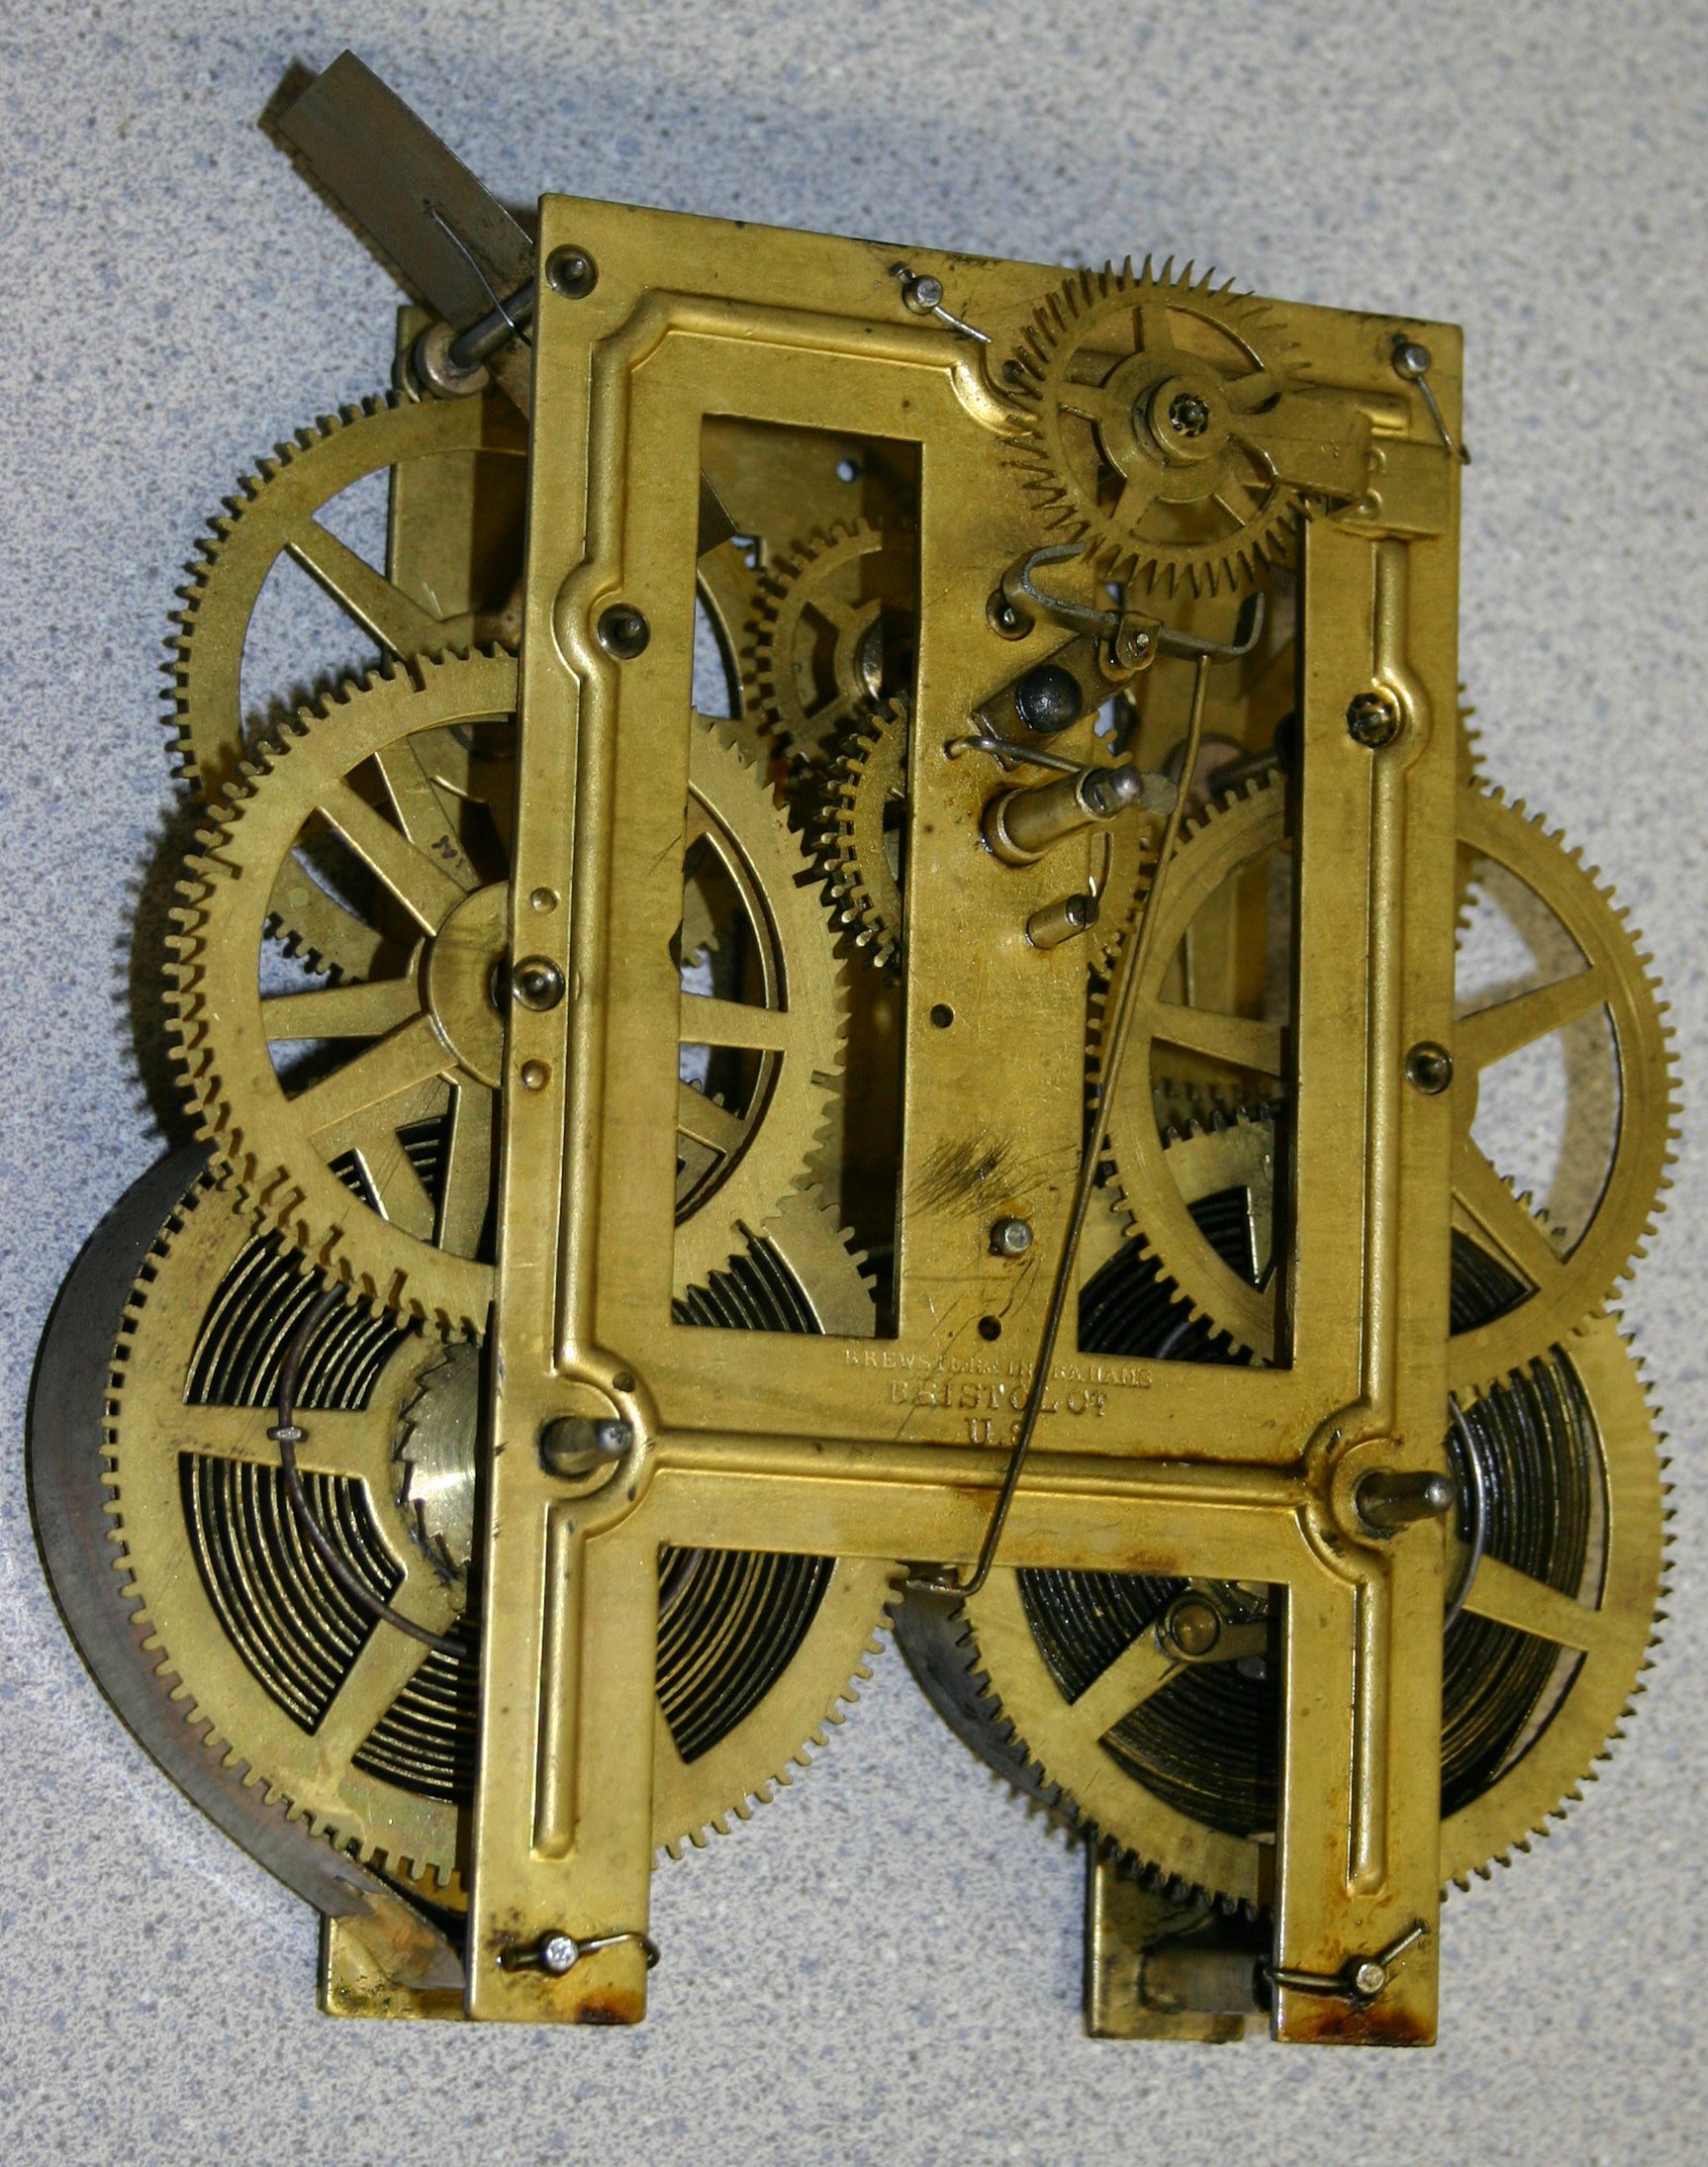
I received the clock pictured below with no levers to control the strike function. I was extremely fortunate to find someone that had this clock and could send me the levers to copy. Below right, are the new levers in which each component piece was made from raw material. The new levers are the shiny ones on the outside and the rusty ones in the middle are what I copied them from. The movement on the left is a Brewster and Ingraham clock with brass mainsprings.

Gathering Pallet Repair
Gathering pallets are parts of a clock that control the strike or chime function when a rack and snail is present. Below is a unique form of gathering pallet. The clock was about 100 years old and through age and fatigue the brass sleeve simply broke leaving the gathering pallet to spin freely on its arbor.
Repairing a Broken Gathering Pallet
Slide Show
-
![Master Clock Repair of Columbus, Ohio offers a friendly, honest, and professional clock service near Chillicothe, Ohio 45601]()
The piece in the very center of the photo was the part that was broken. I took a chance and left the clock with the customer and only brought the broken piece into the shop.
-
![Master Clock Repair of Columbus, Ohio offers a friendly, honest, and professional clock service near Chillicothe, Ohio 45601]()
Here is a close up of the broken part. You can see that the brass sleeve is broken at the jagged edge.
-
![Master Clock Repair of Columbus, Ohio offers a friendly, honest, and professional clock service near Chillicothe, Ohio 45601]()
Here is the finished piece. Keep scrolling to see how it was made.
-
![Master Clock Repair of Columbus, Ohio offers a friendly, honest, and professional clock service near Chillicothe, Ohio 45601]()
When machining a piece like this it is important to consider what cuts to make first. The replacement sleeve has to be hollow and drilled perfectly down the center of the raw brass stock. It also had to have small hole drilled to receive a taper pin to hold it in place.
-
![Master Clock Repair of Columbus, Ohio offers a friendly, honest, and professional clock service near Circleville, Ohio 43113]()
Here is the finished sleeve removed from the raw stock.
-
![Master Clock Repair of Columbus, Ohio offers a friendly, honest, and professional clock service near Circleville, Ohio 43113]()
This photo shows the broken brass sleeve, the completed replacement sleeve and the steel gathering pallet.
-
![Master Clock Repair of Columbus, Ohio offers a friendly, honest, and professional clock service near Circleville, Ohio 43113]()
The gathering pallet fully assembled with the new sleeve riveted in place and the gathering pallet pin installed. Upon delivery and installation I was extremely pleased to find that I had drilled the small hole to receive the taper pin, in the perfect position. It lined up beautifully.


Repairing a Broken Chime Control Cam
Slide Show
-
![Master Clock Repair of Columbus, Ohio offers a friendly, honest, and professional clock service near Circleville, Ohio 43113]()
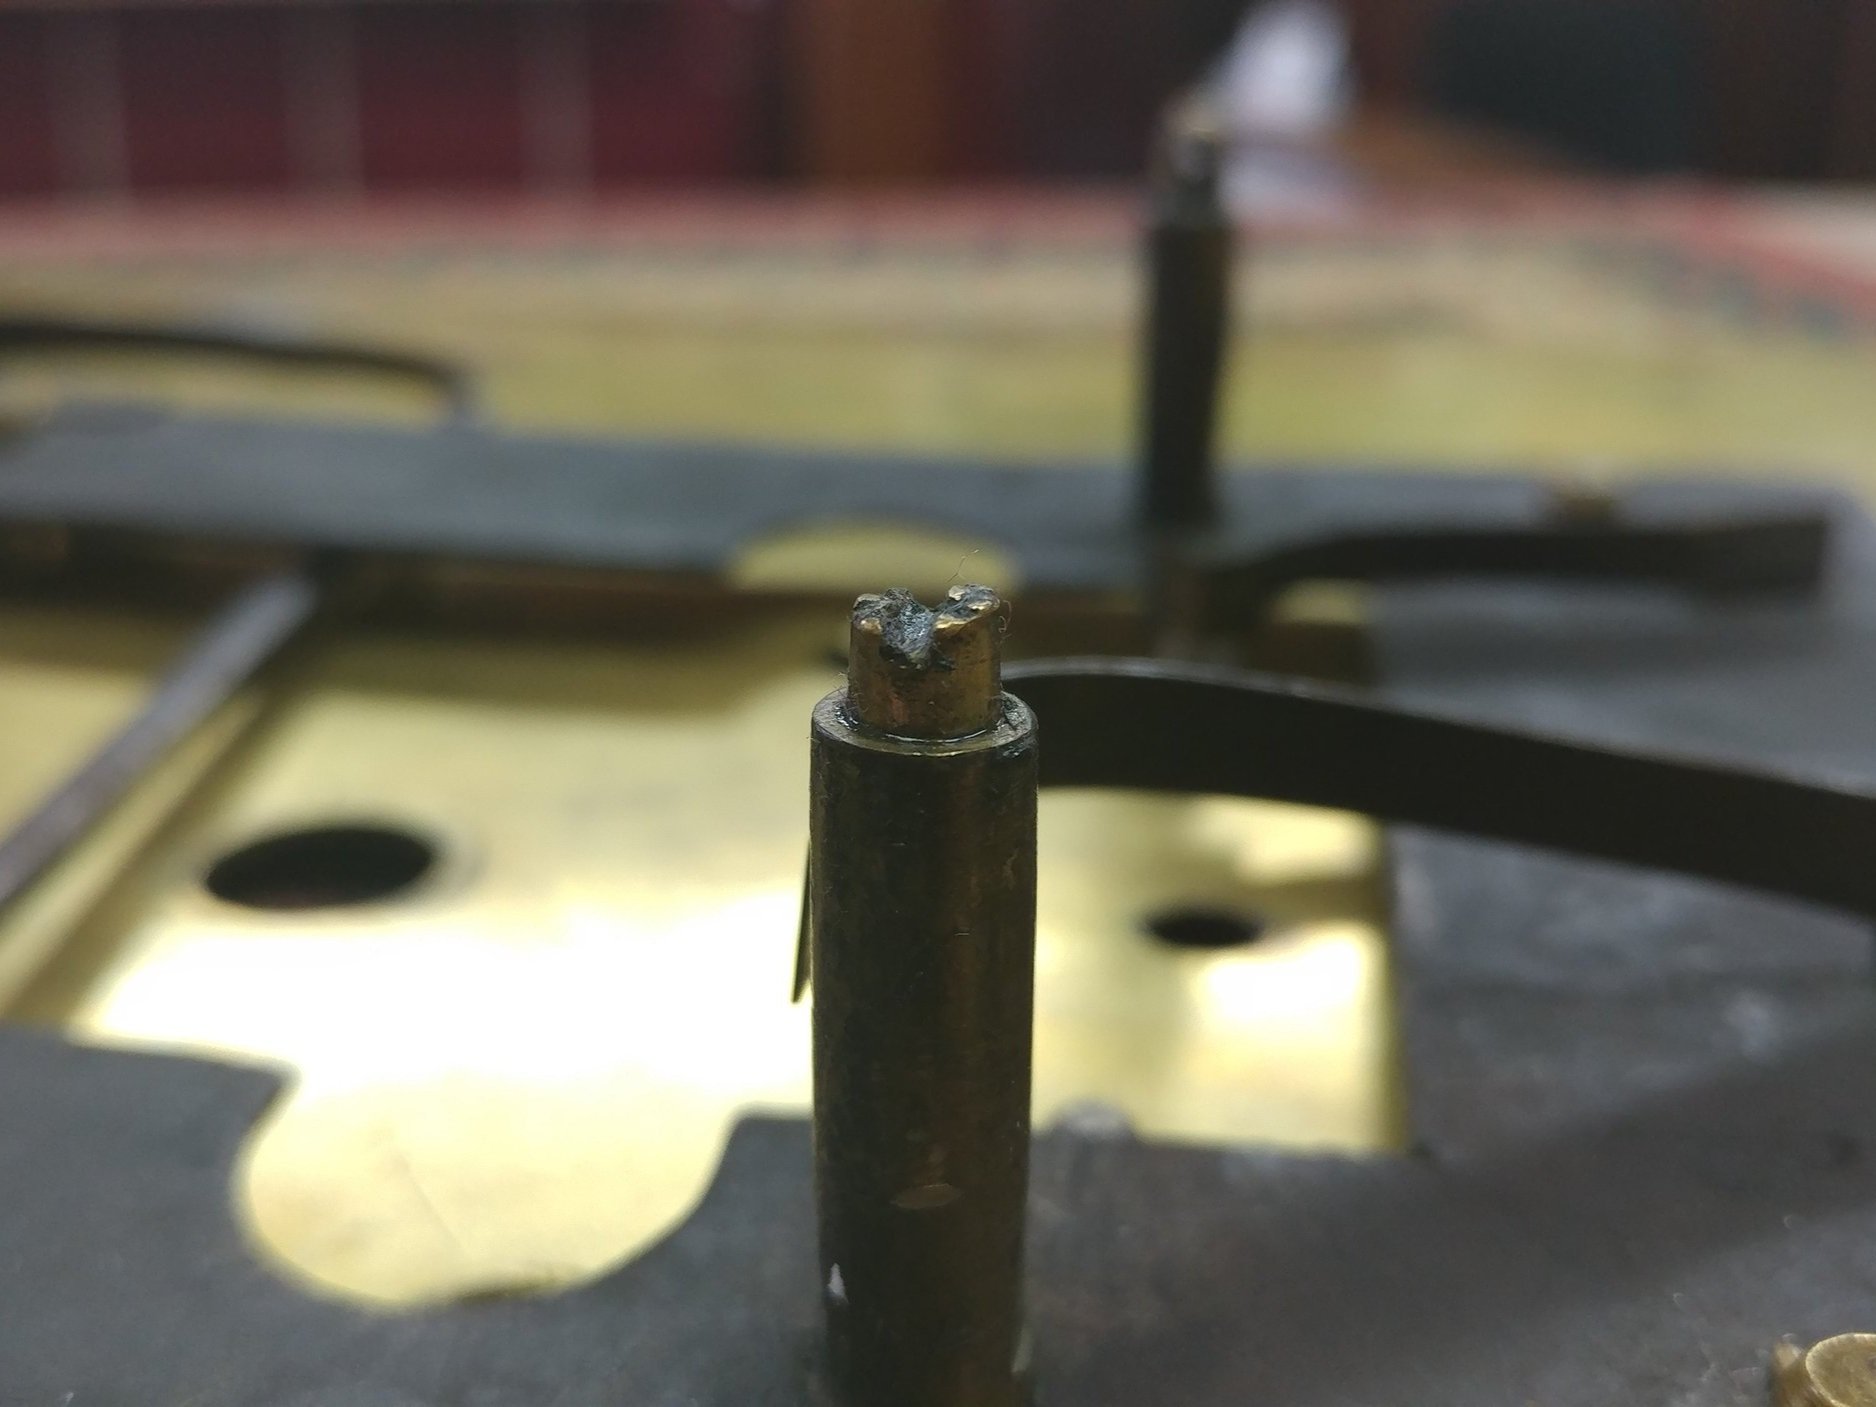
This is a slightly out of focus chime control cam. The pin facing downward at an angle is supposed to fit into the dark hole in the next photo.
-
![Master Clock Repair of Columbus, Ohio offers a friendly, honest, and professional clock service near Circleville, Ohio 43113]()
The dark hole in the center of this photo is where the part in the previous photo is supposed to fit. Unfortunately, someone attempted a bad repair. The pin that slides into the dark hole was supposed to be one piece with the arbor it slid in to, not a separate pin sliding into a hole. Because it was two pieces, and the fit was not precise, the part was able to slip out of proper position.
-
![Master Clock Repair of Columbus, Ohio offers a friendly, honest, and professional clock service near Circleville, Ohio 43113]()
This a photo of the completed repair. The out of focus piece in the first picture is now more clearly seen. It is the brass-colored cam just above center in the photo. Now, let's see how it was done.
-
![Master Clock Repair of Columbus, Ohio offers a friendly, honest, and professional clock service near Circleville, Ohio 43113]()
The highest point on the left (now viewed from the side) is the dark hole seen in the second photo. The gear is now removed from the clock. Just to the right of the tip and to the left of the small brass collet you can see where the "center drilling" busted through the side wall of the arbor.
-
![Master Clock Repair of Columbus, Ohio offers a friendly, honest, and professional clock service near Circleville, Ohio 43113]()
Another view of the same gear from the other side. The lantern pinions and the small brass collet have now been removed. Careful measurements have been taken so I can place everything back precisely where it belongs. An entire new arbor and pivots must be made to complete a proper repair.
-
![Master Clock Repair of Columbus, Ohio offers a friendly, honest, and professional clock service near Circleville, Ohio 43113]()
The two pieces at the bottom are some of the broken pieces of the original arbor. Some of the pieces disintegrated while removing the component parts from the damaged arbor. Above is the reassembled gear.
-
![Master Clock Repair of Columbus, Ohio offers a friendly, honest, and professional clock service near Circleville, Ohio 43113]()
The process began with a piece of round steel stock. The diameter was turned to the exact dimension as the original. A pivot was cut into the lower end, a relief made in the arbor diameter where the lantern pinions would go, and a square was filed onto the end where the cam would attach. The square end will keep the cam from slipping out of position.
-
![Master Clock Repair of Columbus, Ohio offers a friendly, honest, and professional clock service near Circleville, Ohio 43113]()
Here is the completed repair. The clock now chimes properly and stops when it is supposed to.


Repairing a POORLY Formed Pivot
I restored an antique bell striking tall case clock movement a number of years ago that had a pivot on one of the mainwheels, that no matter how much I filed and polished it, I kept exposing impurities and empty pockets of air in the steel. After consulting with someone very knowledgeable about metallurgy and centuries old blacksmithing techniques, I learned that when making steel, blacksmiths would often place “things” into the “mix” that would affect the hardness of the steel. According to some “ancient recipes”, sometimes a rat would be thrown into the molten steel. Strangely, there was some element in the dead rat that would have an effect on the quality of the steel. Apparently, these pits were caused by some “substance” in the steel other than a metal. Instead of replacing this very large pivot I placed a “sleeve” over top of it instead. See how I did it below.
“Sleeving” a Bad Pivot
Slide Show
-
![Master Clock Repair of Columbus, Ohio offers a friendly, honest, and professional clock service near Delaware, Ohio 43015]()
Here you can see the oddly shaped arbor and the pitted pivot. In the pits was what looked like rust. Important background information about this task is written above.
-
![Master Clock Repair of Columbus, Ohio offers a friendly, honest, and professional clock service near Delaware, Ohio 43015]()
The completed repair. NOw keep scrolling to see how it was done.
-
![Master Clock Repair of Columbus, Ohio offers a friendly, honest, and professional clock service near Delaware, Ohio 43015]()
On the right is a piece of appropriately hardened steel that has had its outer diameter reduced to the proper diameter for the pivot and then center drilled to match the current original pivot diameter.
-
![Master Clock Repair of Columbus, Ohio offers a friendly, honest, and professional clock service near Delaware, Ohio 43015]()
Another view of the prepared pivot sleeve.
-
![Master Clock Repair of Columbus, Ohio offers a friendly, honest, and professional clock service near Delaware, Ohio 43015]()
The prepared sleeve was cut from the larger stock and then tapped onto the old pivot. The sleeve was machined to fit snugly but I also used some low temperature solder to be sure it would not come off.
-
![Master Clock Repair of Columbus, Ohio offers a friendly, honest, and professional clock service near Delaware, Ohio 43015]()
I have now begun to shape the end of the repaired pivot in order to make the repair "disappear".
-
![Master Clock Repair of Columbus, Ohio offers a friendly, honest, and professional clock service near Delaware, Ohio 43015]()
The completed repair, barely visible and ready for another 100 years of use.


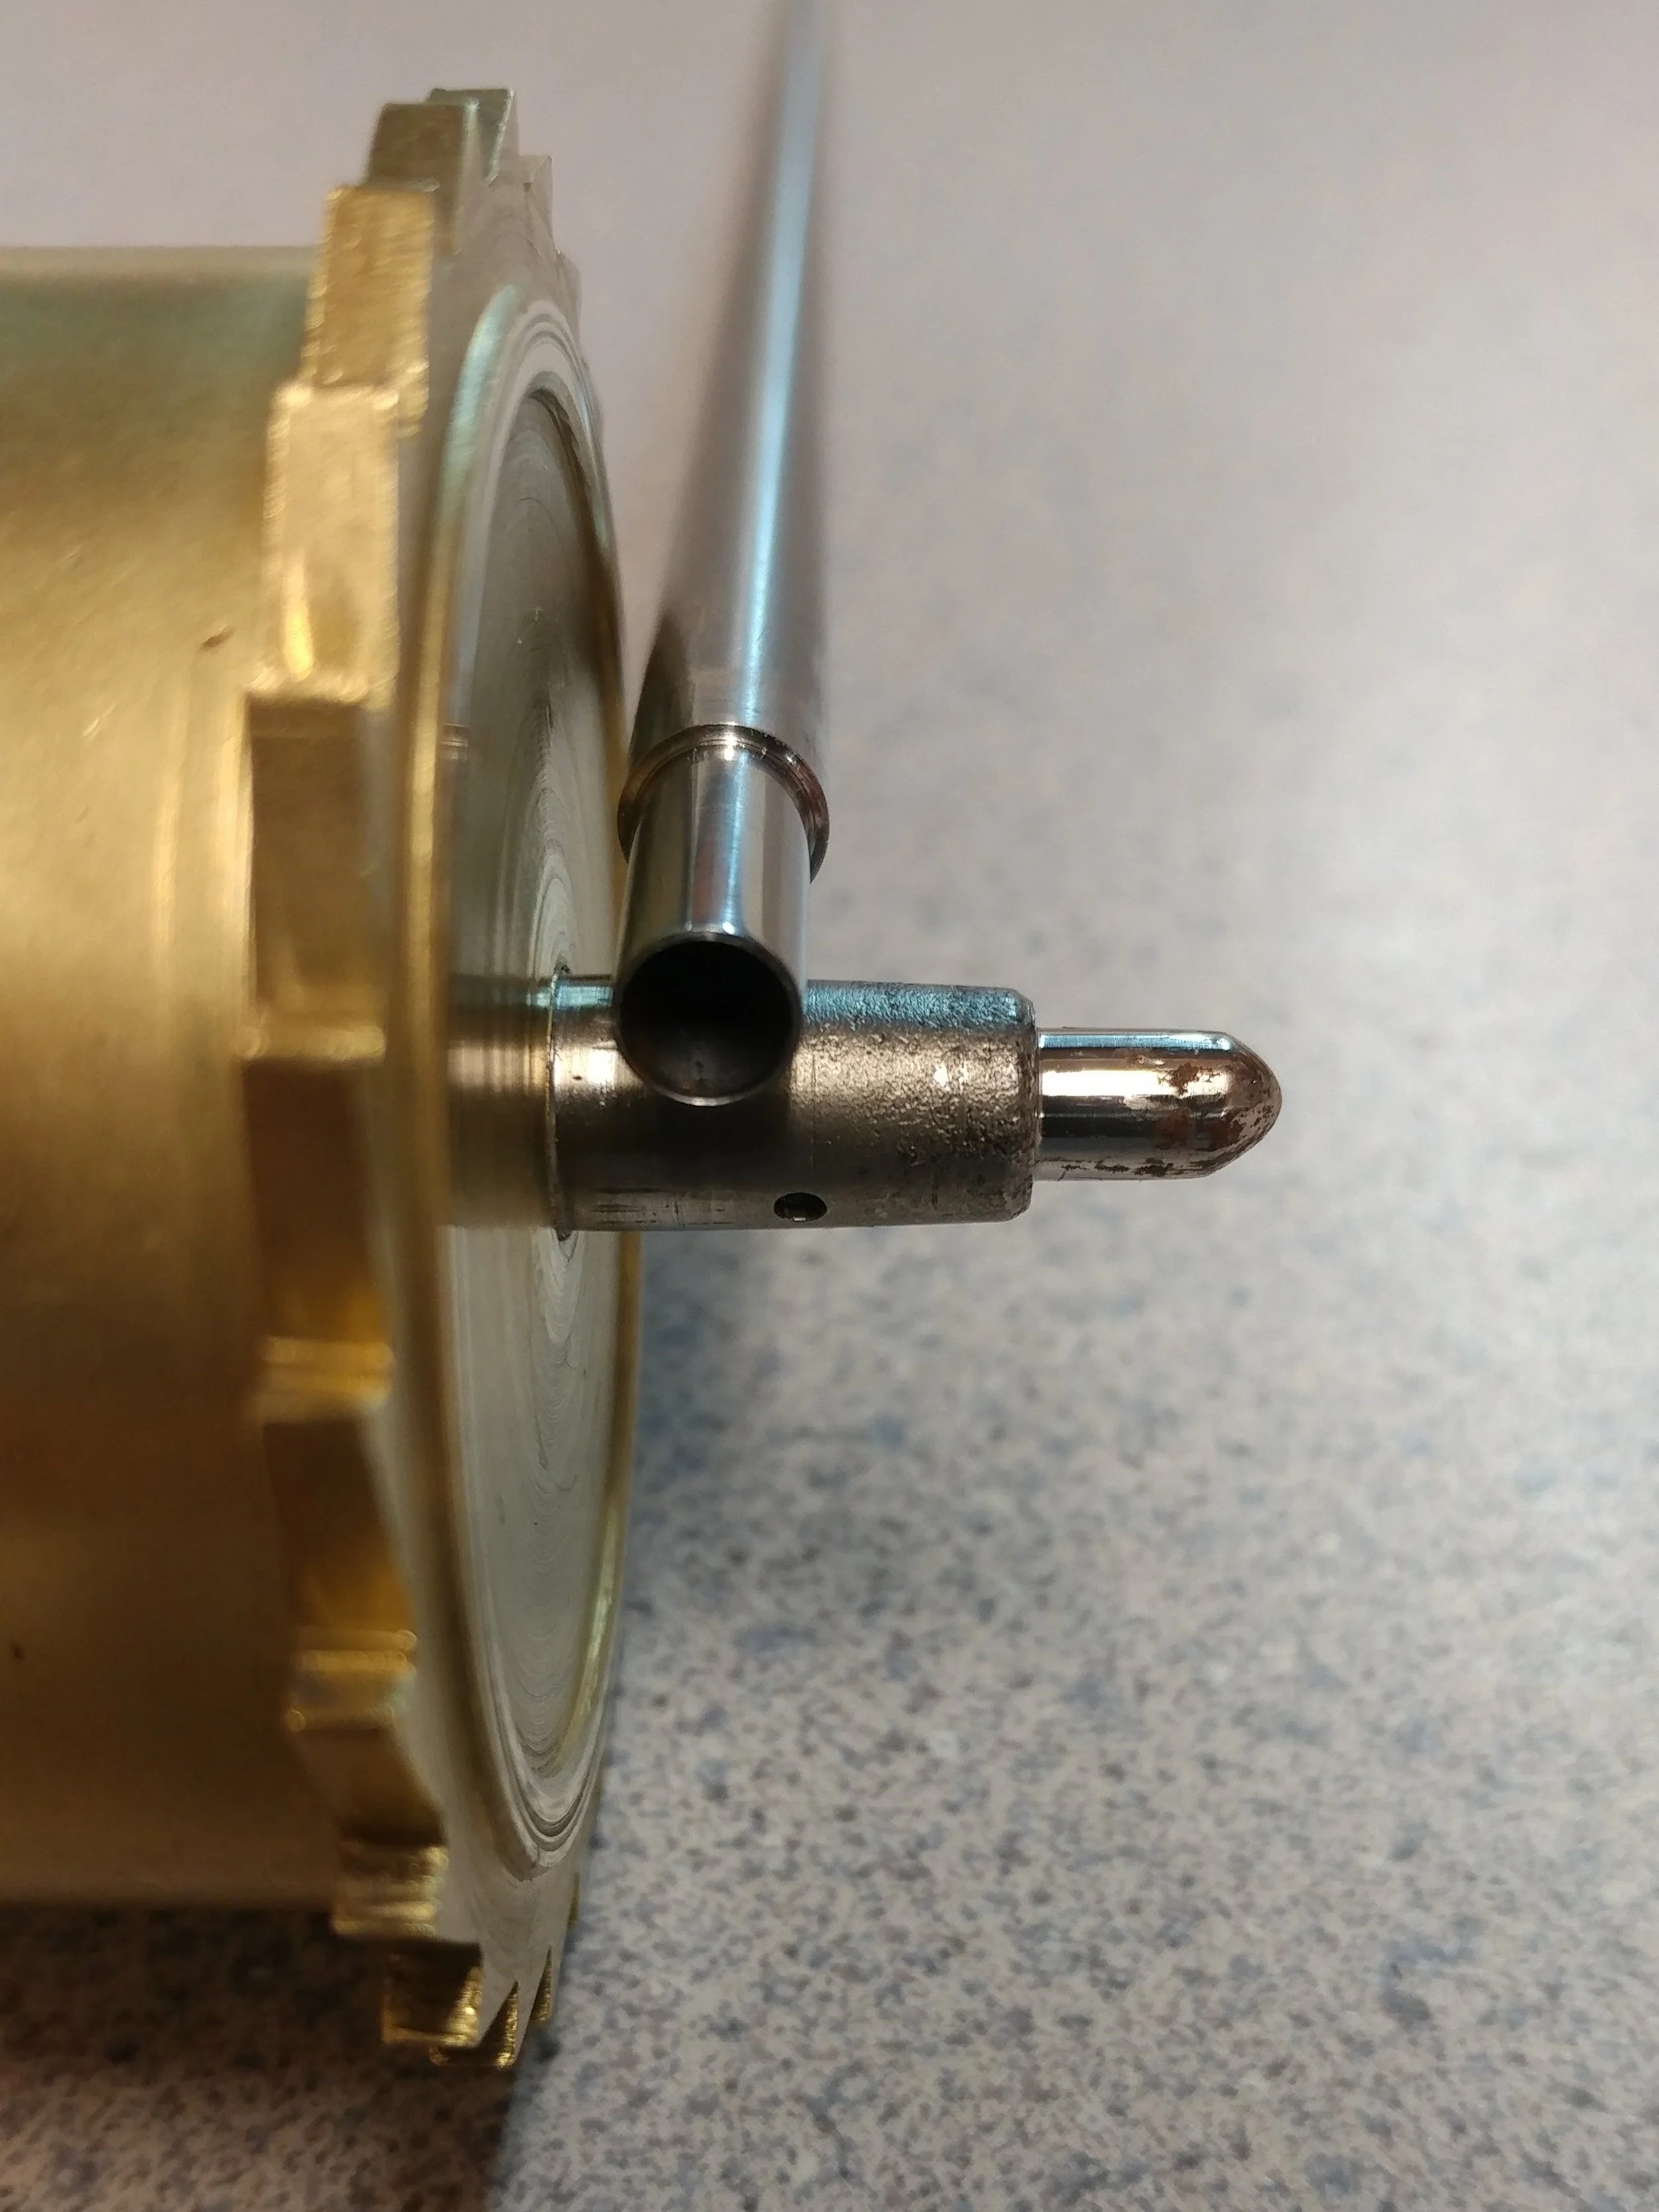


Repairing a Dial Post
This is the backside of a dial for an antique bell striking tall case clock. One of the post tips that go through a hole in the movement broke off where the hole was drilled to receive the taper pin that keeps the post from pulling out. The first photo shows the broken post and the second shows the repaired post. it was necessary to flatten the broken post where the diameter is reduced for the tip, center drill the post and then insert a properly shaped plug into the drilled hole. All of the machined dimensions were precise and tight enough that I could tap the post into the hole and finish it off with a bit of low temperature solder.

Making a New Pulley Saddle
A pulley saddle is the part that the weight hangs from and also holds the pulley that rotates as the clock runs down. The badly worn pulley saddle in the slide show below came to me with a set of weights and a pendulum from a 100-plus year-old, high-quality tubular bell tall case clock. The owner wanted me to refinish the weights, the pendulum and the pulleys. upon examination of one of the pulleys, the one that held up a 40-pound weight, I discovered that the pulley was worn so badly it was about to wear right through to the edge, which would eventually have resulted in a horrible noise and great damage when the weight hit the floor of the clock. Although we could obtain a generic replacement pulley and saddle, the owner wanted it to match the other two and also wanted to retain the look of the originals. I then set about the task of making a new one exactly like the original.
Making a New Pulley Saddle
Slide Show
-
![Master Clock Repair of Columbus, Ohio offers a friendly, honest, and professional clock service near Delaware, Ohio 43015]()
Here you can see how close the hole was to wearing through the edge of the saddle.
-
![Master Clock Repair of Columbus, Ohio offers a friendly, honest, and professional clock service near Marysville, Ohio 43040]()
The first task was to make the holes at either extreme of the saddle to match the original's spacing exactly. The holes were traced using the old saddle and then a small hole was drilled first, which would be slowly enlarged to be sure I stayed within the lines previously drawn.
-
![Master Clock Repair of Columbus, Ohio offers a friendly, honest, and professional clock service near Newark, Ohio 43055]()
The holes have now been enlarged to match the size of the original unworn holes.
-
![Master Clock Repair of Columbus, Ohio offers a friendly, honest, and professional clock service near Newark, Ohio 43055]()
I did not have any layout dye so I used a black marker to discolor the brass so it would be easier to see the scribed lines I was about to make.
-
![Master Clock Repair of Columbus, Ohio offers a friendly, honest, and professional clock service near Newark, Ohio 43055]()
I lined up the original over the new holes so i could scribe a line onto the raw material.
-
![Master Clock Repair of Columbus, Ohio offers a friendly, honest, and professional clock service near Newark, Ohio 43055]()
You can now see the scribed outline I would follow to cut the pieces out. You will always leave a piece of brass well beyond the size you need to help hold the piece in a vise when cutting it out.
-
![Master Clock Repair of Columbus, Ohio offers a friendly, honest, and professional clock service near Newark, Ohio 43055]()
When you saw it out, you want to stay a little outside the line so you can file down to it later.
-
![Master Clock Repair of Columbus, Ohio offers a friendly, honest, and professional clock service near Newark, Ohio 43055]()
Clamping the piece between two pieces of wood so I wouldn't damage the raw material with the vise, I let the scribed line sit just above the wood to help guide my saw.
-
![Master Clock Repair of Columbus, Ohio offers a friendly, honest, and professional clock service near Newark, Ohio 43055]()
Both pieces are now completely cut out but they will need to be filed down to the lines.
-
![Master Clock Repair of Columbus, Ohio offers a friendly, honest, and professional clock service near Newark, Ohio 43055]()
We want both pieces to match exactly so I placed an appropriately sized diameter of steel rod through both holes to line them up together while filing. You can see that both pieces match and are filed down to the lines.
-
![Master Clock Repair of Columbus, Ohio offers a friendly, honest, and professional clock service near Newark, Ohio 43055]()
Here are the new pieces on the left laid next to the worn originals.
-
![Master Clock Repair of Columbus, Ohio offers a friendly, honest, and professional clock service near Newark, Ohio 43055]()
This is the original piece that holds the two pieces together and from where the weight hook will attach. I will have to make a new one of these because I had to remove too much of the riveted material to disassemble the original pulley for tracing.
-
![Antique Clock Repair by Master Clock Repair of Columbus, Ohio]()
Cutting the new piece on the lathe that holds the saddle together.
-
![Antique Clock Repair by Master Clock Repair of Columbus, Ohio]()
On the left side is the new saddle pieces assembled and ready for the pulley wheel to be inserted. There is a steel axle that will go through one side of the upper saddle hole, through the center of the pulley wheel that carries the cable and out through the hole on the other piece of the saddle. The axle is then held in place with a cotter pin.


