
Owners Manual

Grandfather Clock Owner’s Manual
Note: The following information will apply to almost all grandfather clocks made after 1960 by brands such as Baldwin, Bulova, Colonial, Comitti of London, Daneker, Emperor, Ethan Allen, Fancher, Hermle, Howard Miller, Keininger, King Arthur, Mason and Sullivan, Pearl, Piper, Ridgeway, Sligh and Trend among others.
Clocks older than 1960, generally those prior to 1925, may very well operate with a different set of rules, particularly when it comes to hand setting. Regulating and winding are pretty much the same for all clocks, regardless of age or make.
Some clocks have idiosyncrasies that demand special attention. If you have been given information specific to your clock by a trusted and knowledgeable clock repairman then it is best that you follow his or her advice.
This manual is a departure from the standard manual produced by many clock manufacturers. I am providing you information from the clock repairman’s point of view which will often include the why and not just the how.

Herschede Clock Dial
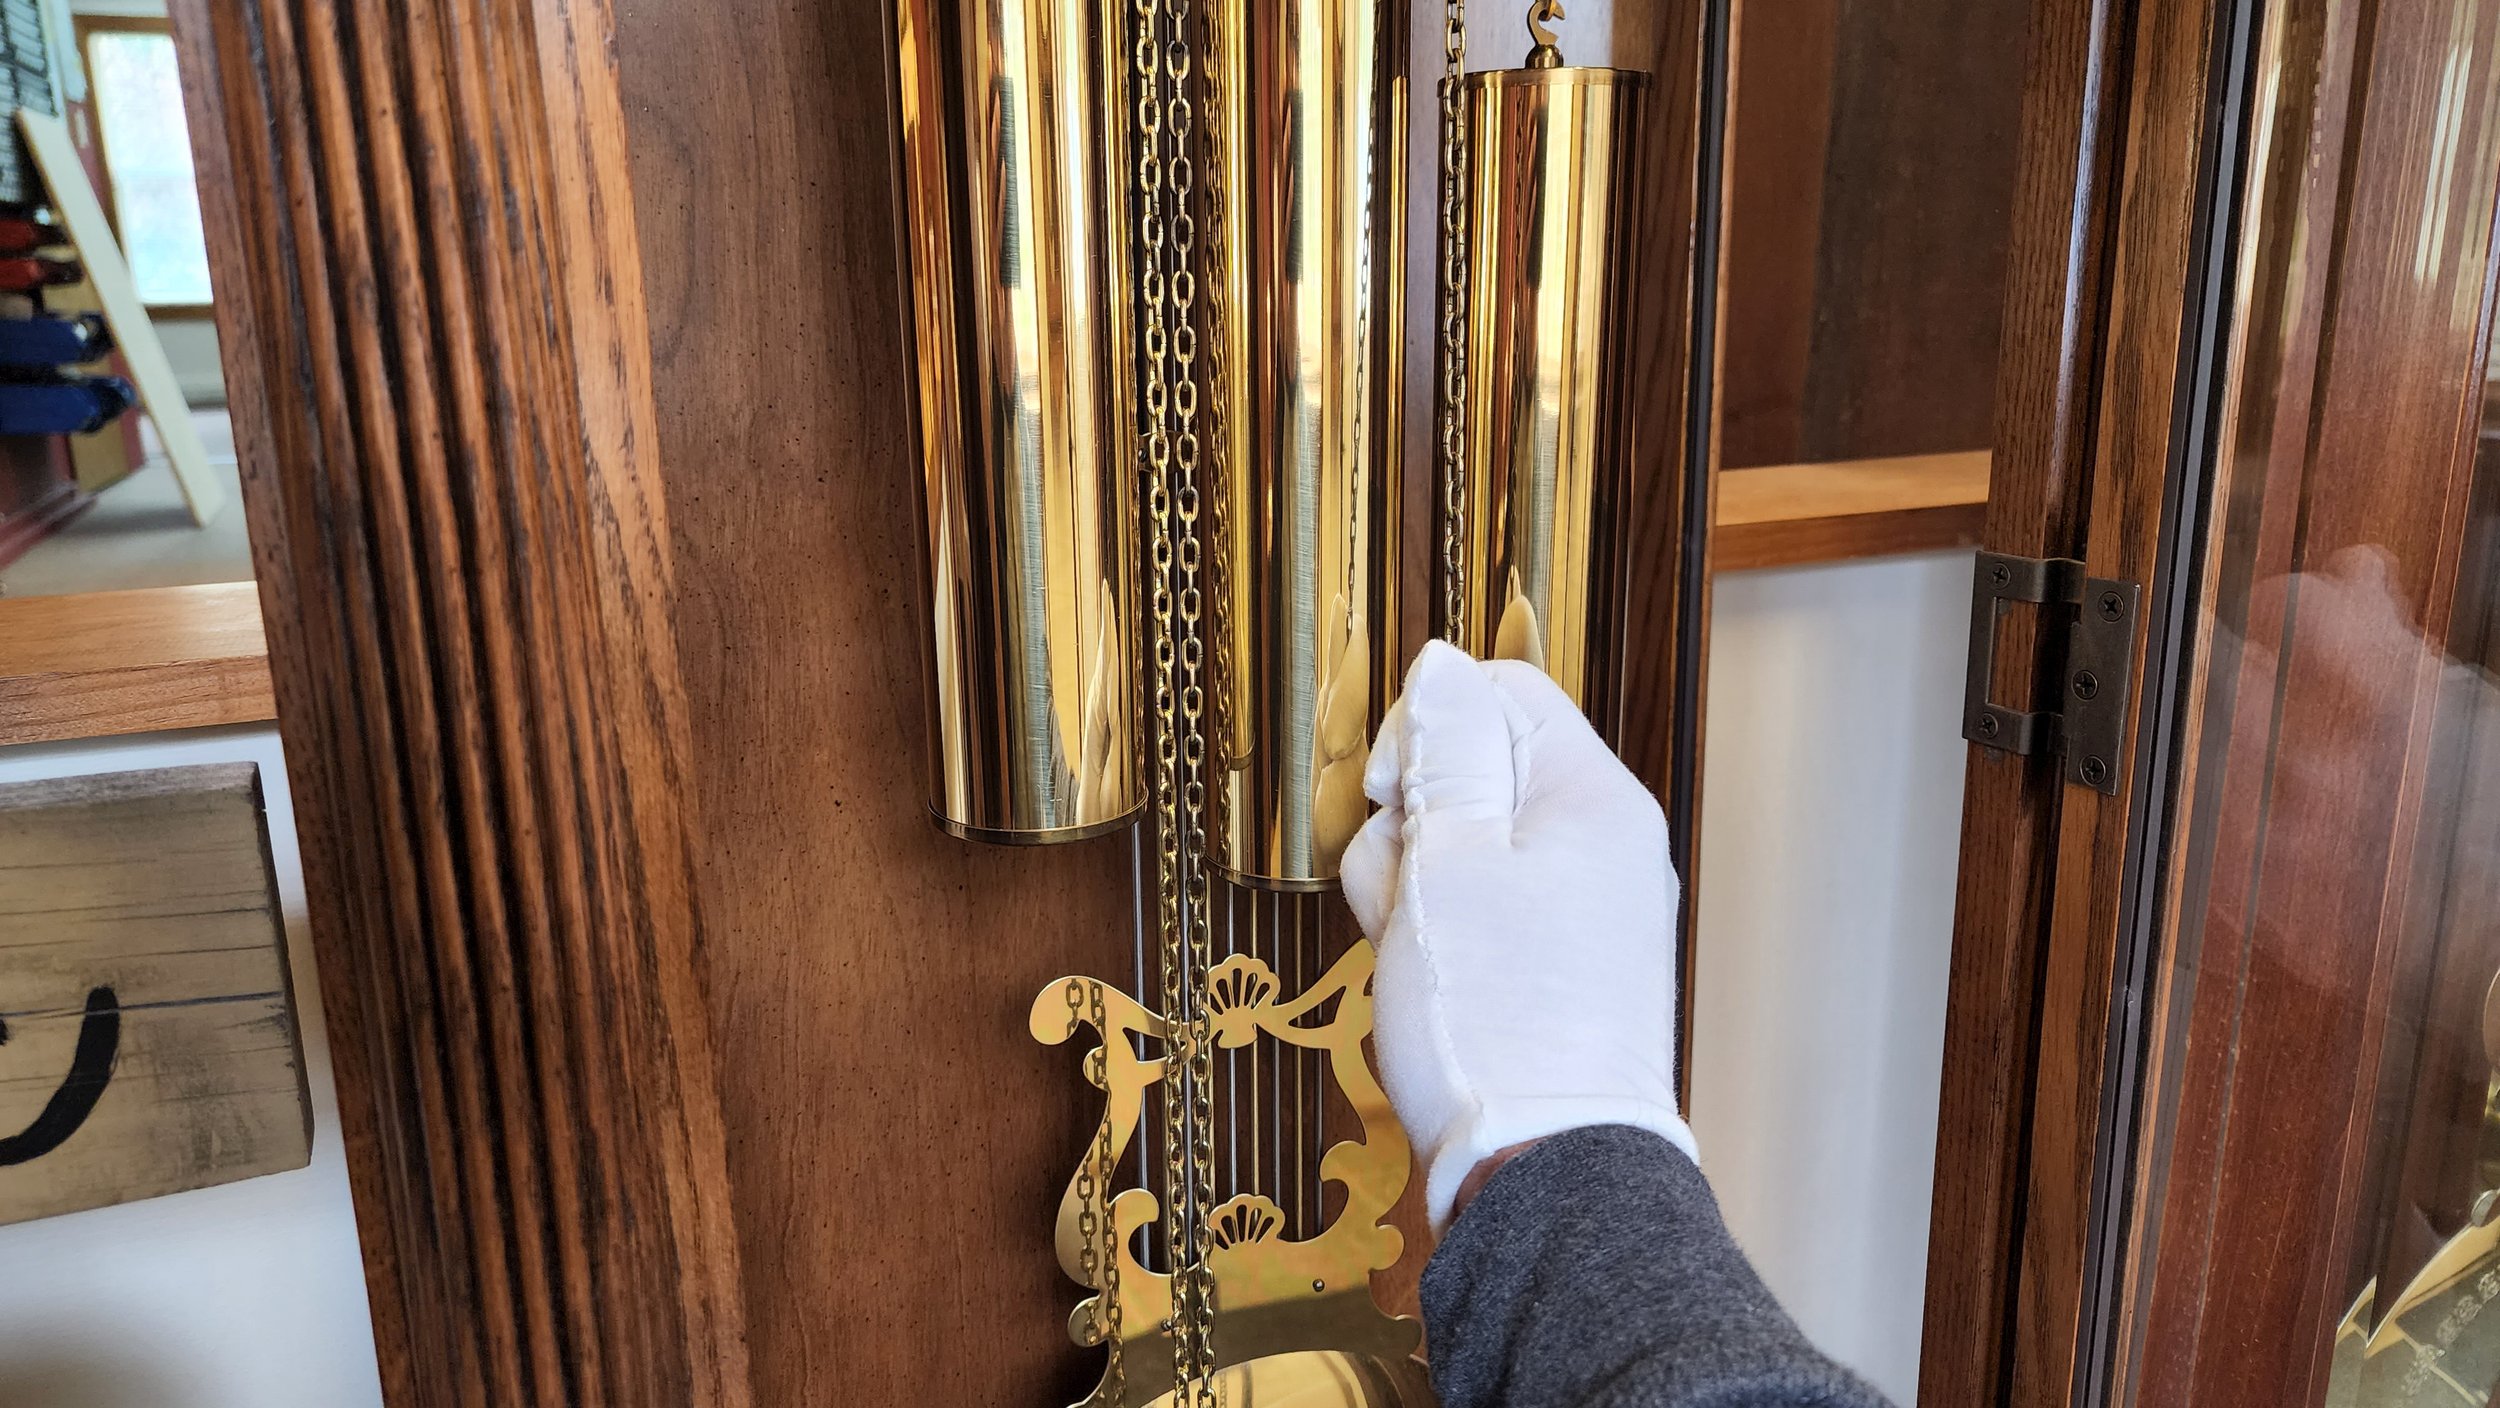
Handling the Brass Components
Most modern clocks have brass weights, chains, pendulums and dials. It is best to avoid handling these parts directly in spite of the lacquer coating that is present on most models. This lacquer coating is mainly there to keep the brass from tarnishing on its own. it is not designed to protect the brass from the oil, sweat or lotions that might be present on our hands and fingers or from other harsh cleaning chemicals. When handling these components, it is best to put something between your hands and the brass item. This can be a cloth or a glove.
If you should leave a fingerprint on the brass, it should be removed immediately with a soft cloth. If you get it right away you almost never need a chemical, the moisture from a single breath will normally do it. If the fingerprint or smudge is stubborn enough, you might try a bit of window cleaner sprayed onto a soft cloth, not the item itself.

Modern Grandfather Clock Dial
Winding
99.9% of all grandfather clocks are designed to be wound once per week. This is done to help the owner establish an easy winding routine. Most of us live our lives by the week, therefore, winding the clock on the same day each week is an easy habit to start. The clock does not care if you wind it every day or every other day if that is your preference, neither does it care if the weights are wound up evenly or not. If you find it pleasing to stagger the weights, be sure not to stagger them excessively as the lowest weight will run down faster than the others.
Chain Drive: If your weights hang from chains then it will be necessary to pull the chains straight down once per week to move the weights back to the top of the clock and start another weeks run. (See photo below) Never lift the weight when pulling the chain! Contrary to popular opinion, this is not necessary or desired. (Visit our “Clock Myths” page for more information. It is best if the chains are not pulled so far that the top of the weight hits the bottom of the mechanism or the seat board on which it sets. If you do this, you are stressing the chains and may very well be damaging the tops of the weight shells. It is best to stop with an inch or two to spare. Leaving a little space here also allows for easy removal of the weights should the need arise. If you do not do this, you will be unable to remove the weights until it runs down a little. This can be really inconvenient if your clock fails to operate after winding and it needs to be repaired or you are preparing the clock to be moved.
If you forget to wind the clock the weights will hit the bottom of the clock and the clock will stop. It is best if you do not let this happen. There is a chance in doing so that the clock’s chime or strike will jam and it will be difficult to restart the clock.
Always be mindful when pulling the chains that the pendulum is not far from the ascending weights. Bumping the pendulum with the weights on their way up may cause the clock to fail to operate properly and quit running. This may set you back the cost of a house call to reset a beat, straighten a bent crutch or replace a broken suspension spring.
Pulling the chain on a chain driven clock with one hand
Cable Drive: If your weights hang on pulleys, it will be necessary to wind the clock using the crank that came with it. see photo below. Although it is possible to wind the clock with a key, a crank is the preferred method. Generally, it is not possible to wind a clock too high or too tight, but as mentioned earlier, on weight driven clocks it is usually best not to go all the way to the very top. Many of the most modern cable driven clocks will have a special set of gears (cable stops) that stop the winding process before there is any possibility of winding too much cable onto the barrel inside or allowing the weights to bump against the bottom of the movement or seat board. However, these limits are set for the movement only and do not take into count different case styles. This means that the clock may still allow the weight shell to come into contact with part of the case itself. Again, we do not want the weight to go up high enough to hit anything. When this happens, we put excessive stress on the cable which may eventually cause the cable to break, and we will not be able to remove the weight if we need to. It is usually best to leave at least half the pulley exposed below the dial frame.
Special Note: Most cable driven clocks do not allow the weights to drop so far that they hit the bottom of the case. In many instances the weights will stop as far as 12-24 inches from the bottom. What is important is not how far the weights go down but whether the clock runs a week on one winding or not.
What do I do when I am on vacation: The best thing to do if you are not going to be home on winding day is to simply stop the clock before you leave by reaching in to stop the pendulum from swinging.

Turning a Crank to Wind a Cable Driven Clock
Setting the Hands
there are a few basic rules regarding hand setting. These are:
1. Use the minute hand only.
2. Never move the hour hand by itself to set the clock.
3. Never move the minute hand while the clock is chiming or striking.
For all modern grandfather clocks the minute hand can be turned either direction; clockwise or counterclockwise. If you go clockwise, it will be necessary to stop at each quarter hour and let the clock chime before advancing to the next quarter hour. If, when going forward you hear the click at the quarter hour and the clock does not chime then it is okay to move to the next quarter. Bear in mind that depending on how well your clock is adjusted the clock may not chime exactly on the quarter. It may be necessary to move slightly beyond it before you hear the click that releases the chime. If you go counterclockwise, the clock will not normally chime so there is no need to wait for anything; simply go back to the correct time and you're done. After moving the hands backwards, you may hear the clock chime the wrong chime or skip a chime. If this occurs, it means that it is “out of synch”. For the clocks I am referring to in this manual, if the clock is functioning properly, the clock will resynchronize itself. It will usually do this within an hour.
next time the time change occurs, do not panic. When we “spring” forward simply advance the minute hand clockwise, stopping at each quarter before moving on to the next. When we “fall” back, move the minute hand backwards one hour. It is really that simple. Do not do what so many people do and move the hour hand forward or backward one hour by itself. If you do this the clock will strike wrong until you put the hour hand back where it was.

Setting the hands using the minute hand only
Regulating
As nice and expensive as most grandfather clocks are, they will not run perfectly accurate! This is true because they are temperature sensitive. When the pendulum gets warmer, it will expand downward, slowing the clock down. When the pendulum gets colder, the pendulum will contract, getting shorter, which makes the clock run faster. A clock that runs accurately in the summer will typically not run accurately in the winter unless the temperature in your house never changes. The manufacturers know this is an issue and that is why there is always a way to compensate for these changes by adjusting the pendulum’s length through moving the pendulum disc up or down. The pendulum disc is much more than just a pretty shiny thing swinging back and forth, it acts as a mechanical weight. The means of compensating therefore is done through the use of the regulating nut that is normally found underneath the round brass disc at the bottom of the pendulum. Tightening the nut or turning it to the right (your thumb moving to the right as you twist it) raises the pendulum’s disc and will make the clock run faster. Loosening the nut to the left (your thumb moving to the left) will lower the disc and slow the clock down.
Generally speaking, one complete turn will make a difference of approximately two minutes per day. The very specific words in italics in the previous sentence are crucial to understand if you desire your clock to run as accurately as possible. First of all, we are talking about a complete turn of the nut, not a twist of the finger. The next important word is approximately. It is impossible to come up with one rule that will apply to all clocks so the phrase “one turn equals approximately two minutes” is a generalization or a starting point. Now, we must stress per day. For example, fourteen minutes fast per day is not the same as fourteen minutes fast per week. Fourteen minutes fast per week is only two minutes per day (14 minutes divided by 7 days equals two minutes per day).

Turning the Regulating Nut on a Lyre Pendulum
here is the process you should follow
1. Set the hands on the clock according to a clock you know is accurate.
2. Set the hands as accurately as possible. For example, there is a significant difference between nine and half minutes after ten and nine minutes after ten.
3. Wait twenty-four hours.
4. Determine how fast or slow your clock is by comparing it to the same clock you set it against.
5. Using that information and according to the rules stated above, make the appropriate number of turns of the adjusting or regulating nut in the correct direction. Up speeds it up, down slows it down.
6. Reset the hands accurately (using the same reference clock again).
7. Wait another twenty-four hours.
8. Keep repeating the above process until you achieve success. This will generally take several days to a week.
After you have let the clock run a while without regulating you may notice that over the course of time the clock has gained or lost a few minutes. It is important to remember that the clock did not do this in a single twenty-four-hour period. it took several days or more for a small difference to accumulate into that greater gain or loss. You must divide this number of minutes off by however many days have passed since you set it last and adjust accordingly.
Once you have achieved success in regulating your clock you must remember that in a few months you may very well have to regulate again. As the season changes so will your heating or cooling patterns which in turn affect the clock’s accuracy.

Restarting a pendulum after regulating
Changing the Chimes- Using the Chime Selector
Your clock may or may not give you the ability to change the chime on your clock. Some play the Westminster chime only and cannot be changed. Many of the more expensive grandfather clocks have what is called a “Triple Chime”. This simply means that the clock will play three different “songs”. If you have this feature, then there is normally a lever that protrudes through a slot in the dial. 99% of the time this slot or lever will be near the number three. A few have the selecting lever above the number twelve or below the number six. There are also some clocks that have a rotary dial (circular dial) for chime selecting and or silencing. When present these are typically located in the top left and right corners of the dial. Other clocks have the lever for chime selecting inside the case and can only be reached by opening a side door or removing a panel. These levers are rarely marked.
If you have the type where the lever comes through a slot in the dial near the number three you will normally see some small wording that indicates the names of the chimes (See photo below). You may change the chime as often as you like. However, it is best if you change the chime just after a chime and not just before a chime. There is a slight chance that if you do it right before it is about to chime you may jam the chime train and cause it not to function. It is best to do it within the ten-minute period after the chime and not the five-minute period before the chime.
When moving the chime selector lever you should be able to feel the lever fall into a groove that you cannot see. Do not try to line up the lever directly with the words printed on the dial near the slot the lever protrudes through. The words on the dial tell you the order of the grooves the lever will fall into to.

Triple Chime Selector Lever and Silencer
Silencers
Not all clocks have silencers on them. Since the mid-eighties however clock manufacturers began to catch on that even though people love the chime on their clock, they want to have a way to control it. Now, almost every clock made has a silencer on it. If your clock has a triple chime feature the silencer is frequently another “groove” in the travel of that same lever (see photo above). If you have a single chime clock the silencer is usually near the number three on the dial (see photo below) and has only two positions: chime and silent. There are some clocks that place it near the number twelve or number six and still others have a metal rod that protrudes below the clock face (almost always on the right side) into the area where the weights hang. If the lever protrudes through a slot in the dial there is usually an indicator on the dial around the slot to tell you which way to push the lever in order to silence the clock. Be aware that moving the lever halfway between chime and silent does not turn the volume down, it is either on or off. If your silencer protrudes into the weight area below the dial pushing the lever up usually is the silent position and down is the chime position.
As mentioned earlier, some clocks will have what are called rotary dials for changing the chime or silencing the clock. These smaller “dials” are on the left and right above the numbers ten and two. These dials will be clearly marked to tell you where to move the pointer to perform the action you desire.
In most cases when you silence the clock, the outer weights (the extreme left and right weight) will not descend while the clock is silenced. This gives the appearance that the middle weight is dropping too fast when in reality it is dropping normally, it is the other two that are not moving. This is normal. The weights will begin to drop again once the chime is turned back on.
Some clocks have a very different silencing mechanism. If you have two levers on your clock, one near the number three and one near the number nine then it is highly likely that your clock will react differently than just mentioned above. The purpose of the two levers is to allow the owner to silence only the chime, only the strike or both whereas the other type, previously mentioned, always silences both. It is important to understand that chiming and striking are two different functions. The chime is the melody or song you hear and is driven by the right weight. The strike is the deeper, fuller, repeated chord that occurs on the hour only after the chime is complete and is driven by the left weight. Because the chime is what trips the strike, if you want to silence the chime but not the strike you must allow the chime gear train to operate even though no sound is heard. Therefore, the method used here is different. What this type of silencer does is disengage the hammers but not the gear train itself. When silencing only the chime but not the strike the chime gear train operates normally but no hammers are lifted to produce the chime tones. When the chime completes it’s silent mechanical hour sequence, it trips the strike function and allows the strike hammers to lift and drop and produce the strike sounds.
For the opposite to occur a similar thing happens. The chiming gear train is allowed to lift and drop the hammers producing the chime tones normally and when it is has competed the hour chime sequence the strike train begins to operate. But this time the strike hammers are disengaged, therefore no striking sound is heard. What will be noticeably different with this system is that regardless of whether you have silenced just the chime, just the strike or both, the two outer weights will drop normally just like the center one does.
Another wrinkle in the silencing “game” is that sometimes on the number three side there will be a fifth position to the chime lever. You will have the three chime positions (only available on triple chime clocks) a “4/4 silent” position and a “silent” position. The 4/4 silent position is telling you that it will not chime the quarters but will still strike the hours (unless you have silenced the hours with the lever at the number nine position). The “silent” position reacts like the first one mentioned. It shuts off both chime and strike with one lever and neither the right or left weight will descend.

Single Chime clock with two position Lever